Ivanti Voice Database Connection Settings
Although the Ivanti Voice database connection settings are configured as part of the Ivanti Voice installation, you can change the settings if needed.
To Use the Management Portal to Connect Ivanti Voice to the Database:
1.Select Start > Programs > Ivanti, Inc. > Communications Management > Management Portal. The Enter Network Password dialog box opens.
2.Enter a user name and password with administrator privileges.
3.Click OK. The menu window appears.
4.Click System Configuration > Host > Database. The Database page opens.
5.In the Database Connection: Database (OLEDB Source String) field, enter the ADO connection string (in OLEDB format) in the text box.
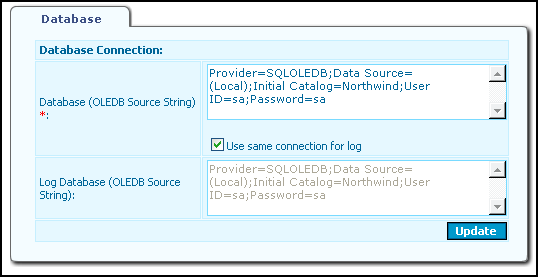
6.To use the ADO connection string for the Ivanti Voice log, click the Use same connection for log check box; the Log Database field is populated with the same ADO connection string.
The Ivanti Voice log is always stored in the database. The system can be configured to use the same database for all data (including log, statistics, etc.) or you can configure a separate database exclusively for the Ivanti Voice log.
7.Click the Update and Commit Changes buttons. Ivanti Voice connects to the database.
Ivanti Voice creates the database structure (including tables, constraints, indexes, and stored procedures) when you either restart IPCM or when the Aggregation Interval expires. If you enable the agent auditing functionality, the system writes agent audit data to the database after the agent changes states 500 times, or when the time you specify in the Aggregation Interval field expires. Refer to Statistics for information.
Refer to Ivanti Voice Database Details for information on the database structure.
Supported DB Drivers
The following drivers are supported in Ivanti Voice which can be configured in the connection string:
1.SQLOLEDB: : This is the default driver configured in the connection string during Ivanti Voice installation. This driver can be used to establish non secure connections with SQL Server.
Examples:
•SQL Authentication: “Provider=SQLOLEDB;Data Source=<IP Address/Domain Name >;Initial Catalog=<DB Name>;User ID=<UID>;Password=<PWD>”
•Windows Authentication: “Provider=SQLOLEDB;Data Source=<SQL Server DB IP Address/Domain Name>;Initial Catalog=<DB Name>;Integrated Security=SSPI”
2.SQLNCLI11: The SQL Server Native Client 11 OLE DB Provider can be used to establish non secure and TLS connections.
Non-Secure Connections:
•SQL Authentication: “Provider=SQLNCLI11;Data Source=<SQL Server DB IP Address/Domain Name>;Initial Catalog=<DB Name>;User ID=<UID>;Password=<PWD>”
•Windows Authentication: “Provider=SQLNCLI11;Data Source=<SQL Server DB IP Address/Domain Name>;Initial Catalog=<DB Name>;Trusted_Connection=yes”
TLS Connections:
•SQL Authentication: “Provider=SQLNCLI11;Data Source=<SQL Server DB IP Address/Domain Name>;Initial Catalog=<DB Name>;User ID=<UID>;Password=<PWD>; Encryption for Data=true”
•Windows Authentication: “Provider=SQLNCLI11;Data Source=<SQL Server DB IP Address/Domain Name>;Initial Catalog=<DB Name>;Trusted_Connection=yes;Encryption for Data=true”
While connecting to the database through secure connections, the “Data Source” field in connection string should be configured with a DB server host whose domain name matches with the domain name of the SSL certificates configured in SQL server.
3.MSOLEDBSQL: Microsoft OLE DB Driver is the latest OLEDB driver provided by Microsoft to connect to SQL Server.
Non-Secure Connections
•SQL Authentication: “Provider=MSOLEDBSQL;Data Source=<SQL Server DB IP Address/Domain Name>;Initial Catalog=<DB Name>;User ID=<UID>;Password=<PWD>”
•Windows Authentication: “Provider= MSOLEDBSQL;Data Source=<SQL Server DB IP Address/Domain Name>;Initial Catalog=<DB Name>;Trusted_Connection=yes”
TLS Connections
•SQL Authentication: “Provider=MSOLEDBSQL;Data Source=<SQL Server DB IP/Domain Name>;Initial Catalog=<DB Name>;User ID=<UID>;Password=<PWD>;Encryption for Data=true”
•Windows Authentication: “Provider= MSOLEDBSQL;Data Source=<SQL Server DB IP Address/Domain Name>;Initial Catalog=<DB Name>;Trusted_Connection=yes; Encryption for Data=true”
Windows Authentication
You may authenticate to SQL Server with or without changing your service account.
Regardless of your authentication method, ensure the Ivanti Voice installation machine and the SQL server machine are on the same domain.
Authenticate with Changed Service Account
- Ensure the Ivanti Voice installation machine and the SQL server machine are in the same domain.
- Install Ivanti Voice configured with a Windows authentication connection string.
To support TLS 1.2, the Microsoft OLE DB Provider for SQL Server (SQLOLEDB) is replaced with the Microsoft OLE DB Driver for SQL Server (MSOLEDBSQL).
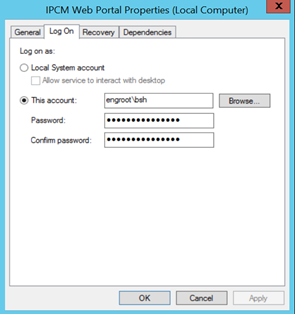
- Change the service account of the following services to domain user, provide password, and restart the services.
- IPCM Web Portal
- IPCM Management Agent
- IPCM Log Writer
- IPCM Statistics and Metrics Engine
- Add the same user in the SQL server machine:
- Open SQL Server Management Studio
- Select Security > Login > Add User
- Set user permissions
- Enable the TCP/IP protocol in your SQL Server instance using the SQL Server Configuration Manager.
Authenticate Without Changing Service Account
- Ensure the Ivanti Voice installation machine and the SQL Server machine are in the same domain.
- Create a self-signed certificate in both the Ivanti Voice installation machine and the SQL Server machine.
- Add the certificate of either machine to the trusted and personal certificate stores of the other machine.
It doesn't matter whether you share from the installation machine to the server machine or from the server machine to the installation machine.
- Select SQL Server Management Studio > Security > Login > Add User Domain.
- Enter the host name of the Ivanti Voice installation machine followed by a $. Example: T1\testvoice$
- From the SQL Server Configuration Manager:
- Verify that the TCP/IP protocol is enabled in your SQL Server instance
- Set Force Encryption to Yes
- Add the certificate of the SQL Server machine
- Restart MSSQLSERVER
- Install Ivanti Voice configured with a Windows authentication string.
- IPCM Web Portal and IPCM Log Writer services should have network service privileges at a minimum.
- If SQL Server Management Studio is on the same machine as the Ivanti Voice installation, then select Security > Login. Add the service accounts of the following services (example: NT AUTHORITY\local service):
- IPCM Web Portal
- IPCM Management Agent
- IPCM Log Writer
- IPCM Statistics and Metric Engine
- If you receive and error: "Login failed. The login is from an untrusted domain and cannot be used with Windows authentication":
- Open the Registry Editor on the Ivanti Voice installation machine.
- Navigate to :HKLM\System\CurrentControlSet\Control\LSA
- Add a DWORD value called “DisableLoopbackCheck”
- Set this value to 1.
- Restart the machine.