Queue Configuration
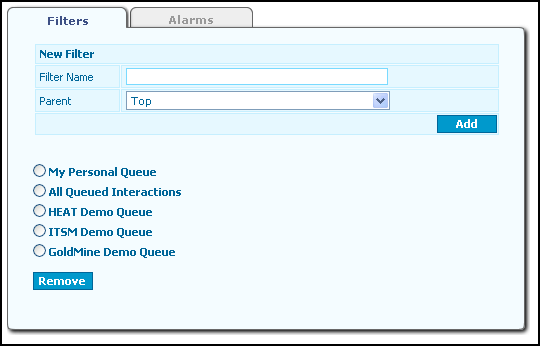
Each queue has its own Queue properties page containing configuration settings. To open the Queue properties page, click the name of the queue in the list on the Queue Monitor Settings page.
There are five components of queue configuration:
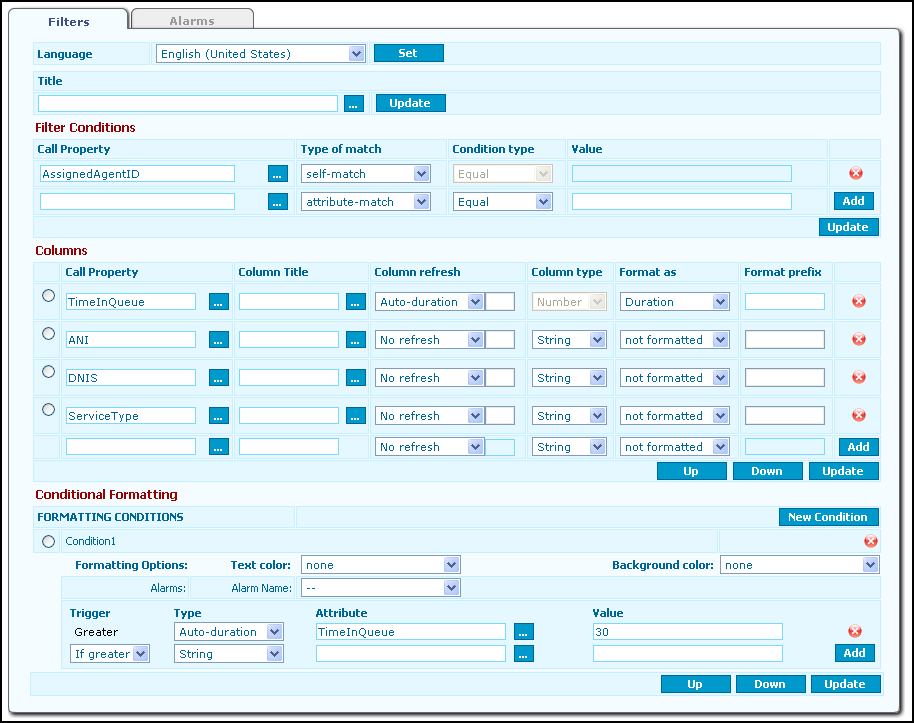
Language
If you have Agent Dashboards running on a non-English version of Windows and want to localize the Queue pages, use the Language field to select the language. You may define the queue Title and Column Titles for every language configured in Ivanti Voice.
The Neutral setting is used when an Agent Dashboard user is running a Windows version in a language you have not chosen to support in Ivanti Voice. With the language field set to Neutral, specify the queue Title and Column Titles to be displayed in such a case.
Title
The text in the Title field is the name of the queue that will display in the Agent Dashboard. There are no naming restrictions. For convenience, the browse button opens a Localization dialog box which displays the queue name for all languages configured in Ivanti Voice.
Filter Conditions
Use the Filter Conditions table to specify the requirements a call must meet for Ivanti Voice to put the call in the queue. Each row of the Filter Conditions table represents one requirement. The call must meet all the requirements in the Filter Conditions table for Ivanti Voice to put the call in the queue.
Columns
Use the Columns table to configure which call data the Agent Dashboard displays in the columns of the Queue tab (when the user selects the queue), and how the Agent Dashboard formats the data. Each row of the Columns table configures one column on the Queue tab.
The Agent Dashboard Queue tab displays the columns you configure in the order they appear in the Columns table (i.e., the columns in the Agent Dashboard display in order from left to right).
Conditional Formatting
The conditional formatting of the queue specifies the fonts and colors the Agent Dashboard Queue tab uses when displaying calls in the queue, as well as the sound the Agent Dashboard plays when a call arrives in the queue. For example, you can configure the Queue tab to use red text with a yellow background when displaying calls waiting in the queue for more than 30 seconds. You can also configure the Agent Dashboard to play an alarm for this condition.
Use the Conditional Formatting table to configure the conditional formatting of the queue. The table displays conditions as rows with adjacent radio buttons. Within the row are parameters that control the formatting and alarms the condition uses, as well as the criteria the call must meet for Ivanti Voice to apply the formatting and alarms.
To Configure a Queue:
- On the Queue Monitor Settings page (in the Management Portal, click System Configuration > Contact Center Server > Queue Monitor Settings), click the queue name. The queue properties page opens (on the Filters tab).
- In the Language field, select the language for which you want to specify the queue Title and Column Titles. Click the Set button.
- In the Title field, type the queue name that will display in the Agent Dashboard. Click the Update button next to the Title field.
For convenience, the browse button opens a Localization dialog box which displays the queue Title for all languages configured in Ivanti Voice.
- Configure the Filter Conditions settings:
- In the Property field, specify the call property(s) a call must have in order for Ivanti Voice to place the call in this queue. You can either type the name of the call property in the Property field, or click the browse button next to the Property field to select the call property from the Properties dialog box.
- In the Type of match field drop-down list, select one of the following:
•attribute-match - Ivanti Voice checks each call for the call property you specified in the Property field. If the call has that property, Ivanti Voice checks the value of that property. If the value of the call property matches the value you specify in the Value field (refer to step 4c), Ivanti Voice classifies the call as meeting the requirement.
•self-match - Ivanti Voice checks each call for the call property you specified in the Property field. If the call has that property, Ivanti Voice classifies the call as meeting the requirement. IPCM does not check the value of the call property for self-match requirements.
- If you selected the attribute-match option, you need to set a Condition type and Value:
Example: If you enter the ANI call property in the Property field, the attribute-match option in the Type of match field, and a value of 415-222-1212 in the Value field, Ivanti Voice places all calls from phone number 415-222-1212 in this queue. If you enter the ANI call property in the Property field and the self-match option in the Type of match field, Ivanti Voice places all calls with the ANI call property in this queue, but does not check the value of the call property.
•If you select Equal in the Condition type drop-down list, in the Value field enter the value the property must have in order for Ivanti Voice to place the call in this queue.
•If you select Not Equal in the Condition type drop-down list, in the Value field enter the value the property must not have in order for Ivanti Voice to place the call in this queue.
The Value fields activate only if you select the Attribute-match option in the Type of Match field.
- Click the Add button at the end of the row. Ivanti Voice adds the row to the Filter Conditions table.
- When all filter conditions have been added, click the Update button for the Filter Conditions section. To delete a filter condition, click the red x icon at the end of the row.
- Configure the Columns settings. Each row in the Columns table represents a column that will display in the Agent Dashboard.
For the queue to operate correctly, you must configure a column for each call property you are using in the Filter Conditions section.
Configure the following settings for each Column:
- In the Property field, enter the call property containing the data you want Ivanti Voice to display in this column on the Queue tab. Either type the name of the call property in the Property field, or click the browse button to the right of the field to select the call property from the Properties dialog box.
- In the Column Title field, type the heading you want the Agent Dashboard to display at the top of the column on the Queue tab. If you do not specify a column title, the Property name will be used. The Column Title is localizable and should be defined for every language you want to support.
For convenience, the browse button to the right of the field opens a Localization dialog box which displays the queue Column Title for all languages configured in Ivanti Voice.
- In the Column Refresh field, select the rate at which you want the Agent Dashboard to refresh the data in the column:
•No refresh - Select this option for columns containing data that does not need to be refreshed.
•Auto-duration - The column data refreshes approximately once every second.
•New timer - The column data refreshes at a rate you specify. If you select this option, in field next to the Column Refresh drop-down list, enter the number of seconds you want Ivanti Voice to wait between refreshing the data.
•3 sec - The column data refreshes every three seconds.
The Auto-duration setting uses a clock within the client application; the New timer and 3 sec settings use clocks within the Ivanti, Inc. server. To avoid network congestion, Ivanti, Inc. recommends using the Auto-duration setting whenever possible.
- In the Column Type field, select the type of values the column displays. Select String if the values are in alphanumeric format, or Number if the values are in a numeric format.
- In the Format as field, indicate the format in which you want Ivanti, Inc. to render the data in the Queue tab:
•Not formatted - Ivanti Voice does not format the data.
•Number - Ivanti Voice formats the data as an integer.
•HEX - Ivanti Voice formats the data in hexadecimal format.
•Duration - Ivanti Voice formats the data as a duration.
- In the Format Prefix field, specify data (such as an area code) for Ivanti Voice to prefix to the value.
This field is inactive if you select the Not formatted option in the Format as field.
- Click the Add button at the end of the row. Ivanti Voice adds the row to the Columns table.
- To change the order in which the columns appear in the Queue tab, select the radio button next to the column you want to move, then click the Up or Down button to position the column in the order you want it to appear on the Agent Dashboard Queue tab.
- When all filter conditions have been added and are in the desired order, click the Update button for the Columns section.
To delete a column, click the red x icon at the end of the row.
- Configure the Conditional Formatting settings:
- To configure the formatting the Queue tab uses for this condition, select the desired Text color and Background color.
- To configure the alarm the Agent Dashboard sounds when it receives a call that meets the condition, select the alarm in the Alarm Name drop-down list (refer to Alarms for information on populating the Alarm Name drop-down list).
- Click the Update button for the Conditional Formatting section before continuing with the next step.
- To set the conditions the call must meet for the Agent Dashboard to use the formatting and alarm functionality, use the following fields to create logical expressions within each condition:
Example: To configure the Agent Dashboard to apply the conditional formatting to a call waiting in the queue for more than 30 seconds, configure: Trigger = Greater, Type = Auto-duration, Attribute = TimeInQueue, Value = 30.
•Trigger - The operator used to compare the values of the call attribute with the value in the Attribute field. Select one of the following: If greater, If less, or If equal.
•Type - The type of values the logical expressions uses:
•String for alphanumeric values
•Integer for numeric values
•Auto-duration for auto-duration values
•Attribute - Type an attribute to use in the logical expression or click the browse button to the right of the field to select an attribute from the Properties dialog box.
•Value - Specify the value of the attribute in the logical expression.
- Click the Add button to add a new logical expression to the table. Click the red x next to the logical expression name if you need to delete it.
- To add another condition to the table, click the New Condition button and repeat the steps to configure it.
- To change the order of the conditions, select the radio button next to the condition you want to move, then click the Up or Down button to position the condition in the desired order. The order of the conditions establishes the condition priority. Only the first satisfied condition formats the way the interaction appears in the queue, and triggers an audible alarm if configured to do so. The higher you move a condition in the table, the greater priority the condition has over the other conditions.
- When all Conditional Formatting settings have been configured, click Update. To delete a condition, click the red x in the row containing the condition name.
- Click the Commit Changes button to enact all settings configured for this queue.