Office Phone System
There are two ways Ivanti Voice can be deployed: as part of an existing phone system or as a stand-alone phone system. In the latter case, you may want to implement the following features in Ivanti Voice:
•Unified Messaging (UM) - Enables a user to access voice, fax, and text messages via a single email or telephone account. User-based and system-wide settings can be configured.
•Phone Groups - Lets you organize phones into groups identified by a single extension to enable call-pickup and call-hunt capabilities.
•Class of Restrictions (COR) - Enables you to set limitations for dialing, transferring/forwarding, and receiving calls.
•Authorization Codes - Lets you establish codes users can enter on a phone keypad to override the default set of restrictions (COR) of the phone and access a set of restrictions for which the phone is not configured.
•User Codes - Lets you create a code a that can be used to log into a phone to override the original COR/forwarding configuration of the phone, replacing it with the COR/forwarding configuration of the user entering the code.
Unified Messaging (UM)
Unified Messaging enables a user to access voice, fax, and text messages via a single email or telephone account. Configure the system-wide UM settings in the Management Portal to use Unified messaging in your Ivanti Voice deployment.
Unified Messaging may require additional licensing to meet your needs; check with your sales representative for more information.
Ivanti Voice comes with three UM applications:
•Unified Messaging AppBuilder Attendant Application
•Unified Messaging AppBuilder Answering Application
•Unified Messaging Access Application
Ivanti recommends that you do not edit or modify any of these applications in Application Builder.
Attendant Application
The Attendant application answers inbound calls, plays a prerecorded greeting, and prompts callers to specify the extension or name of a call destination. The SIP Soft Switch connects an incoming call to the Attendant application if one of the following occurs:
•The call meets the start criteria specified in Applications Selector for the Attendant application (the call starts with 5011).
•The caller dials a SIP Soft Switch dial plan number allocated to the Attendant application.
The Attendant application lets callers enter DTMF input to specify the extension or name of the user they want to reach. The Attendant application also accepts voice input if integrated with a third-party ASR application. The SIP Soft Switch interprets the input to determine the call destination, and does one of the following:
•If the SIP Soft Switch finds the user and the user is available, the Attendant application connects the call to the requested user.
•If the SIP Soft Switch finds the user but the user is unavailable, the Attendant application forwards the call to the Answering application, which lets the caller leave a voice message for the user.
•If the SIP Soft Switch does not find the user, the Attendant application transfers the call to a live operator.
Dial-by-Name
Ivanti Voice uses a Name Search Mechanism (NSM) to interpret DTMF input as first and last name combinations, letting callers specify the intended recipient of a call or voice mail by pressing phone keys to type the recipient’s name. This capability is included in the Attendant application. You can specify if any particular user should be included or excluded in the Dial-By-Name in the user configuration.
Ivanti Voice accepts first names, last names, or any combination of the two in any order, as well as initials and incomplete input, and can also accept variants for each user name. For example, a caller could specify a user named John Smith by entering any of the following:
•John
•Smith
•John Smith
•Smith John
•J S
•J Smith
•John S
The NSM starts searching for a match when the caller first presses a key. With each key the caller enters, the number of users whose names match the input reduces. The NSM stops searching when one of the following occurs:
•Only one name matches.
•The caller presses the pound key (#).
•The number of potential matches will not change if a new key entered.
Answering Application
The Answering application lets callers record voice mail for users. The SIP Soft Switch connects a call to the Answering application if one of the following occurs:
•The caller dials a number which meets the start criteria specified in Applications Selector for the Answering application (the call starts with 5012). In such cases, the Answering application prompts the caller for input to determine the destination of the voice mail.
•The Attendant application forwards the call to the Answering application if the intended recipient does not answer, is busy, or is unavailable. In such cases, the Answering application uses the DNIS of the forwarded call to automatically determine the destination of the voice mail.
In addition, a caller can dial the Answering application number followed by the extension of the user for whom they want to leave a message. For example, if the Answering application number is 5012 and the target user extension is 601, the caller can dial 5012601 to directly reach the target user’s voice mail.
The Answering application begins recording after the voice prompt, using an audible tone to signal the start of the recording. To stop the recording and save the message, the caller must hang up or press any key except the star key (*).
If the caller presses the star key (*), the Answering application stops the recording without saving the message, and transfers the caller to the Access application.
When a caller finishes recording a voice message, the Answering application saves the voice message as an audio file, and sends it as an attachment to an email address associated with the extension.
The Answering application uses Voice Activity Detection (VAD) to discard empty messages or stop recording if the sound of a voice is stopped for a specified time. VAD does not detect the audio source type (such as answering machine, fax, etc.), but only detects the activity.
Two options control the VAD feature: initial silence cut-off and silence cut-off, which are configured on the General tab of system-wide Unified Messaging settings in the Management Portal. Refer to the General UM Settings section for more information.
Access Application
The Access application lets IPCM users access their voice mailboxes by phone to retrieve and manage their voice mail and email. The Access application also lets Ivanti Voice users customize their voice mailboxes by phone.
The SIP Soft Switch connects a call to the Access application if one of the following occurs:
•The call meets the start criteria specified in Applications Selector for the Access application (the call starts with 5013).
•The caller presses the star key (*) while connected with the Answering application.
When an Ivanti Voice user connects to the Access application, the Access application attempts to use the ANI call property to identify the Ivanti Voice user. If the Access application does not recognize the ANI, it prompts the user to enter a mailbox number or extension.
After identifying the user, the Access application prompts the user to enter a PIN:
•If the PIN is not entered or is invalid, the Access application terminates the call.
•If the PIN is valid, the Access application accesses the user’s mailbox, announcing the number of new messages and the total number of messages in the mailbox.
The Access application plays voice mail and reads email according to the configured message processing order. For current messages, the Access application announces menu options.
When working with the Access application:
•If the user opts to forward or send the message, the application lets the user specify the destination by extension or by name. If the user presses the star key (*), the Access application invokes the search by name feature.
•If the user opts to reply to, forward, or send a message, the application offers to record a voice message.
When specifying a call destination:
•If the user chooses to specify the destination by extension, the Access application searches the user’s list.
•If the user chooses to specify a destination by name, the Access application searches the user’s list, the Ivanti Voice global address book, and the user’s personal address book.
While connected to the Access application, Ivanti Voice users can press 0 to access the Access application settings menu, which lets users configure mail preferences (such as the order in which the Access application plays messages) and record a personal greeting. The Answering application plays the personal greeting if the SIP Soft Switch fails to connect a caller trying to reach the user, or if the user does not answer during a predefined time interval. If the user does not record a personal greeting, the Answering application plays a generic prompt inviting the caller to leave a message.
If the UM email protocol is IMAP, Ivanti Voice users can navigate folders in the voice mailbox by pressing 2 on the phone keypad.
Changing the Start Criteria for UM Applications
When you install Ivanti Voice, each UM application automatically registers in the Applications Selector and the default start criteria (as specified in the previous application descriptions) is used for calls. Since the default extension of the voice server is 501, the voice server receives all calls placed to extensions 5011, 5012, and 5013. For each call it receives, the voice server uses the Applications Selector to check the start criteria of each application to find the right application for the call. The voice server directs calls intended for extension 5011 to the Attendant application, calls intended for extension 5012 go to the Answering application, and calls intended for extension 5013 go to the Access application.
You can change the start criteria for each application such that the SIP Soft Switch directs a call to the application if the DNIS of the call matches a value you specify. For this to work, the number callers dial to access each application must start with the voice server extension, which has the default of 501.
To change the Start Criteria for the UM Applications:
1.In the Management Portal, click System Configuration > Applications). The Applications Selector page opens.
2.Click the name of the application you want to modify.
3.In the APPLICATION SELECTION CRITERIA section, click the Starts with link in the Call property:DNIS column.
4.In the Set condition dialog box, change the number in the Starts with field to reflect the number callers will dial to start this application.
5.Click Set.
6.Click the Update button for the APPLICATION SELECTION CRITERIA section.
7.Click the Commit button to apply the change.
8.Repeat these steps for each application for which you want to change the start criteria.
Refer to Preparing for Incoming Calls for more information about configuring start criteria for applications.
General UM Settings
System-wide UM settings are configured on the General tab on the Unified Messaging page.
In addition to the general Unified Messaging configurations, configure user profile UM settings for each user who plans to use UM. Refer to the online help topic "User Configuration: Unified Messaging (UM) User Configuration."
To Configure the UM Settings on the General Tab:
1.In the Management Portal, click System Configuration > Users > Unified Messaging.

2.On the General tab:
•In the Forwarding prefix for Answering TUI field, type the extension of the Answering application. The voice application forwards calls to the Answering application using this extension. The prefix should be the same prefix the SIP Soft Switch uses to forward calls to the Answering application from the PSTN. The default is 5012.
The Answering application removes the prefix from the number to determine the original DNIS of each forwarded call.
•In the Extension for live secretary field, type the extension of the live operator. If the UM functionality does not recognize the caller input as a valid destination, a message is left on the live operator’s extension. The Attendant application and Answering application also transfer client calls to this extension in other cases, such as input time-outs.
•In the Maximum time for message recording field, type the maximum number of seconds the Answering application and Access application allow for recording a single message (optional).
You can also set maximum recording time limits for individual mailboxes - refer to the Unified Messaging (UM) User Settings section. If you do not set a recording time limit on an individual mailbox, the mailbox uses the value you set in this field.
•In the Initial silence cut-off field, type the number of seconds the Answering application will wait for the sound of a voice to begin before terminating the call and discarding the message. The default value of 5 seconds tells the Answering application to stop recording and discard the message if the sound of a voice has not started within 5 seconds after the tone. The caller then hears the prompt An empty message cannot be sent, followed by call termination. If the field is empty or 0, initial silence is not monitored.
Initial Silence Cut-Off value can also be specified at the user level (refer to the Unified Messaging (UM) User Settings section). When not empty, the field at the user level is used by the Answering application instead of the system-wide value. If empty, the system-wide value is used.
•In the Silence cut-off field, type the number of seconds the Answering application will wait when the sound of a voice stops before ending recording and sending the message. The default value of 10 seconds tells the Answering application to end the recording 10 seconds after the sound of a voice stops and send the voice mail. If the field is empty or 0, an indefinite, lengthy terminating silence is allowed.
3.Click the Update and Commit Changes buttons to apply the changes.
4.On the User Defaults tab:
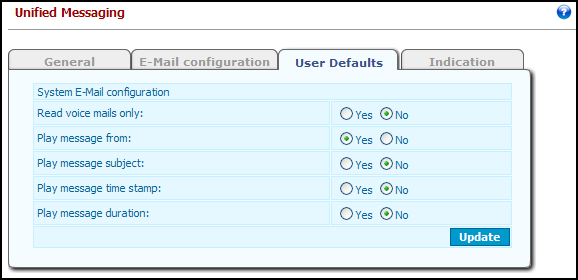
•In the Read voice mails only field, select Yes to configure Ivanti Voice read only voice mail when a user calls the Access application; select No to configure Ivanti Voice also read email to the user.
•In the Play message from field, select Yes to configure Ivanti Voice to announce the name of the message sender.
•In the Play message subject field, select Yes to configure Ivanti Voice to announce the subject of the message (if provided).
•In the Play message time stamp field, select Yes to configure Ivanti Voice to announce the time Ivanti Voice received the message.
•In the Play message duration field, select Yes to configure Ivanti Voice to announce the amount of time the message lasts.
These settings can be overridden on a user-by-user basis when configuring individual user profiles - refer to the Unified Messaging (UM) User Settings section.
5.Click the Update and Commit Changes buttons to apply the changes.
For information on configuring the settings on the E-Mail configuration tab refer to the online help topic "Unified Messaging Configuration: System Email Configuration." For information on configuring the settings on the Indication tab, refer to the online help topic "Unified Messaging Configuration: MWI Configuration (Indication Tab)."
Unified Messaging (UM) User Settings
The system administrator must configure the settings on the Unified Messaging tab of the user’s properties page to allow an Ivanti Voice user to access the Unified Messaging functionality.
To Configure the User’s Unified Messaging Settings:
1.In the Management Portal, click System Configuration > Users.
2.In the Login column on the Users page, click the name of the user. The User properties page for that user opens.
3.Click the Unified Messaging tab. Unified Messaging is configured on three sub-tabs: General, E-Mail, and Other.
4.Click the General tab. You can set (or reset) the user personal identification number (PIN):
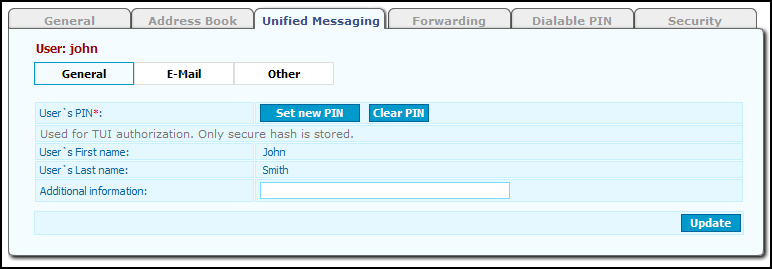
•Click the Clear PIN button. A confirmation dialog box opens.
•Click OK. A dialog box opens, confirming that user’s PIN has reset to 0000. Click OK.
•Click the Set new PIN button. The Set new PIN dialog box opens.
•In the Current PIN field, type 0000.
•In the New PIN field, type a new PIN.
•In the Confirm New PIN field, re-type the new PIN.
•Click OK. A confirmation dialog box opens. Click OK.
Users can also set their own PIN by following the audio instructions of the Access application. If a user forgets the PIN, click the Clear PIN button to reset the PIN to 0000, then advise the user of the temporary PIN and have the user call the Access application to create a new PIN.
5.Click the Update button to apply the settings.
6.Click the E-Mail configuration tab:
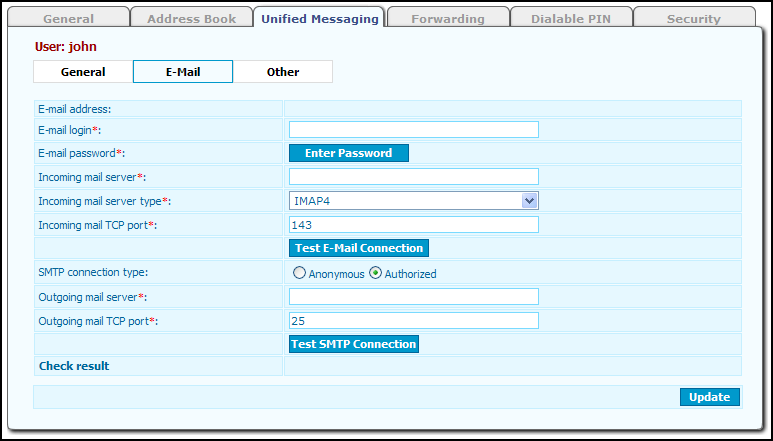
•In the E-mail address field, type the user email address, as specified on the user profile General tab. Ivanti Voice uses this email address as the recipient address for voice messages sent to the user, and as the sender address when the user utilizes the Access application to send email.
•In the E-mail login field, type the login for the user email account.
•Click the Enter Password button, type the user PIN and email account password in the dialog box, and click OK.
For information on configuring other user email settings on this tab, refer to the online help topic "User Configuration: Unified Messaging Tab Configuration."
7.Click the Update button to apply the settings.
8.Click the Test Email Connection button beneath the Incoming mail TCP port field to test the connection to the user email account (this can only be done after clicking the Update button). The Enter Password dialog box opens. Enter the user PIN and email account password, then click OK. The Check result line at the bottom of the page informs you of the test result.
9.Click the Other tab:
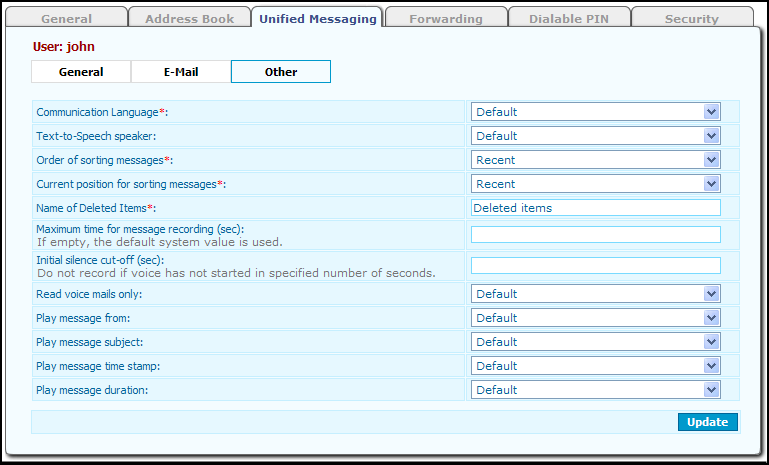
•In the Communication Language field, select the language in which the Access application plays prompts and reads text messages for this user (or leave the setting as Default).
•In the Text-to-Speech Speaker field, select the Text-To-Speech speaker the Access application uses to read text messages (or leave the setting as Default).
•The Order of sorting messages works in conjunction with the Current position for sorted messages field to determine the order in which the user’s voice mailbox plays messages (refer to the Mail Processing Order Examples section). Select either Recent or Oldest.
•In the Name of Deleted Items field, type the name of an existing mailbox folder in which Ivanti Voice will place messages the user deletes.
•In the Maximum time for message recording field, type the maximum number of seconds the Answering application and Access application allow for recording a single messages (optional). If this field is empty, Ivanti Voice uses the system-wide setting (refer to the General UM Settings section for more information).
•In the Initial silence cut-off field, type the number of seconds the Answering application will wait for the sound of a voice to begin before terminating the call and discarding the message. The default value of 5 seconds tells the Answering application to stop recording and discard the message if the sound of a voice has not started within 5 seconds after the tone. The caller then hears the prompt An empty message cannot be sent, followed by call termination. If this field is empty, the system-wide setting is used.
•In the Read voice mails only field, select Yes to configure Ivanti Voice read only voice mail when this user calls the Access application; select No to configure Ivanti Voice to also read email to the user. Select Default if you want Ivanti Voice to use the settings on the system-wide User Defaults setting (refer to the General UM Settings section for details).
•In the Play message from field, select Yes to configure Ivanti Voice to announce the name of the message sender. Select Default if you want Ivanti Voice to use the settings on the system-wide User Defaults setting (refer to the General UM Settings section for details).
•In the Play message subject field, select Yes to configure Ivanti Voice to announce the subject of the message (if provided). Select Default if you want Ivanti Voice to use the settings on the system-wide User Defaults setting (refer to the General UM Settings section for details).
•In the Play message time stamp field, select Yes to configure Ivanti Voice to announce the time Ivanti Voice received the message. Select Default if you want Ivanti Voice to use the settings on the system-wide User Defaults setting (refer to the General UM Settings section for details).
•In the Play message duration field, select Yes to configure Ivanti Voice to announce the amount of time the message lasts. Select Default if you want Ivanti Voice to use the settings on the system-wide User Defaults setting (refer to the General UM Settings section for details).
10.Click the Update button to apply the settings.
Mail Processing Order Examples
The Order of sorting messages and Current position for sorted messages fields determine the order in which the user voice mailbox plays messages when the user presses the 6 (next) button on the phone to scroll through messages. The following examples describe each combination of settings, and use the following sample messages:
•Message 1, received 5/20/08 (read)
•Message 2, received 5/21/08 (read)
•Message 3, received 5/22/08 (read)
•Message 4, received 5/23/08 (unread)
•Message 5, received 5/24/08 (unread)
•Message 6, received 5/25/08 (unread)
Example 1:
If the Order of sorting messages = Recent and the Current position for sorted messages = Recent, the voice mailbox first plays any unread messages in the order of newest to oldest, and then plays read messages in the order of newest to oldest. For example:
•Message 6, received 5/25/08 (unread)
•Message 5, received 5/24/08 (unread)
•Message 4, received 5/23/08 (unread)
•Message 3, received 5/22/08 (read)
•Message 2, received 5/21/08 (read)
•Message 1, received 5/20/08 (read)
Example 2:
If the Order of sorting messages = Recent and the Current position for sorted messages = Oldest, the voice mailbox first plays the oldest unread message. Then, the voice mailbox plays the read messages in order of newest to oldest. If there are additional unread messages, the voice mailbox plays these in the order of newest to oldest after playing the read messages. For example:
•Message 4, received 5/23/08 (unread)
•Message 3, received 5/22/08 (read)
•Message 2, received 5/21/08 (read)
•Message 1, received 5/20/08 (read)
•Message 6, received 5/25/08 (unread)
•Message 5, received 5/24/08 (unread)
Example 3:
If the Order of sorting messages = Oldest and the Current position for sorted messages = Oldest, the voice mailbox first plays any unread messages in the order of oldest to newest, and then plays read messages in the order of oldest to newest. For example:
•Message 4, received 5/23/08 (unread)
•Message 5, received 5/24/08 (unread)
•Message 6, received 5/25/08 (unread)
•Message 1, received 5/20/08 (read)
•Message 2, received 5/21/08 (read)
•Message 3, received 5/22/08 (read)
Example 4:
If the Order of sorting messages = Oldest and the Current position for sorted messages = Recent, the voice mailbox first plays the newest unread message. Then the voice mailbox plays the read messages in order of oldest to newest. If there are additional unread messages, the voice mailbox plays these in the order of oldest to newest after playing the read messages. For example:
•Message 6, received 5/25/08 (unread)
•Message 1, received 5/20/08 (read)
•Message 2, received 5/21/08 (read)
•Message 3, received 5/22/08 (read)
•Message 4, received 5/23/08 (unread)
•Message 5, received 5/24/08 (unread)
Global Address Book Management
Ivanti Voice displays an editable version of the Global Address Book in Management Portal > System Configuration > Users > Global Address Book.
An uneditable version of the Global Address Book appears in the Agent Dashboard as the Common Contact list.
To Add an Entry to the Global Address Book:
1.Fill in the empty fields in the bottom row.
2.Click the Create button. IPCM adds the entry to the Global Address Book table.
To Edit an Entry in the Global Address Book:
1.Type over the information you wish to edit.
2.Click the Update button.
To Delete an Entry from the Global Address Book:
1.Click the red x icon to the right of the entry. A confirmation dialog box opens.
2.Click OK. The entry is deleted from the table.
Phone Groups
The Phone Groups page lets you organize phones into groups identified by a single extension. A phone group can contain any number of phones. Also, a single phone can be a member of multiple groups.
When you assign a phone to a phone group, the phone still keeps its own extension.
You can enable the following features for phone groups:
•Call hunt - When a caller dials the phone group extension, the SIP Soft Switch connects the call to a randomly selected extension in the group. If all extensions in a hunt group are busy, the SIP Soft Switch will queue the call and play music until the group member extension becomes available.
•Call pickup - Lets you use any phone to answer inbound calls to other phones. When an extension in the phone group rings, a user can answer the call by using another phone in the group to dial the Call pickup group number, which you configure on the Special Numbers page.
You can also configure call pickup for extensions outside of phone groups, letting Ivanti Voice users answer calls to other extensions in the company by dialing a special number (Call pickup directed number) followed by the extension of the ringing phone. Refer to the online help topic "SIP Soft Switch Configuration: Special Numbers."
Create and Delete Phone Groups
To Create and Configure a Phone Group:
1.In the Management Portal, click System Configuration > SIP Soft Switch > Phone Groups. The Phone Groups page opens.
2.In the empty field, type the extension of the phone group.
3.Click Add. The extension is added to the list of Phone Groups.
4.Click the new phone group link to configure the settings.
5.On the Membership tab, the Group Number field displays the extension you typed on the Phone Groups page. Change this number if needed.
6.In the Group Members field, add an extension to this group by typing the extension in the empty field and clicking the Add button (remove phones by clicking the red x icon). Do this for all extensions to be included in this group.
7.Click the Update button.
8.Click the Features tab.
9.In the Enable call pickup in this group field, select Enable to let users answer inbound calls to this group by dialing the Call pickup group number from any phone in the group (the call pickup group number is configured on the Special Numbers page - refer to the online help topic "SIP Soft Switch Configuration: Special Numbers"). The Disable option requires users to physically answer the ringing phone to answer inbound calls to this group.
10.In the Enable call hunt in this group field, select Enable to allow the SIP Soft Switch to route calls to phones in this group when a caller dials the phone group extension. If all extensions in a hunt group are busy, the SIP Soft Switch will queue the call and play music until a group member extension becomes available. The Disable prevents the SIP Soft Switch from routing calls to any extension when a caller dials the extension of the group.
11.Click the Update button.
To Delete a Phone Group:
1.On the Phone Groups page (in the Management Portal, click System Configuration > SIP Soft Switch > Phone Groups), click the red x icon next to the phone group extension.
2.Click OK to confirm the deletion.
Class of Restrictions (COR)
A class of restrictions (COR) is a set of limitations you apply to collections of extensions. The class of restrictions:
•Determines the numbers an extension can dial. For example, you can prevent extensions in a certain class from dialing external numbers, making long distance calls, etc.
•Determines the numbers to which an extension can transfer or forward calls. For example, you can prevent users in a certain class from transferring calls outside the system.
•Determines the numbers from which an extension can receive calls, including forwarded calls and transfers. For example, you can prevent extensions in a certain class from receiving external calls, calls from other internal departments, etc.
Call Restriction Levels
CORs let you set incoming and outgoing call restriction levels, which determine the priority Ivanti Voice grants to extensions (including phones, trunks, and gateways) when allocating system resources. Extensions with an assigned outgoing call restriction level can only call extensions with an incoming call restriction level the same or lower. This enables you to reserve expensive resources (such as high-quality trunks) for certain extensions or subsets of users, such as company executives.
If there are multiple extensions to which Ivanti Voice can route the call, and each has an incoming call restriction level lower than the outgoing call restriction level of the calling extension, Ivanti Voice routes the call to the resource with the highest incoming call restriction level.
Refer to the online help topic "SIP Soft Switch Configuration: Class of Restrictions (COR)" for COR and call restriction level examples, as well as information and examples for least-cost routing.
Create and Delete a Restriction Class
The Restrictions page(in the Management Portal, click System Configuration > SIP Soft Switch > Restrictions) lets you create and configure CORs to assign when configuring extensions. All tabs, except Levels, contain the Allow List and Deny List fields, into which numbers or an asterisk (*) can be entered (the asterisk indicates any number).
To Create and Configure a Restriction Class:
1.In the Management Portal, click System Configuration > SIP Soft Switch > Restrictions. The Restrictions page opens.
2.In the empty field, type a name for the restriction.
3.Click Add. The properties page opens, displaying five tabs: Calling Device, Called Device, Transfer, Forward, and Levels.
4.On the Calling Device tab:

•In the Allow List fields, type the numbers you want to allow extensions in this restriction class to call, then click the Add button.
•In the Deny List fields, type the numbers you want to prevent extensions in this restriction class from calling, then click the Add button.
For both the Allow List and Deny List fields:
•You do not need to enter a specific phone number to be allowed or denied, you can type a prefix instead. For example, to disallow all calls beginning with the digit 9, type 9 in the Deny List.
•If a number is not in either the Allow List nor Deny List, the SIP Soft Switch allows extensions in the class to call the number.
•The Allow List overrides the Deny List. This enables you to allow calling exceptions in denied groups. For example, if you want to prevent extensions in the COR from calling all numbers beginning with a 9 except for the number 91-415-555-1212, type 9 in the Deny List and the specific number to be allowed (914155551212) in the Allow List.
Click the red x icon to remove allowed or denied entries.
5.Click the Update button to apply the configuration.
6.On the Called Device tab:
•In the Allow List fields, type the numbers from which you want extensions in this restriction class to receive calls, then click the Add button.
•In the Deny List fields, type the numbers from which you want extensions in this restriction class to not receive calls, then click the Add button.
For both the Allow List and Deny List fields:
•If a number is not in either the Allow List nor Deny List, the SIP Soft Switch allows extensions in the class to receive calls from the number.
•The Allow List overrides the Deny List. This lets you allow exceptions for specific numbers in denied groups. For example, you can use the Deny List to prevent the extension from receiving calls from the PSTN unless the call originates from a number you specify in the Allow List (for example, allowing calls from the number of a remote office).
Click the red x icon to remove allowed or denied entries.
7.Click the Update button to apply the configuration.
8.On the Transfer tab:
•In the Allow List fields, type the numbers to which you want to allow extensions in this restriction class to transfer calls, then click the Add button.
•In the Deny List fields, type the numbers to which you want to prevent extensions in this restriction class from transferring calls, then click the Add button.
For both the Allow List and Deny List fields:
•If a number is not in either the Allow List nor Deny List, the SIP Soft Switch allows extensions in the class to transfer calls to the number.
•The Allow List overrides the Deny List. This lets you allow extensions in this restriction class to transfer calls to specific numbers from denied groups. For example, you can use the Deny List to prevent the extension from transferring the call to any international number except the number of an overseas office you specify in the Allow List. When transfer is restricted, the extension, such as hard phone, will not be able to complete a blind or consult transfer (nothing happens when the Transfer button on the phone is pressed). The phone typically provides no indication on its LCD.
Click the red x icon to remove allowed or denied entries.
9.Click the Update button to apply the configuration.
10.On the Forward tab:
•In the Allow List fields, type the prefixes to which you want to allow extensions in this restriction class to forward calls, then click the Add button.
•In the Deny List fields, type the prefixes to which you want to prevent extensions in this restriction class from forwarding calls, then click the Add button.
For both the Allow List and Deny List fields:
•If a prefix is not in either the Allow List nor Deny List, the SIP Soft Switch allows extensions in the class to forward calls to the number.
•The Allow List overrides the Deny List. This lets you allow extensions in this restriction class to forward calls to specific numbers from denied prefix groups. For example, you can use the Deny List to prevent the extension from forwarding the call to any international number except the number of an overseas office you specify in the Allow List.
Click the red x icon to remove allowed or denied entries.
11.Click the Update button to apply the configuration.
12.On the Levels tab, you can configure restriction levels that control the accessibility of phones or trunks/gateways in this restriction class. Each device has two restriction levels:
•Outgoing calls restriction level - An integer that determines the resources a device in this class of restrictions can access. Devices in this restriction class can only access devices belonging to restriction classes with incoming call restriction levels equal to or lower than the integer you specify in this field. The default is 10.
•Incoming calls restriction level - An integer that determines which resources can access devices in this class of restrictions. To use a device in this class, the calling device must have an outgoing call restriction level greater than or equal to this integer. The default is 5.
13.Click the Update button to apply the configuration.
To Delete a Restriction Class:
1.On the Restrictions page (in the Management Portal, click System Configuration > SIP Soft Switch > Restrictions), click the red x icon to the right of the COR.
2.Click OK to confirm the deletion.
Authorization Codes
The Authorization Codes page lets you establish codes users can enter on a phone keypad to override the default COR of the phone and access a COR for which the phone is not configured. The override begins when the user dials the Override Class of Service Prompt extension (configured on the Special Numbers page - refer to the online help topic "SIP Soft Switch Configuration: Special Numbers") and enters an authorization code followed by the pound sign (#). The override ends when the user dials the Override Class of Service Prompt extension and presses only the pound sign key.
The Authorization Codes page lists the CORs you configured on the Restrictions page.
To Specify an Authorization Code for a COR:
1.In the Management Portal, click System Configuration > SIP Soft Switch > Authorization Codes. The Authorization Codes page opens.
2.In the Auth Code field next to the COR, type the numeric authorization code.
3.Click the Update button to apply the configuration.
User Codes
The User Ids page lets you create a code that can be used to log into a phone in the Ivanti Voice environment and override the original COR/forwarding configuration of the phone. The phone’s original COR/forwarding configuration is replaced by the COR/forwarding configuration of the user entering the code.
To Create and Configure a User Code:
1.In the Management Portal, click System Configuration > SIP Soft Switch > User Codes. The User Ids page opens.
2.In the empty field, type a numeric user code.
3.Click Add. This is the code the user dials to assume control of the extension. This code becomes a virtual extension, capable of receiving and originating calls. The phone's original extension still can be used to receive calls.
4.To configure the user code, click the user code link. The properties page opens, displaying two tabs: User Code and Forwarding.
5.On the User Code tab:
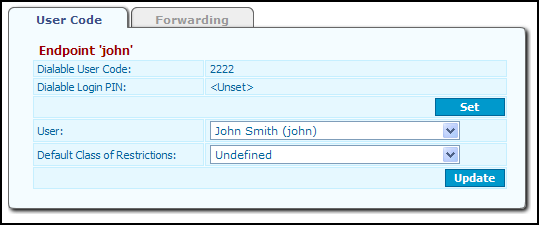
•To set the PIN the user enters after dialing the user code, click the Set button. In the Change Dialable PIN dialog box, type the user code extension in the Dialable User Code field, type the PIN number in both the Dialable User PIN and the Confirm Dialable User PIN fields, then click Set.
•In the User field, select the user who will be allowed to utilize this code. Each user code can be assigned to only one user.
•In the Default Class of Restrictions field, select the COR that will be used for this extension while the user is logged in.
6.Click the Update button to apply the configuration.
7.Configure the settings on the Forwarding tab. Click the online help icon for field explanations.
•For each forwarding category you want to enable, indicate in the Strip, # of digits field the number of digits the SIP Soft Switch removes automatically from the beginning of the telephone numbers of forwarded calls. In the Prefix with these digits field, indicate the digits the SIP Soft Switch prefixes automatically to the beginning of the telephone numbers of forwarded calls.
The voice application may disable call forwarding on a per call basis. For example, if an extension belongs to an agent and the queued call is routed to the agent, the call forwarding for this extension will be disabled to avoid routing queued calls to the agent's voice mail.
8.Click the Update button to apply the configuration.
To Delete a User Code:
1.On the User Ids page (in the Management Portal, click System Configuration > SIP Soft Switch > User Codes) click the red x icon to the right of the extension.
2.Click OK to confirm the deletion.