Supervisor Functions
The Contact Center Supervisor can monitor agent activity through the use of the Agent Dashboard and the Statistics Console. While logged into the Agent Dashboard, the supervisor can assign calls to agents, monitor and participate in conversations, perform whisper conferencing (coaching heard only by the agent, and record agent conversations.
Supervisors can use the Statistics Console to view real-time statistics for agents, agent groups, services, as well as the entire contact center, and can also log out agents, if needed.
Monitor Agents Using the Agent Dashboard
The Agent Dashboard is a client application running on the computer of each agent and supervisor in the contact center. Each Agent Dashboard installation has a softphone: a built-in application with a graphical user interface for performing basic telephony tasks such as answering, dialing, transferring, and hanging up calls. A microphone and speaker or headset attached to the computer enables agents to audibly converse with callers, just as you would using a desktop phone.
Agents use the Agent Dashboard to:
•Perform call handling tasks, such as answering, transferring, and dialing calls using the buttons on the Control Bar and the Softphone tab.
•View the properties of calls in the queue using the Queue tab.
•Notify the server of their availability to receive calls using the Agent State bar.
Supervisors use the Agent Dashboard to:
•View the states of all agents and monitor calls using the Quality Management tab.
•View the properties of calls in the queue and assign calls to an agent using the Queue tab.
The Agent Dashboard User’s Guide contains procedures for agents using the Agent Dashboard.
Log In
To Log into the Agent Dashboard:
1.Select Start > Programs > Ivanti, Inc. > Communications Management > Agent Dashboard.
2.In the login dialog box, type the Ivanti Voice user name and password provided by your system administrator. Do not change other fields on the dialog box unless instructed to do so by the system administrator.
3.Select the Save password check box to have the Agent Dashboard remember your password.
4.Click OK. The Agent Dashboard interface displays your user name and extension.
If the Agent Dashboard does not connect, the softphone might still work depending on the configuration of the contact center; however, the Agent Dashboard cannot receive calls the server distributes. Contact the system administrator for assistance if this occurs.
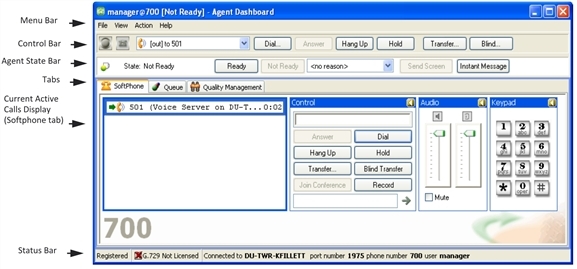
Agent Dashboard Interface
The Agent Dashboard display you see may be different, depending on the your privileges and system configuration.
The Agent Dashboard has the following tool bars:
•Menu Bar - Provides access to commands and configuration options.
•Control Bar - Contains call controls for the softphone, a drop-down list of the calls the Agent Dashboard is currently handling, a missed call indicator, and a voice mail indicator (only for installations with unified messaging).
•Agent State Bar - Contains controls to indicate availability to take calls, and displays the current state of the agent or supervisor.
•Tabs - The Agent Dashboard displays two tabs for agents and supervisors (the SoftPhone tab and the Queue tab), and a third tab (the Quality Management tab) for supervisors only.
•Status Bar - Displays connectivity and user information. Select View > Status to hide the Status bar.
Depending on the system configuration, the Agent Dashboard may display a list of all online agents and their status. Toggle this view by selecting View>Agents. If your system configuration does not give you this option, the Agents option in the View menu is inactive.
Softphone Tab
The SoftPhone tab lets you perform basic telephony tasks using your computer. The arrow icons in the top right corner of each section minimize and maximize the section.
Depending on the Agent Dashboard configuration, the SoftPhone tab may not be visible to agents and supervisors using a SIP-enabled desk phone.

The SoftPhone tab features include:
•Current Active Calls Display - Displays information about the calls you are currently handling. A red arrow symbol indicates an inbound call; a green arrow symbol indicates an outbound call.
•Control section - Contains call controls for the softphone, similar to those available on the Control bar. The field at the bottom of the Control section enables you to enter a string of digits while you are on a call (also enabling you to edit them). For example, you could use this field to dial an authorization code after dialing an outside extension (type the digits, then click the arrow to the right of the field).
•Audio section - Controls volume levels for the current call. The left slider controls your speaker, and the right controls the your microphone. You can click the Mute check box to temporarily disable the microphone so a caller cannot hear your voice.
•Keypad section - Displays the keys you click to dial telephone numbers and enter Dual Tone Multi-Frequency (DTMF) digits while making outbound calls. The number you enter appears in the Control field.
Queue Tab
The Queue tab lets you view the various queues containing current calls waiting for agents. The Queue tab does not list calls between agents or calls between agents and supervisors.

The left pane of the Queue tab displays a hierarchy of contact center queues. Select a queue and the right pane displays the calls in that queue, as well as information about each call including the amount of time the call has been in the queue, the call service type (customer service, technical support, etc.), the agent to which Ivanti Voice assigned the call, etc.
The information the Queue tab displays depends on the Ivanti Voice configuration.
The Queue tab contains the following default queues:
•My Personal Queue - Displays all calls assigned to you. A call is assigned to a personal queue when one of the following occurs:
•The Interactive Voice Response (IVR) system assigns the call to a user.
•A supervisor assigns a call to an agent; the call appears in the agent’s personal queue. (refer to the Assign Calls to Agents section).
•A call is parked in a personal queue (refer to "Parking Calls" in the Agent Dashboard User’s Guide).
•All Queued Interactions - Displays all calls waiting in all queues.
•ISM Demo Queue - Displays calls that are part of the ISM configuration demonstration application included with Ivanti Voice.
•ITSM Demo Queue - Displays calls that are part of the Foundation/ITSM, CSM, and GMEE configuration demonstration application included with Ivanti Voice.
•GoldMine Demo Queue - Displays calls that are part of the GoldMine configuration demonstration application included with Ivanti Voice.
•Outbound calls - Display only if Ivanti Voice Outbound Dialer is installed (refer to the Ivanti Voice Outbound Dialer Guide).
For information on HEAT, Foundation/ITSM, CSM, and GMEE, and GoldMine, refer to the documentation accompanying those products.
The Queue tab may contain other queues, depending on the system configuration.
Agents can remove a call from any of the visible queues and place the call in their personal queue by selecting a call in the Queue tab and clicking the Pull button. If the agent is ready to receive the call, the phone rings; if not ready, the call goes into their personal queue.
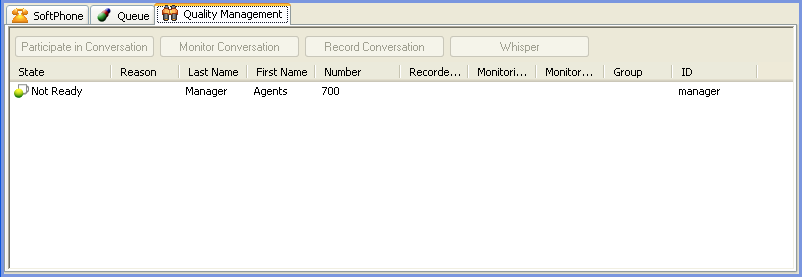
Quality Management Tab
The Quality Management tab lets supervisors monitor the activity of agents logged into Ivanti Voice and displays agent states. Ivanti Voice categorizes the status of each agent, call, and interaction into states. Each agent, call, or interaction can be in only one state at a time. For example, an agent can be in the Ready state, meaning the agent is ready to take calls. If Ivanti Voice routes a call to the agent, Ivanti Voice changes the agent from the Ready state to the Reserved state, during which time the agent’s phone rings and the agent becomes unavailable to take other calls. When the agent answers the call, Ivanti Voice changes the agent to the Busy state, during which time the agent has an active conversation with the caller.
Ivanti Voice automatically triggers some types of state changes, while the actions of agents and callers trigger other types of state changes. For example, an agent hanging up a call places the agent in the After-Call Work state. State changes can also be manual: you can allow agents to manually put themselves in the Not Ready state, meaning they are logged into Ivanti Voice but unavailable to take calls. This notifies Ivanti Voice to re-route calls that would normally go to that agent.
The Quality Management tab displays the following information:
•State - The state of the agent.
•Logged Out - The agent is not logged into the Agent Dashboard.
•Not Ready - The agent is unavailable to take calls because the agent clicked the Not Ready button on the Agent Dashboard.
•Ready - The agent is available to take calls.
•Reserved - Ivanti Voice is routing a call to the agent, making the agent unavailable to take other calls. The agent’s phone rings during this state.
•Busy - The agent is engaged in an active conversation with the caller or is transferring the call.
•After-Call Work - The agent has completed the call and is engaged in after-call work, which consists of tasks related to the call. These tasks can include completing the fields on a call management record or editing notes about the call. The agent is unavailable to take calls while in the After-Call Work state. Depending on the system configuration, agents either automatically return to the Ready state after a configured period of time elapses, or manually place themselves back in the Ready state after completing the post-call tasks.
•Reason - The Not Ready reason the agent selected if the agent is in the Not Ready state (not ready reasons may or may not be required; refer to Organizing the Contact Center).
•The agent’s last and first name.
•Number - The agent’s telephone number or extension.
•Recorded by - The name of the supervisor recording the conversation (if the conversation is being recorded).
•Monitoring type - The type of monitoring the supervisor is using, if any.
•Monitored by - The name of the supervisor monitoring the conversation (if the conversation is being monitored).
•ID - The agent’s user name.
While on the on the SoftPhone and Queue tabs, supervisors can also display the Quality Management tab information in an additional pane by selecting View > Agents.
Assign Calls to Agents
When you log into the Agent Dashboard as a supervisor, the Queue tab displays the Assign button. The Assign button lets you assign a queued call to a specific agent.
To Assign Calls:
1.On the Queue tab, select a queued call. The Assign button becomes active.
2.Click the Assign button. The Agent Dashboard displays a list of agents.
3.Select an agent. The Agent Dashboard assigns the call to that agent. If the agent is in the Not Ready state, the call goes into the agent’s queue.
Participate in Conversations
Supervisors with the Quality Management supervisor role can join a conversation between an agent and a third party.
To Participate in a Conversation:
1.On the Quality Management tab, select an agent who is on a call. The Participate in Conversation button becomes active.
2.Click the Participate in Conversation button. Your phone rings.
3.Answer the call. Both the agent and third party can hear your voice. The agent and possibly the third party may hear a notification message when a supervisor joins a conversation, depending on the Ivanti Voice configuration in the voice application (refer to the online help topic "Voice Application Design: Building Block Definitions: Connect Call Block.").
Monitor Conversations
Supervisors can use the Agent Dashboard to listen to agent calls. The system administrator configures the voice application to enable the Agent Dashboard to allow one of following:
•Undisclosed monitoring - The agent and the person with whom the agent is talking are unaware the supervisor is listening.
•Disclosed monitoring - The Agent Dashboard plays a tone when the supervisor begins listening, notifying the agent and the person with whom the agent is talking that their conversation is being monitored.
To Monitor a Call:
1.On the Quality Management tab, select an agent who is on a call. The Monitor Conversation button becomes active.
2.Click the Monitor Conversation button. Your phone rings.
3.Answer the call and listen to the conversation between the agent and the caller.
Recording Agent Conversations
Supervisors with the Quality Management supervisor role can use the Agent Dashboard to record agent calls.
You may record phone calls through the use of the licensed software. The laws on recording phone calls vary from country to country and state to state. Ivanti recommends you inform the other party or parties to your phone call that you are recording their conversation; however, it is your responsibility to comply with all applicable laws and regulations in your use of the licensed software. You agree to abide by all applicable communication, privacy, and similar rules, directives, and other laws in your use of the licensed software. In no event will Ivanti be liable for any action or inaction on your part which leads to or causes you to break the law.
The system administrator configures the voice application to enable the Agent Dashboard to allow one of following:
•Undisclosed recording - The agent and the person with whom the agent is talking are unaware the supervisor is recording the conversation.
•Disclosed recording - The Agent Dashboard plays a tone when the supervisor begins recording, notifying the agent and the person with whom the agent is talking that their conversation is being recorded.
A Contact Center Supervisor who has been granted the Configure Quality Management privilege can schedule agent recordings; refer to the online help topic "Contact Center Server Configuration: Agent Configuration: Agent Interaction Recording Option" for details.
To Record a Call:
1.On the Quality Management tab, select an agent who is on a call. The Record Conversation button becomes active.
2.Click the Record Conversation button. Ivanti Voice records the conversation.
To Access the Recorded Conversation:
•Use the Management Portal > Reporting > Interactions feature as described in the Interaction Reports section.
Whisper Conferencing
Whisper conferencing lets a supervisor with the Quality Management supervisor role join a call between an agent and a third party and converse with the agent without the third party hearing the supervisor. The supervisor and agent can hear each other and the third party, but the third party can hear only the agent. This feature gives supervisors the ability to coach agents on a call without the third party noticing.
To Enable Whisper Conferencing:
1.On the Quality Management tab, select an agent who is on a call. The Whisper button becomes active.
2.Click the Whisper button. Your phone rings.
3.Answer the call. The whisper conference is active. The agent can hear your voice, but the third party cannot. The agent and possibly the third party may hear a notification message when the supervisor whispers into the conference, depending on the Ivanti Voice configuration in the voice application (refer to the online help topic "Voice Application Design: Building Block Definitions: Connect Call Block").
Statistics Console
The Statistics Console is a client application for supervisors that displays real-time statistical data about:
•Agents
•Agent groups
•Services
•The contact center as a whole
These statistics include the number of calls coming into the contact center, the average time each agent spends talking to a caller, the maximum duration for which a caller is on hold, the number of callers who hung up when calling about a specific service, etc. Some of these statistics are current values (such as the current number of busy lines) while others are values calculated over a specific monitored period (such as the number of calls answered in the last hour, or the minimum call duration since midnight).
To Open the Statistics Console:
1.Click Start > Programs > Ivanti Voice > Communications Management > Statistics Console.
2.In the left panel, click the Connection button.
The Statistics Console automatically detects a local Ivanti Voice installation. Use the following procedure to establish a connection between a remote Statistics Console and the Contact Center server, or add a new Contact Center server connection to the Statistics Console
To Establish or Add a Connection:
1.Open the Statistics Console by clicking Start > Programs > Ivanti Voice > Communications Management > Statistics Console.
2.Select File > New Connection. The New Connection screen opens and a New Connection tab is added to the left pane.
3.Click the Configure button to activate the fields on the New Connection screen, and complete the fields:

•Title - Type the name of the new connection as you want it to display on the tab in the left pane of the Statistics Console.
•Connect To section - Select the Remote System radio button, which activates the Name/Address and Port Number fields.
•Name/Address - Type the IP address or computer name of the Contact Center server host computer to which you want to connect.
•Port Number - Type the port number of the Contact Center server to which you want to connect (the default is 1972).
•Description - Type a description of the connection.
•Connect Automatically - Select this check box if you want this connection to occur every time you start the Statistics Console.
4.Click the Connect button. The Statistics Console connects to the Contact Center server you specified.
If the Statistics Console cannot connect, error messages display in the left pane. Click Start > Settings > Control Panel > Administrative Tools > Services and restart the Ivanti Voice Message Bus and Ivanti Voice Statistics and Metrics Engine services to correct the problem.
To Close a Connection:
1.At the bottom of the left pane, click the tab for the connection.
2.Click File > Disconnect.
To Delete a Connection:
1.At the bottom of the left pane, click the tab for the connection.
2.Click File > Delete Connection.
Viewing Statistics
You can view statistics for an agent, agent group, or service by selecting the desired object in the hierarchy on the left. The statistics pertaining to the object you select appear on the right.
With the 2018.1 release, a new option has been added where agents can be viewed with their full name i.e. First name and Last name in Statistics Console. This will avoid confusion between agents have similar first name or login id’s. This option can be selected from the View menu.

For example, to view the statistics for an individual agent, expand the hierarchy until the name of the agent appears, then select the agent’s name.
Select All Agents to view a compilation of the statistics for all agents. Select Contact Center to view a compilation of the statistics for the entire contact center. Select a service to view the statistics pertaining to that service.
One Statistics Console can monitor multiple Ivanti Voice deployments. Use the tabs at the bottom of the hierarchy on the left to choose the Ivanti Voice deployment you want to monitor.
When the Ivanti Voice Statistics and Metrics Engine service is down, all real-time statistics reset to zero.
The tabs at the bottom of the right pane of the Statistics Console let you view different types of statistics as well as statistics from different time periods. The tabs change depending on the object selected in the hierarchy on the left:
•Last hour - Displays statistics Ivanti Voice calculates using data recorded from 60 minutes ago to the present.
•Outbound - Displays outbound call statistics (refer to the Outbound Dialer Guide).
•Overview - Displays a combination of statistics Ivanti Voice calculates using data recorded since midnight, and data recorded from 60 minutes ago to the present.
•Staging - Displays statistics based on queue stages (queue stages are a series of timers that begin when an initiating event, such as answering a call, occurs, and end a configurable number of seconds later; refer to the online help topic "Statistics" for more information).
•Today - Displays statistics Ivanti Voice calculates using data recorded since midnight, or a time specified in the configuration by your system administrator.
•Services - Displays services statistics Ivanti Voice calculates using data recorded since midnight, and data recorded from 60 minutes ago to the present.
•Inbound - Displays inbound call statistics.
Refer to the online help topic "Web Statistics Overview" or the Ivanti Voice Web Statistics Guide if your company has chosen to use Web Statistics, which is a configurable tool for statistics viewing.
Log Out Agents
You might need to log out an agent when a system problem arises. This is done from the Management Console:
1.Open the Management Console by clicking Start > Programs > Ivanti, Inc. > Communications Management > Management Console.
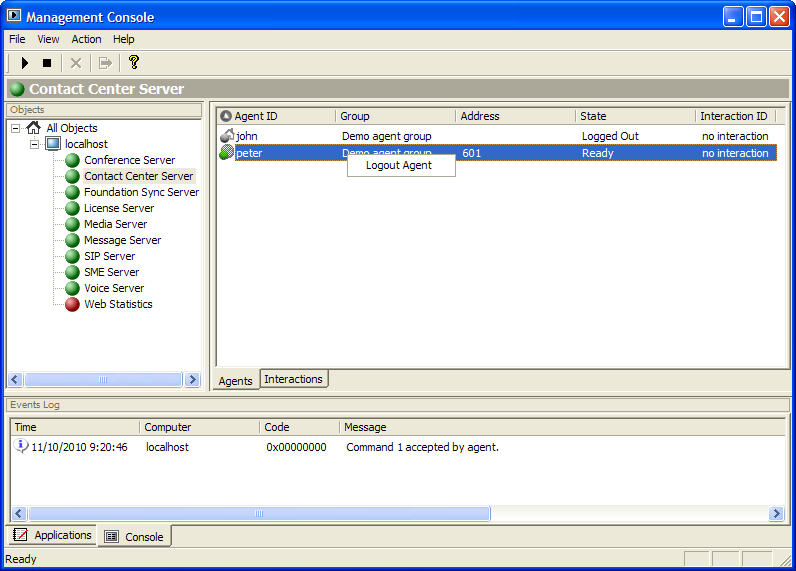
2.In the Objects panel, click the Contact Center Server. The Agents and Interactions tabs appear in the right pane.
3.Click the Agents tab to display all configured agents.
4.Right-click the agent you want to log out and select Logout Agent. The agent changes to the Logged Out state.
Interaction Reports
Interaction reports are reports listing records of previous interactions within Ivanti Voice. Records include audio recordings of agent calls.
You can search for recordings, then play the recordings and rate the agent performance.
Recordings: Search, Listen, and Rate
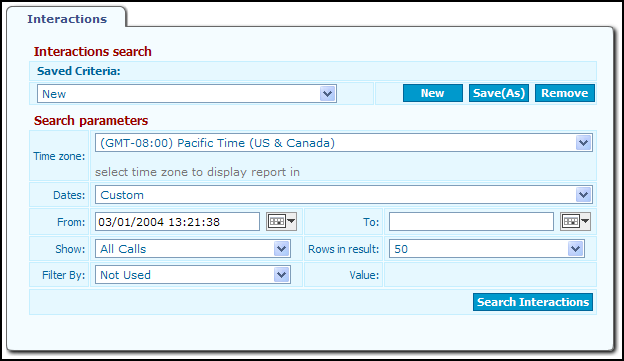
The Interactions page (Management Portal > Reporting > Interactions) lets you search for interaction records in the Ivanti Voice database, and save the searches you perform. You can create a new search or run a saved search to find the desired recordings. The search parameters can include a default time frame (such as This month) or you can define a specific time frame.
Once you perform the search, you can listen to audio recordings of agent conversations listed on the Found Interactions page. These recordings are triggered by any of the following:
•A supervisor clicking the Record Conversation button on the Quality Management tab of the Agent Dashboard interface.
•A voice application (refer to the online help topic "Voice Application Design: Building Block Definitions: Connect Call Block").
•The Contact Center Quality Management schedule (refer to the online help topic "Contact Center Server Configuration: Agent Configuration: Agent Interaction Recording Option").
An agent can record a call by clicking the Record button on the Agent Dashboard. However, this action records the call only locally (on the client workstation). Local recordings are not available on the server (or in the Management Portal). Only server side recordings are tracked by server.
To Find, Listen to, and Rate Recordings:
1.In the Management Portal, click Reporting > Interactions.
2.On the Interactions page, set the Search Parameters:
•Time zone - Select your time zone in the drop-down list.
•Dates - The time frame from which you want to retrieve interaction records. Either select a defined period such as Today, or select the Custom option and specify a range in the From and To fields.
•From and To fields - If you select the Custom option in the Date field, specify the time frame for which you want the search to retrieve interaction records: either specify the earliest date and time using the From field, the latest date and time using the To field, or a range of time using both fields. Either click the calendar icon next to the field and specify a date and time in the pop-up, or type the date/time in the field using the following format: <month>/<day>/<year> <hour>:<minute>:<second>. For example: 06/05/2006 15:53:25.
•Show - Select All calls if you want the search to return records of all interactions. Select Only calls with recordings if you want the search to include only calls that were recorded.
•Rows in result - Select the number of rows you want the search to return.
•Filter by - Select the interaction property you want to use as the search key, or select the Custom option to manually enter both Field and Value.
•Value - Enter or select the value of the attribute you selected in the Filter by field.
3.Click the Search Interactions button. Ivanti Voice searches the database and refreshes the page to display the results.
4.On the Found Interactions page, recordings are marked with an audio icon. Click the audio icon to listen to a recording. The Listen Interaction screen opens, displaying audio controls that control the playback of the recording, as well as several different categories of ratings that enable you to rate the recording on a scale of 1 to 10 in various categories.
The red icon indicates a recording error occurred and provides an explanation.

5.Rate the recording by selecting ratings from the drop-down lists. You can also add comments in the Record Note field (maximum 255 characters). The notes will be visible to anyone else subsequently viewing the interaction. Click the Update button.
You can download the recording if needed: in the Listen Interaction dialog box click the Download button, in the File Download dialog box click the Save button, in the Save as dialog box click the folder in which you want to store the recording and click Save, then click Close.
6.Click the Close button to return to the Found Interactions page.
7.You can listen to and rate other recordings or click the Back link at the top of the page, below the Interactions tab, to run another search.
Saving Searches
To Save a Search:
1.On the Interactions page, configure your search by setting the parameters in the Search Parameters section.
2.Click the Save(As) button. The Set Criteria Name dialog box opens.
3.Type a name for the search and click Ok. The search is added to the Saved Criteria drop-down list.
To Run a Saved Search:
1.Select the search in the Saved Criteria drop-down list. The values in the Search Parameters change to reflect the search you select.
2.Click the Search Interactions button to run the search.
To Delete a Saved Search:
1.Select the search in the Saved Criteria drop-down list.
2.Click the Remove button.
3.Click the OK to confirm the deletion.