Creating ServiceNow Catalog
Ivanti has no control over third-party software or content and is not responsible for the availability, security, or operation, of any third-party software. If you encounter issues while setting up your integration, please contact Ivanti Support.
Before integrating ServiceNow with Application Control, create a new catalog item for Application Control in ServiceNow using the following requirements. Additional variables and an altered workflow can be configured as appropriate.
This topic will walk you through the following sections:
Creating an App Control Catalog
- Type Catalog in the filter and search for Maintain Items. When clicked that will bring up the existing catalog items that come installed by default.
- Click New.
-
Enter the catalog name, other details, and click Submit.
-
Select the new catalog and navigate to Variables tab and click New.
-
Create a New variable, Single Line Text item for each of the following:
- Question: Application / Name: Application
- Question: User Name / Name: User_Name
- Question: Computer Name / Name: ComputerName
- Question: Hash / Name: Hash
- Question: Vendor / Name: Vendor
- Question: Reason / Name: Reason
- Question: Description / Name: Description
- Question: Version / Name: Version
-
Create a new variable, and choose the Select Box option for each of the following. Under each New select box item add the Question choices options (once the select box has been created you can save time by navigating to the hamburger icon and clicking Save. This will refresh the variable page with question options):
- Question: Resource Type / Name: Resource_Type. Then, select the hamburger icon and click Save.
Text & Value: Application – Click Submit.
Text & Value: Windows Component.
-
Question: Action / Name: Action
-
Text & Value: Allow
-
Text & Value: Allow and Elevate
-
Text & Value: Allow and Elevate (Excluding Child Processes)
-
-
Question: Windows Component / Name: Component
 Text & Value
-
Add Hardware
-
Automatic Updates/Windows Updates
-
Backup and Restore Center
-
BitLocker Disable/Suspend
-
BitLocker Enable/Resume
-
Calibrate Color
-
Certificate Manager
-
Clear Type Text
-
Component Services
-
Computer Management
-
Data Sources
-
Date and Time
-
Default Location
-
Defragment
-
Desktop DPI
-
Device Manager
-
Disk Management
-
Display
-
Ease of Access Center
-
Easy Transfer
-
Event Viewer
-
Explorer - Advanced Security, Change Permissions
-
Explorer - Advanced Sharing
-
Explorer - Check Drive for Errors
-
Explorer - Security, Edit Users or Groups
-
Explorer - Show Quota Settings
-
Indexing Options - Advanced Indexing Options
-
Indexing Options - Pause Indexing
-
Indexing Options - Show All Locations
-
Install/Uninstall Languages
-
Internet Options
-
iSCSI Initiator
-
Local Security Policy
-
Network Connections - Advanced Sharing Settings
-
Network Connections - Local Area Connection Properties
-
Network Connections - Manage Local Area Connection (Disable/Delete/Rename/Bridge)
-
Network Connections - Manage Wireless Profile
-
Network Connections - Wireless Network Properties, Copy Profile to USB Flash Drive
-
Network Connections - Wireless Network Properties, Show Characters
-
Offline Files
-
Performance Monitor
-
Power Options
-
Printers
-
Problem Reporting
-
Programs and Features - Uninstall an Update
-
Programs and Features - Uninstall or Change a Program
-
Recovery Disc
-
Recovery Restore
-
Regional Options
-
Server Manager
-
Services
-
System
-
System Configuration
-
Task Scheduler
-
Troubleshoot
-
Trusted Platform
-
User Accounts - Manage User Accounts
-
User Accounts - User Account Control Settings
-
Windows Defender
-
Windows Features
-
Windows Firewall Advanced Settings
-
Windows Firewall Settings - Action Center
-
Windows Firewall Settings - Control Panel
-
-
Question: Duration / Name: Duration
-
Text & Value: One Hour
-
Text & Value: Four Hours
-
Text & Value: One Day
-
Text & Value: Two Days
-
Text & Value: One Week
-
Text & Value: Two Weeks
-
Text & Value: One Month
-
Text & Value: Indefinitely
-
- Question: Resource Type / Name: Resource_Type. Then, select the hamburger icon and click Save.
-
Save all the above options.
Creating ServiceNow Workflow
In this example, the workflow allows anything signed by Microsoft. This is to demonstrate what can be achieved in workflows; however, it may not be applicable in all situations. Please modify the workflow according to business requirements.
- Type workflow into the searchbox and click Workflow Editor, then New Workflow.
- Specify a workflow name, Table: Request item [sc_req_item], and click Submit.
-
Add the required workflow elements from the Core tab.
-
Utilities > X= Set Value
-
Name: Set Values to open
-
Values: State - Open
-
-
Conditions > If
-
Name: Signed by Microsoft
-
Conditions: Variables – Application Control Catalog – Vendor – Starts with - Microsoft
-
-
Approvals > Approval – User
-
Name: Manager Approval
-
Stage: Waiting for Approval
-
Approver: Users – System Administrator
-
Condition for approval:
-
Wait for: Anyone to approve
-
When anyone rejects: Reject the approval
-
Approval column: approval
-
Approval Journal column: approval_history
-
-
-
Utilities > X= Set Value
-
Name: Approved
-
Stage: Complete
-
-
Values:
-
Approval – Approved
-
State – Closed Complete
-
-
Utilities > X= Set Value
-
Name: Set Rejected
-
Stage: Complete
-
Values:
-
Approval – Rejected
-
State – Closed Complete
-
-
-
- Connect the workflow activities as shown in the below screenshot.
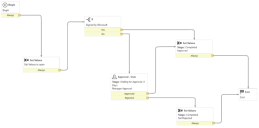
Once the workflow is complete, select the hamburger icon and click Publish.

Updating the App Control Catalog
- Navigate to the App Control catalog under the Process Engine tab > Workflow and select the workflow that you created.
- Go to the Portal Settings tab and set the Request method option to Request
- Select all the hide options in the Portal Settings tab.
- Click Edit in the Catalog Builder (top-right corner) to publish the catalog.
- Go to the Review and Submit tab on the left-hand side and then click Submit.
This action will update the status to Published.
The developer ServiceNow instances go into hibernation overnight; you have to log back in each morning to activate the instance.