Incorporating an MSI-based Software into an MSI Package
If you an incorporate an MSI-based software into an MSI Package, the following occurs:
- You use the wizard
to create a new package with the following name:
<MSI product name> <MSI product version>.
You can change the name. - You can use the
wizard to add a new transform or modify an existing one.
For existing transforms, the wizard automatically shows whether they fit the selected MSI Package or not
  .
. - You can use the
wizard to immediately add a patch.
The wizard automatically shows whether a patch fits the selected MSI package or not
  .
. - In the wizard, you define how the source files for the MSI Package (MSI file, transforms and any other files) are referenced (see below).
- You set the type of the MSI Package in the wizard (standard MSI-based software or admin installation package).
- The completed MSI package contains the eScript command MSIInstallProduct, which will install the selected MSI-based software.
The MSI Package will always be created with the following settings:
- Type of installation: computer-related
- MSI logging option: NORMAL
- Advertisement mode: No advertisement (application is installed completely)
You can change these default settings by editing the MSIInstallProduct command (see the section entitled Changing the settings for an MSI-based Software).
To incorporate an MSI-based Software into an MSI Package, proceed as follows:
- Select the desired software folder in the Software Library.
- Choose the
Create an Application Package > MSI Package task and
follow the wizard.
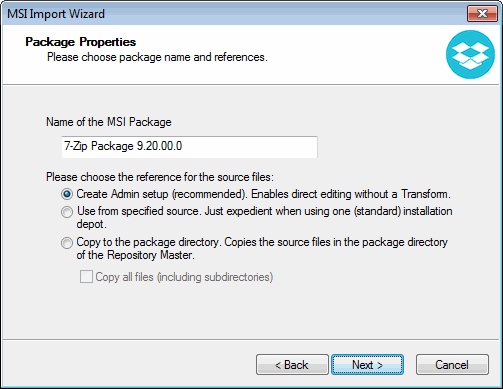
Above all you define where the source files for the MSI Package (MSI file, transforms and any other files) are to be stored.
The options have the following meanings:- Create Admin setup (recommended)
An administrative installation (also known as an admin setup) is a special variation of an MSI-based software. It allows an MSI-based software to be altered directly, without requiring a transform. This way allows, for example, license information to be added directly to the MSI file.
Also, admin setups are unpacked separately, and can be patched directly.
The files are automatically distributed to the local depots if you have defined the distribution for the package (see the section entitled Distributing Packages). - Use from specified source
When you want to use a (fixed) installation server (not recommended), choose the option Use from specified source. In this case, Ivanti DSM will not distribute the files. You must make sure that the files are available on the installation server. - Copy to the package directory
The files will be copied into the subdirecory Extern$\Msidata under the package directory in the master repository.
If the application files are not included in the MSI file, you will also need to activate this option: Copy all files (including subdirectories).
As far as distribution and source paths go, the same conditions apply for admin setups as for Create Admin setup.This option has the advantage that Ivanti DSM will change the MSI source paths automatically whenever the managed computer's location changes. If the MSI-based software needs to be post-installed or repaired by the Windows Installer at any point, this is done via a local depot and not from the original source.
Admin setups and "normal" MSI-based software, which are in the package directory, are by default created as (DSM) MSI Package. This allows the subsequent addition of transforms and patches with the MSI import wizard.
- Create Admin setup (recommended)