Commands
NetInstall Spy commands:
Example
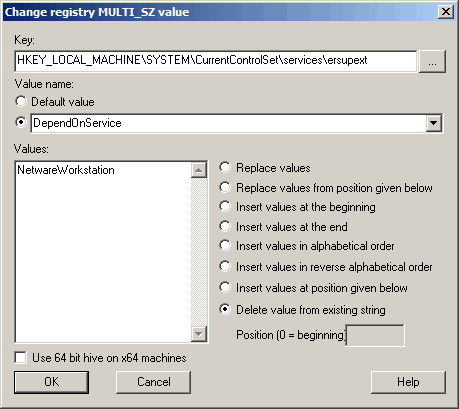
Deletes the value NetwareWorkstation from the key HKEY_LOCAL_MACHINE\SYSTEM\CurrentControlSet\services\ersupext\DependOnService.
Definition
Use this command to change or extend a registry Multi_SZ value.
This command allows you to create, delete and modify REG_Multi_SZ
values. When performing an analysis, NetInstall Spy records changes to
these values and automatically creates the required command.
Multi_SZ-values:
![]() Background information.
Background information.
Please be very careful
when using this command!
Changing Multi_SZ values can seriously
damage your operating system!
If an error occurs while running the command, the script stops. If you want to continue the script if there is an error, enable the setting  Continue script despite error in the Script Editor.
Settings
Input
- Key
Specify the registry key (branch) you want to change. - Value
name
Either the default value of the key or the name of a different value. If this is present on the workstation, it can be selected. - Values
The values to be specified.
The action to be performed for the respective value can be specified via the radio buttons.
Options
 Use 64 bit hive on x64 computer
For reasons of compatibilty, Ivanti DSM maps file and registry access to the default storage location for 32 bit applications (provided that the storage location differs from that of 64-bit applications). File access: whenever a 32-bit application attempts to access %windir%\System32, the access is redirected to %windir%\SysWOW64. Registry commands: when accessing HKEY_LOCAL_MACHINE\SOFTWARE the calls are redirected to HKEY_LOCAL_MACHINE\SOFTWARE\Wow6432Node. The x64-switch stops this redirection of file and registry accesses when running the script command on a x64 computer; the eScript command runs on the specified path. CallScript command: the script runs in a 64-bit process.
Example
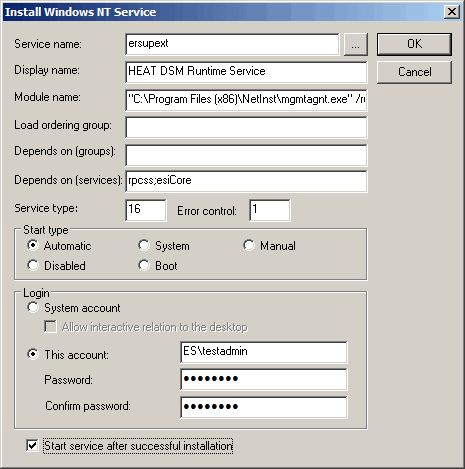
Installs and starts the DSM Runtime Service.
Definition
Use this command to install a service or a device for Windows. It is not recommended to install devices.
NetInstall Spy automatically creates this command.
Settings
Input
Please note that you should not fill in this dialog box manually; use the Browse
button next to the first text box to find the service you want to install. All the other text boxes will be filled in automatically;
you can only change the login values.
- Service name
Specifies the service name in the service database. Click Browse to select a specific service from the service database. When the service name is displayed, all the other text boxes will be filled in automatically.
The location of the service database is in the registry key: HKEY_LOCAL_MACHINE\SYSTEM\CurrentControlSet\Services. - Display name
Describes the service (full name). (This is the name displayed in the Services dialog box on the Control Panel.) - Module name
Specifies the full path and the name of the service's executable file (.EXE). - Load ordering group
Displays the load ordering group (all services can be grouped in load ordering groups). The list of available service groups is located in the registry key:
HKEY_LOCAL_MACHINE\SYSTEM\CurrentControlSet\Control\ServiceGroupOrder. - Depends on (groups)
Displays the load ordering group the selected service depends on. The service will only run if at least one member of the group is running (after trying to start all services within a group). - Depends on (services)
Displays the service the selected service depends on. The selected service will only run if this service is already running. - Service type
Displays a bit pattern specifying the service type. Allowed values:
1 (SERVICE_KERNEL_DRIVER)
2 (SERVICE_FILE_SYSTEM_DRIVER)
4 (SERVICE_ADAPTER)
8 (SERVICE_RECOGNIZER_DRIVER)
16 (SERVICE_WIN32_OWN_PROCESS)
32 (SERVICE_WIN32_SHARE_PROCESS)Detailed information on the service types can be found in MSDN (CreateService).
If you specify either 16 or 32, and the service is running in the context of the local system account, you additionally specify the following value by adding it: 256 (SERVICE_INTERACTIVE_PROCESS). Example: 16+256=272 - ErrorControl
Specifies the behavior of the service in case of an error during service startup.
Options
Start type
To change the start type of the service, select one of the following options:
•Boot starts the service when the workstation is switched on.
•System starts the service at operating system startup after the services with the start type Boot have been started.
•Automatic starts the service automatically after the services with the start type Boot and System have been started.
•Manual allows a user or a dependent service to start the selected service.
•Disabled prevents the service from being started by a user. The service can only be started by the system.
Changing the start type of a service with the start types Boot or System can put the system into an unstable condition
Sign in
Determines whether a service logs in with a system account or with a user account. Most services log in with a system account.
(Apart from the DSM Runtime Service, the directory distribution service
and the schedule service are usually the only Windows default services that log in with another user account).
•System account
Select this login option if you want the service to log in using a system
account. Check the Allow interaction with the desktop checkbox if the service may provide a user interface for every user who is logged in when the service is started.
•Allow interaction with the desktop determines, if the service may provide a user interface for every user who is logged in when the service is started.
•This account
Select this login option to assign a particular user account to a service. Enter the account name with the syntax Domain\UserID. Enter the password for the user account and confirm by re-entering it in the Confirm Password text box. Please note that password entries are case-sensitive.
•Start service after successful installation
Starts the service immediately after it has been installed. Then you no longer need to use the command StartService.
Example
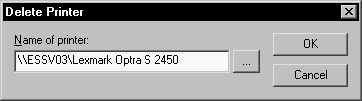
Deletes the printer "Lexmark Optra S 2450".
Definition
Use this command to delete a connected network printer.
Please note that the printer needs to be installed on the workstation where
you create the installation package.
Use the command AddPrinterConnection to connect printers.
You cannot use this command
to uninstall local printers that have been installed using the command
InstallPrinter.
The NetInstall Spy does not generate
this command.
Settings
Input
- Printer
name
Displays the name of the printer you want to delete.
Usage
To use the command:
- Install the printer using an administrator account.
- Select the NetInstall command DeletePrinter.
- Select the printer you want to delete and click OK.
- The
Delete Printer text box is filled now.
Use the Browse button to open the printer list anew.
Example
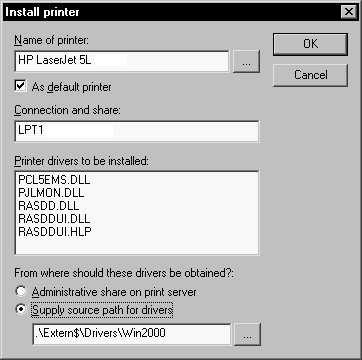
Installs the printer "HP LaserJet 5L". The printer is connected to the port LPT1: and the required driver files will be copied automatically to the local workstation.
Definition
Installs a local printer.
Requirements for incorporating the command:
- The printer must be installed on the computer on which the installation package is generated.
- The printer is
"supplied with the operating system", i.e. installation of the
printer is included in the operating system's scope of delivery.
(For printers which are not included in the delivery: see Installation of printers not supplied with the operating system).
This command is not generated by NetInstall Spy.
You cannot use the InstallPrinter command to install Plug
& Play printers.
Instead, please create a package to install the Plug
& Play device (Insert > New >
Package for Plug&Play Devices).
Proceed as follows to include the command:
- Install the printer with the mechanisms provided in Windows using an administrator account.
- Open the required package in the script window of the NetInstall Manager.
- Select command InstallPrinter. The Select Printer dialog appears.
- Select the required printer. Click OK.
- The
Install printer dialog appears. Values are
already defaulted in the text fields. You will normally not need to change
anything. You can substitute fixed values with variables if required.
You can select another printer by clicking the Browse button. - Click OK. This takes you back to the script window.
Settings
Input
Input in the dialog Install Printer:
- Printer
name
The descriptive name of the printer. - Use
as default printer
The printer is defined as default for all programs. - Port
name /Share
The port the printer is connected to and is available at.
Windows printer
\\Server\<Share>. The value can be changed.
Printers addressed as UNIX print queues
- via default TCP/IP-Port (Windows 2000 and higher): IP_<IP Address>
- via LPR port (Windows NT 4.0 and higher): <Printer>:<Queue>
The value cannot be changed.
See also: UNIX Printer Queues - Files
to be installed
The driver files for this printer.
The content of this field cannot be changed. - Source
path for driver files
The path on which the driver files for this printer are located.
Two options are available:- Administrative share on the print server
Relates to administrative (hidden) share print$:
The directory w32x86 of the administrative share print$ (%winsysdir%\spool\drivers\w32x86) is used: \\servername\print$\w32x86. - Specify source path
Permits the source path to the specified directly; use the default if possible (.\Extern$\Drivers\).
Warning: If you use a path outside .\Extern$, the driver files are not replicated! Specify the path where you want to copy the driver files from.
- Administrative share on the print server
Proceed as follows:
- Record local printer installation with NetInstall Spy.
- Before and after the RegLoad command containing printer installation, insert a command to stop and/or start the spooler service. Also insert a Sleep command immediately in front of the RegLoad command.
Data located in the spooler when the service is stopped is lost.
Generating LPR ports
When generating new LPR ports, the spooler service is stopped and restarted. Data located in the spooler when the service is stopped is lost.
Support of UNIX compatibility parameters for printers addressed via the default TCP/IP port
The UNIX compatibility parameters (EnableBannerPage,
HpUxCompatibility, OldSunCompatibility)
are adopted automatically when the InstallPrinter
command is generated.
If one of these parameters is not equal to zero, a restart is requested
when the InstallPrinter command is executed.
You can suppress an immediate restart with the ClearRestartFlags command. The compatibility parameters
are only effective after a restart, however.
You can bypass the restart by inserting commands StopService
('Spooler';) and StartService('Spooler';)
after command InstallPrinter. Please note:
Data located in the spooler when the service is stopped is lost.
Data located in the spooler when the service is stopped is lost.
Definition
Use this command to set up a network printer connection and to install network printers.
The printer connection will be stored computer-related and the driver files will be used by the print server. Please note that the printer must be installed on the workstation where you want to create an installation package
The NetInstall Spy does not create this command.
Settings
Input
- Printer
name
Describes the printer.
Usage
- Install the required network printer according to Windows instructions.
- Select the AddPrinterConnection command.
- Select the required printer from the list of installed network printers in the dialog box.
- Click OK to confirm the printer. The dialog box will be closed and the command inserted into the script.
When a package is uninstalled, the following commands are "reversed" automatically:
|
Command |
Reverse |
|---|---|
|
Copy |
Delete |
|
InstallFile |
DeleteFileList |
|
InstallFileList |
DeleteFileList |
|
MakeDir |
RemoveDir |
|
CreateFolder |
RemoveFolder |
|
CreateIcon |
RemoveIcon |
|
CreateInternetLink |
RemoveLink |
|
CreateLink |
RemoveLink |
|
AddPrinterConnection |
Deletes the connection |
|
InstallService |
UninstallService |
|
MSIInstallProduct |
MSIUninstallProduct |
|
RegLoad |
Deletes the keys |
The following command is created by NetInstall Spy and can be reversed only under specific conditions:
|
Command |
Action during uninstallation |
|---|---|
|
AddINI |
CONDITIONALLY REVERSIBLE…
The following rules apply: Background information: If the INI files resides in the Windows directory the Installer makes use of a reference counter for every section that AddINI modifies.
|
|
REVERSABLE…
Please note: |