Importing data from Ivanti Cloud
You can import data from Ivanti Cloud using the Cloud connector designed for your data source. You must be an Asset Administrator to do this and have accounts for both Ivanti Cloud and Asset Manager Cloud.
There are three types of records you can import into Asset Manager from Ivanti Cloud:
•Software inventory – Licensable software records that will display in two places:
•The Hardware Assets workspace > Licensable Software tab for individual devices with that software installed.
•The Software Assets workspace > Installations tab for a manufacturer, listing all devices with that software installed.
•Invoices – Records for vendor invoices that are associated with asset purchase orders. These will display in the Invoices workspace.
•Devices – Hardware asset records that will display in the Hardware Assets workspace.
The process
You must have all aspects of your Ivanti Cloud account set up and ready to use with Asset Manager Cloud. This includes:
•Reviewing the two emails from Ivanti regarding your account—the first contains the URL to the Ivanti Cloud website along with account details, and the second contains the encrypted password needed to access the account.
•Working with your Ivanti representative to ensure that the tenants for both Ivanti Cloud and Asset Manager are set up to communicate with each other during the data transfer.
•Configuring the Ivanti Cloud connector for your data source. For details, see the product help in Ivanti Cloud or under the Cloud link at help.ivanti.com.
Next, follow the process outlined below to import the records into Asset Manager. You’ll need to be logged in to both Ivanti Cloud and Asset Manager Cloud to monitor the end-to-end import as it’s occurring.
The general steps for the import are:
•In Asset Manager Cloud:
•Select the types of records you want to import—current options include software inventory, invoices, and devices. (See procedure below.)
•If you're importing device records, also configure the CI import process for the platform you’re using. (See procedure below.)
•In Ivanti Cloud, run the data connector to start the import process. The connector will begin pulling records into Cloud from the data source, then over into Asset Manager. If needed, you can set a schedule for recurring imports.
It should take no longer than several minutes for the import process to begin populating the Asset Manager database. If this doesn't occur, contact Ivanti customer support for assistance.
•In the Asset Manager > Integration Queue workspace, monitor the progress, which may take a while. Refresh the page as often as needed.
•You’ll see the status of the import job go from Queued to Running to Completed. The job will disappear from this workspace once completed, but historical information about it is saved in the Integration History workspace. If you ever need to troubleshoot an import job that has failed, your first step would be to view the Integration History workspace.
•While the job is occurring, you can view any related details in the Message Queue Journal workspace.
•Once the job is finished, the records will display in the correct workspace for the record type, as mentioned above. You may need to refresh those workspaces (Hardware Assets, Software Assets, and Invoices) before the records display.
Note that device records import into the Hardware Assets workspace as an unmanaged asset type (ivnt_UnmanagedAsset). You'll need to change the unmanaged status of these records to a managed asset type and subtype. (See procedure below.)
Note that this workspace includes a New Ivanti Cloud Asset Import Configuration option to add your own record types, but this feature is currently disabled and for future use only.
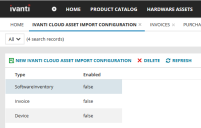
1.Open the Ivanti Cloud Asset Import Configuration workspace.
2.In the list view, double-click the record type you want to import—current options include software inventory, invoices, and devices. Note that by default, all record types are turned off (shown as false).
3.Click the Enabled check box.
4.Click Save, then click List View. Repeat for each record type you want to import.
Enabled record types should now display as true, which means that the Ivanti Cloud connector will actively import data for that type until you disable it again.
This procedure is only necessary if you're importing device records.
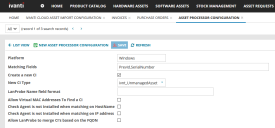
1.Open the Asset Processor Configuration workspace.
2.Double-click the platform you’re using (in this case, Windows).
3.Click the Create a new CI check box.
4.For New CI Type, ensure that ivnt_UnmanagedAsset is selected.
5.Leave the other options as-is or blank.
6.Click Save, then click List View.
The imported records will display in the Hardware Assets workspace as unmanaged until you change the status. See the next procedure for how to change the status.
1.Open the Hardware Assets workspace.
2.In the list view, expand Asset Type: ivnt_UnmanagedAsset.
3.Manually select the records in the list.
4.In the upper-right area of the page, click the More drop-down menu and select Administration Actions > Change Asset Type.
5.In the Enter dialog, select the correct type and subtype from the drop-downs.
6.Click OK. The workspace list view will update accordingly.