Customizing asset data imports
This topic is specific to Asset Manager Cloud.
Asset Administrators have the option of creating device parent type/subtype filters and field mappings to define how the Ivanti Neurons connector will import source asset into Asset Manager. These customizations provide a high level of control over how the data is displayed in Asset Manager and are the most efficient way of importing a large number of devices at one time.
You can export the connector customizations as a package, then test them in a staging or UAT environment before using in a production landscape to sync data from Ivanti Neurons. The package enables you to duplicate the customizations across multiple tenants, each of which must be installed with the most recent version of Asset Manager.
To access this feature, you're required to apply Asset Manager content package update Drop #21 (202002) and above, which is downloadable from the Ivanti Marketplace. (Note that Drop #21 may be part of a consolidated package.)
Non-computer asset type support
This content package also provides SNMP connector support for importing non-computer asset types from Ivanti Neurons. For example, printer data received from Ivanti Neurons can be imported as a Printer subtype into the Asset Manager database.
To enable support, you must first create a new subtype mapping for the non-device type in the Asset Sub Type workspace under one of the existing parent types. You can then add the required mapping for the SNMP connector by following the next procedure.
1.Open the Asset Manager configuration console by clicking the  icon in the top right of the header bar.
2.Click Extend > Integration Tools > Data Import Connections in the left navigation pane. The Data Source Manager page lists all data import connections currently defined for your installation.
3.Scroll down the list to the Ivanti Neurons Connector – Device link. Ensure that the connector is ON and click the link to open.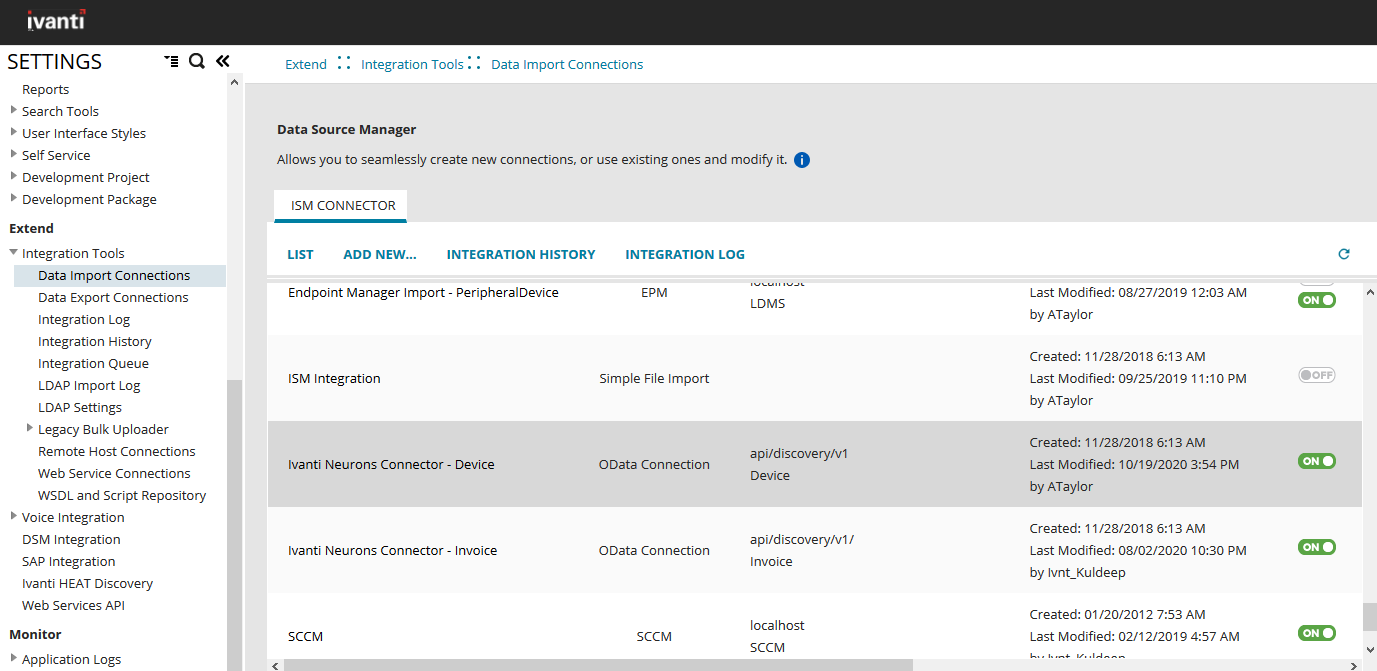
4.Connection Setting page: In most cases, you'll want to leave the default settings as they are, though you can change as needed. Click Test Connection near the bottom of the page to verify that your connection settings work. If successful, click Next.
5.Object Mapping page: In most cases, you'll want to leave the default settings as they are. Source mapping tables is a list of populated tables based on the defined Ivanti Neurons connector object from the previous page. Batch size is the total number of records processed for any given job. Max size is the number of records retrieved each time the database is queried. Root table is the primary table containing the master data that uniquely defines all devices in your organization. Unique key uniquely identifies all devices in your organization. Change-Time column is an attribute that records the date/time of devices each time they’re updated in the Asset Manager database.
6.Click Next.
7.Filter Setting page: Click Create Filter to define the filter conditions for the devices you want to import. Based on the filter settings defined, only those devices will be imported into the database. For example, you can choose to import an asset type of Laptop by creating the filter value Laptop as shown below.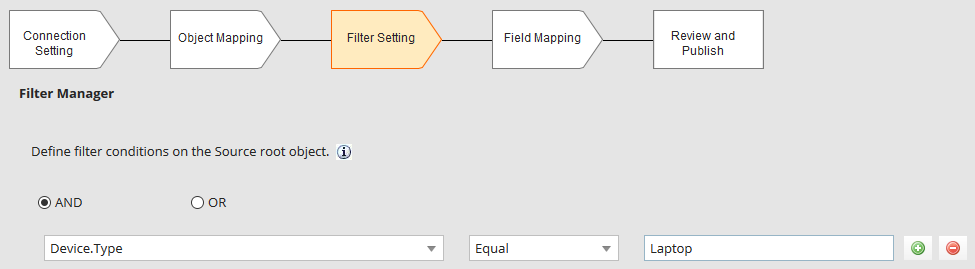
•In the left drop-down, select a field from the source database. For this procedure, select Device.Type, but you can create filters for different fields as well. Ensure that you do not select a field that results in a collection of values being imported from Ivanti Neurons—filters will not work for those fields. For example, don’t select a value such as Device.BIOS.BIOSSettings.
•In the middle drop-down, select a function. In most cases, you’ll want to select Equal.
•In the field to the right, enter your filter condition. You can only add one filter per row.
•Use the AND/OR conditions as necessary and click the  icon to add more filters to the list. To remove a filter, click the
  icon.
icon.
8.When finished, click Next.
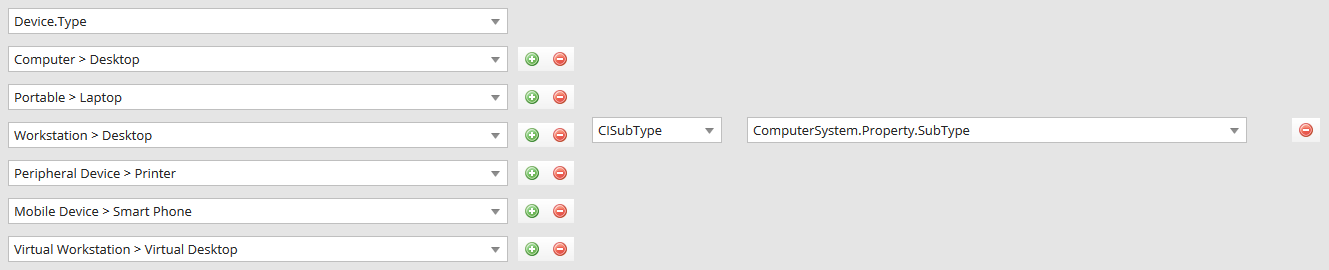
9.Field Mapping page: Use this page to define how fields in the source database are mapped to fields in the Asset Manager database. The newly added map types of CIParentType and CISubType reconcile the asset parent type and subtype of the imported records based on the “type” received from Ivanti Neurons (as defined in the Asset Sub Type workspace).
Always ensure that both the parent type and subtype mapping are up to date in the Asset Sub Type workspace. This mapping will determine the asset import categorization. Also note the following:
•If CIParentType reconciliation doesn't find a proper parent type in the Asset Sub Type workspace, then the parent type will be mapped to the New CI Type category as defined in the Asset Processor Configuration workspace (by default, ivnt_UnmanagedAsset). The device record will display in the Hardware Assets workspace under the same category.
•If CISubType reconciliation doesn't find a proper subtype in the Asset Sub Type workspace, then the asset import will fail.
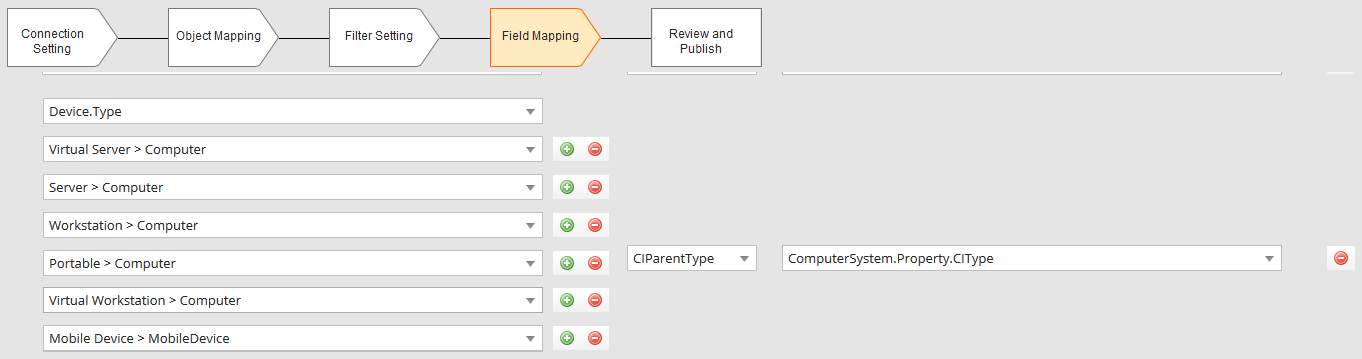
•The left column displays the source field names, and the right column displays the target field names. It’s assumed that you know the source mapping names in advance. If you need sample mapping scenarios, see the section below.
•Scroll down the page until you find the Device.Type source field in the left column. (There will be two Device.Type sections. In the first, you’ll select the CIParentType mapping. In the second section, you’ll select the CISubType). Note that to have a CISubType field mapping, it's mandatory to first have a CIParentType mapping.
•Under the Device.Type source, use the drop-downs to select the asset parent type you want imported into the database.
•From the middle column drop-down, select CIParentType.
•From the right column drop-down, select ComputerSystem.Property.CIType for the field you want to map to.
•Scroll down to the second Device.Type source field in the left column. Use the drop-downs to select the asset subtype you want imported into the database.
•From the middle column drop-down, select CISubType.
•From the right column drop-down, select ComputerSystem.Property.SubType.
10.When finished, click Next.
11.Review & Publish page: Click Preview to ensure that the mappings look as expected. Click Back to make any changes. When you’re satisfied with the results, click Publish. The options for Publish to Run Now and Publish & Test Run are currently disabled for the Ivanti Neurons connectors (Device and Invoice).
Filters and field mappings are saved for future imports until you manually change them again. After publishing, you'll want to test that the customizations work as intended. For details, see the following section.
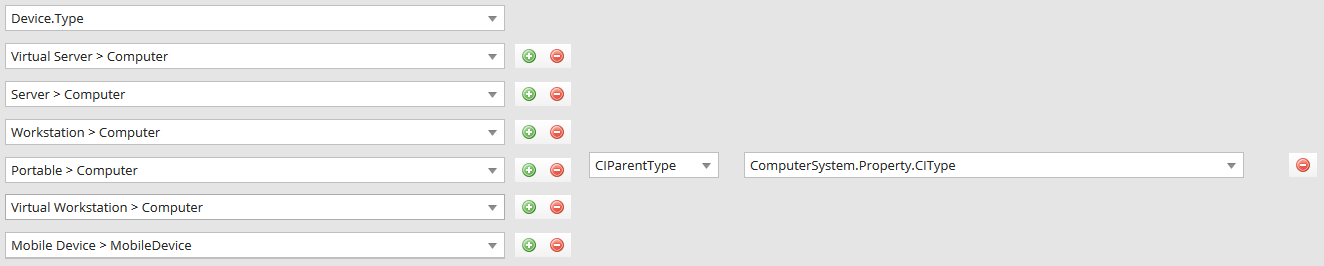
Use case 1: For the mapping Portable > Computer = CIParentType = ComputerSystem.Property.CIType shown below, the asset imported from Ivanti Neurons having Device.Type > Portable is mapped to the parent type Computer in Asset Manager. Hence, the device is imported under the parent type of Computer.
Use case 2: If you create a mapping of Laptop > Computer = CIParentType = ComputerSystem.Property.CIType, it won't work if Laptop isn't also defined in the Asset Sub Type workspace. In this situation, devices of type Laptop will be moved to the New CI Type category defined in the Asset Processor Configuration workspace (by default, Ivnt_UnmanagedAsset) and will display in the Hardware Assets workspace under that same category.
Use case 3: If a CIParentType mapping is not defined in the Ivanti Neurons connector Field Mapping page, then the New CI Type category defined in the Asset Processor Configuration workspace will be used (by default, Ivnt_UnmanagedAsset), and the device will display in the Hardware Assets workspace under that same category.
Use case 4: With the subtype mapping Portable > Laptop = CISubType = ComputerSystem.Property.SubType shown below, the Device.Type received from Ivanti Neurons as Portable is imported as subtype Laptop under the parent type of Computer.
Use case 5: If a Device.Type is received as Laptop, which does not exist in the mapping (left panel), then this subtype will be considered as Laptop in Asset Manager.
Testing the connector customizations
It's recommended that you export your customizations as a metadata package and test them in a staging or UAT environment before importing into a production landscape. The process follows these general steps which are detailed in the procedure below:
In all cases, the latest version of Asset Manager must be installed on your tenants.
•Export the customizations as a package that includes the default table selection, filter options, and field mappings created in the procedure above.
•Contact Ivanti to have them point Ivanti Neurons to your staging or UAT tenant.
•Import the package to the same staging or UAT tenant and test it. Make any necessary changes.
•Contact Ivanti again to have them point Ivanti Neurons to your production tenant.
•Import the package to your production tenant in preparation for importing data from Ivanti Neurons.
Important:
•The following procedure is applicable only for an update scenario; exported packages won’t create new connections if the connector doesn't already exist as part of your installation.
•Create a backup of your database before applying the package.
•Clone and delete actions for Ivanti Neurons connectors (Device and Invoice) are currently disabled or have been removed.
1.From the Asset Manager configuration console, click Extend > Integration Tools > Data Import Connections in the left navigation pane.
2.Scroll down the list to the Ivanti Neurons Connector – Device link. Scroll to the far right of that link and click the  icon to export the customizations as a package. In the Warning dialog that displays, click Continue. The package is exported to your Downloads folder.
3.Contact Ivanti to have them point Ivanti Neurons to your staging or UAT tenant.
4.From your browser, log into a staging or UAT tenant and open the Asset Manager configuration console.
5.Click Build > Development Package > Packages in left navigation pane. Ensure that you're in the list view, then click Import Package (top right of the toolbar).
6.Browse for and open the customization package. In the dialog that displays, click Preview Impact to view details about how this package may impact your database. Click Execute to apply it; this process may take a few minutes to complete.
7.Verify that the package works as intended and make any necessary changes.
8.Contact Ivanti again to have them point Ivanti Neurons to your production tenant.
9.Import the package to your production tenant. If needed, you can duplicate the package across multiple production tenants.
Once you've completed this procedure, you can begin the actual import process from Ivanti Neurons. For details, see Importing data from Ivanti Neurons.