Managing Deliveries and Inventory Lifecycle
You can associate one or more invoices with a purchase order to help you to track the invoices from your vendor and highlight any differences between the total cost from all of the invoices and the expected cost that was recorded on the purchase order.
1.Open the required purchase order, and click the Invoices tab.
2.Click New Invoice. The new invoice dialog displays with the Purchase Order field completed.
3.Enter the Invoice Number from your vendor.
4.Optionally, enter the Invoice Date, Freight Charge, and the Invoice Total, then click Save.
The invoice is added to the purchase order and to the Invoices workspace. The Invoice Total on the purchase order updates to show the sum of the invoice totals from all of the invoices associated with the purchase order.
If the invoice totals from all of the invoices associated with the purchase order do not add up to the Total Cost of the purchase order, the Invoice Total label is highlighted in red.
You can associate one or more shipments with an invoice. Shipments enable you to specify a destination location and storage space for the shipment, so that you don't need to specify this individually for each delivered asset.
Shipments that you add to an invoice also display in the Shipments workspace, where you can manage them.
1.Open the Invoices workspace.
2.Double-click an invoice in the list view to open it.
3.Under the Shipments tab, click New Shipment.
4.Enter the Shipper and Shipment Number that was provided by the vendor.
5.If your shipper has provided tracking information, add the Tracking Number and the URL for their Tracking Site. If the URL to track your shipment is created by appending the tracking number to the URL provided in the Tracking Site field, click the Append Tracking Number to URL check box. Click Here displays under the Tracking Site field. Clicking this link opens the tracking site in a new tab.
6.Enter the Destination Location and Destination Storage Space.
7.Click Save. The shipment is added to the invoice.
When the ordered assets arrive, you can manage their delivery and storage from the Assets tab on the Purchase Order, Invoice, or Shipment workspace as needed.
1.Open the appropriate purchase order, invoice, or shipment, then click the Assets tab. The template asset records for the ordered items are displayed if you're using a purchase order.
If you're using an invoice or a shipment, link the required assets by clicking Link. You can link all of the assets on a purchase order to an invoice by clicking Add All PO Assets at the top of the form, or you can link all of the assets on an invoice to a shipment by clicking Add All Invoiced Assets at the top of the form.
2.Select the assets that have been delivered and click Take Delivery. You can do this for individual hardware assets and consumables, or on a selection. The enter dialog displays.
The Take Delivery button is available only if hardware assets already have their Serial Number set. To add the serial number, double-click the asset and open the edit dialog. The Take Delivery button is always available for consumables, even though they don't have serial numbers.
3.Use the Condition drop-down to select the condition that the asset was in when you received it.
4.If you're taking delivery from a purchase order or an invoice, set the Location and Storage Space where you've placed the asset, then click OK.
If you're taking delivery from a shipment, these fields are not displayed, as they are populated using the values from the shipment. The Status for the asset updates to In Stock.
You can use the Ivanti Neurons ITSM & ITAM smartphone app to take delivery of hardware assets that are line items of a purchase order. Use the app to scan asset barcodes into the database at the point of delivery.
This feature is available as part of the latest version of the app. For details about downloading and setting up the app for use in your organization, see Mobile app.
Getting started
Before you can take delivery via the app, complete the following steps:
•Important: After app setup is complete, contact Ivanti support and ask that they turn on the EnableReceivingNewAssets feature on your ITAM Cloud or On-Premises tenant. You can't take delivery via the app if this feature isn't enabled.
•Ask the Asset Administrator to assign you the Mobile Asset Manager user role to use the app.
•Create and save a purchase order in ITAM with one or more hardware line items as described in the procedure above. When adding each hardware line item, fill in the fields for Item Name, Type, Sub Type, Quantity, and Cost Per Unit. The product automatically calculates the Total Cost. Leave the Create Asset check box selected to create template asset records once the order is submitted.
•Submit the purchase order for approval. This action will update the order to Approved status, and the template asset records will display under the Asset tab with a status of On Order.
•Define a delivery location with a storage space within ITAM. For details on setting up both, see Locations and storage spaces.
Taking delivery
Once the assets are delivered, you can use the app to scan each asset's barcode into the database and take delivery. These actions will update the asset records with a serial number, a new status of In Stock, and a storage location.
1.Open the app on your phone. Enter your Tenant URL, then tap Continue.
2.Log in to an account with the Mobile Asset Manager user role. The home screen displays. Tap Scan Assets.
3.On the resulting page, tap Select Purchase Order and Line Item.
4.On the Currently on Order page, search for the line item of this purchase order by entering key words into the search field. The purchase order information should automatically display. Tap the purchase order you want to view.
5.Scroll down the purchase order and tap Purchase line items to expand all line items associated with this order.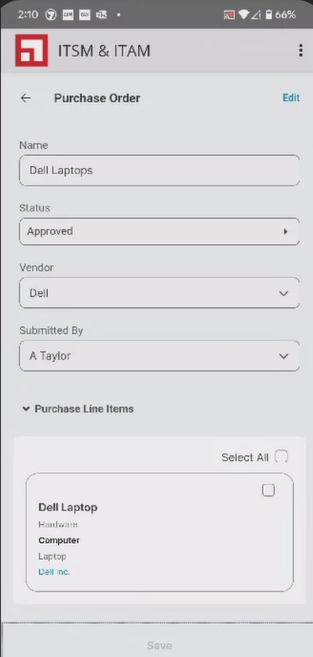
6.Tap a line item, then scroll down and tap Assets to expand all assets associated with this line item. 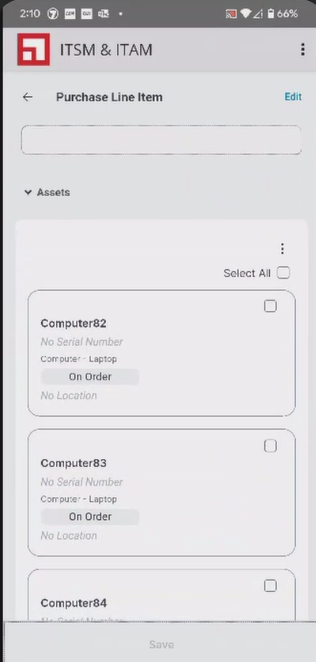
7.Tap the check box of individual assets you want to scan (or tap Select all), then tap  > Scan Now to open the barcode scanner.
8.Use the scanner to scan each barcode, then tap Done & Scan Next after each scan. Scanned assets with serial numbers will display in the lower half of the screen.
9.Once you're finished scanning, tap Finish Scan. If you get an error message indicating that a record can't be saved because the serial number already exists in the database, it's possible the barcode belongs to a different purchase order. In that case, simply tap Re-Scan to scan a different barcode.
10.To finish taking delivery for this purchase order, tap the check box of individual assets (or tap Select all to take delivery in bulk), then tap > Take Delivery. Select the asset Condition, the delivery Location, and the associated Storage Space. Click OK.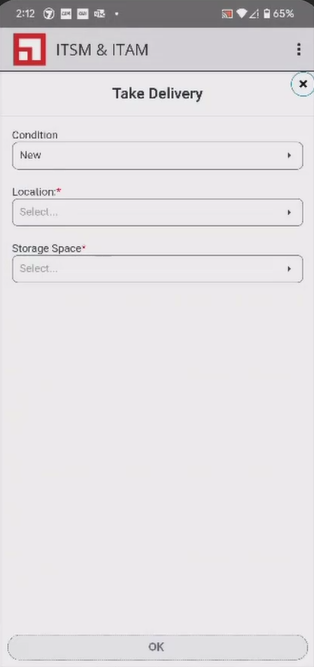
If the records were successfully updated, each asset will now have a serial number, a status of In Stock, and a storage location. The updates will display in the app, as well as in the workspaces for Purchase Orders and Hardware Assets. You may need to refresh the workspaces to see the updates.
From release 2026.2, ITAM allows partial delivery of consumables to the same or different storage locations, assignment of quantities to specific storage spaces, and stock transfers between storage locations.
1.Create Consumables
•Open the Products catalog window.
• Create required consumables and enter all mandatory details:
•Name
•Manufacturer
•Model
•SKU/Part number
•Category
2.Create a Purchase Order (PO)
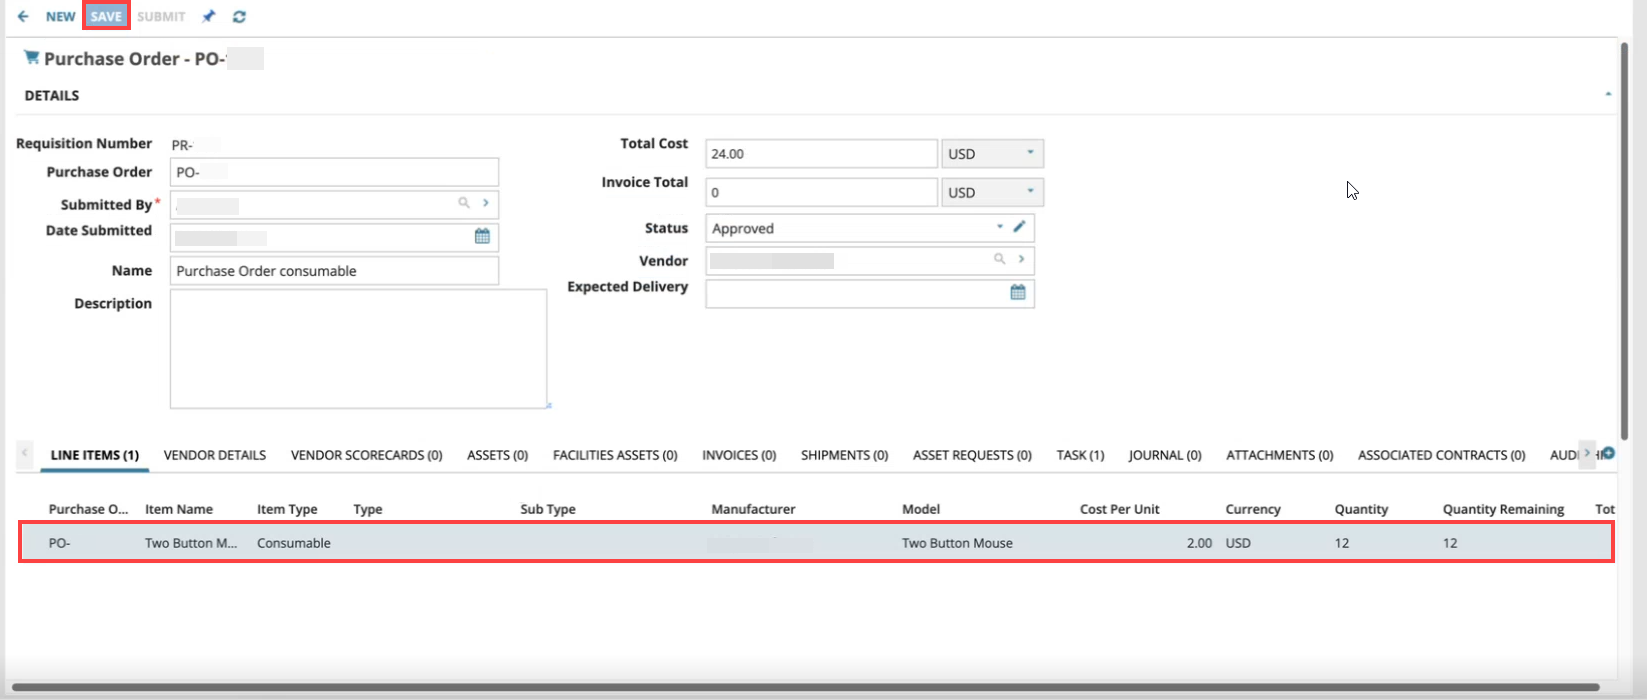
•Open the Purchase Order window and enter the following details:
•Name
•Vendor
•Submitted By
•Date Submitted
•Cost
•Click Save.
3.Under the Line items tab:
•Click New Consumable Purchase Line item,
•Enter the required quantity and cost per unit
•Add this as a line item and click Save.
4.In the Purchase Order window, click Submit.
The generated asset will appear under the Asset tab.
5.Record Delivery via Invoice
•Open the Invoice window, create an invoice for the delivery.
•Refresh the window to attach the asset to the invoice.
6.Create a Shipment
•Go to the Shipments tab, and click New shipment.
•Enter required shipment details:
•Shipper
•Shipment number
•Destination location
•Destination storage space
7.Link the invoice to the shipment
•Click Add all Invoiced Assets
The Consumables tab has the assets.
•Click Link to add the consumables
8.Take Partial or Full Delivery.
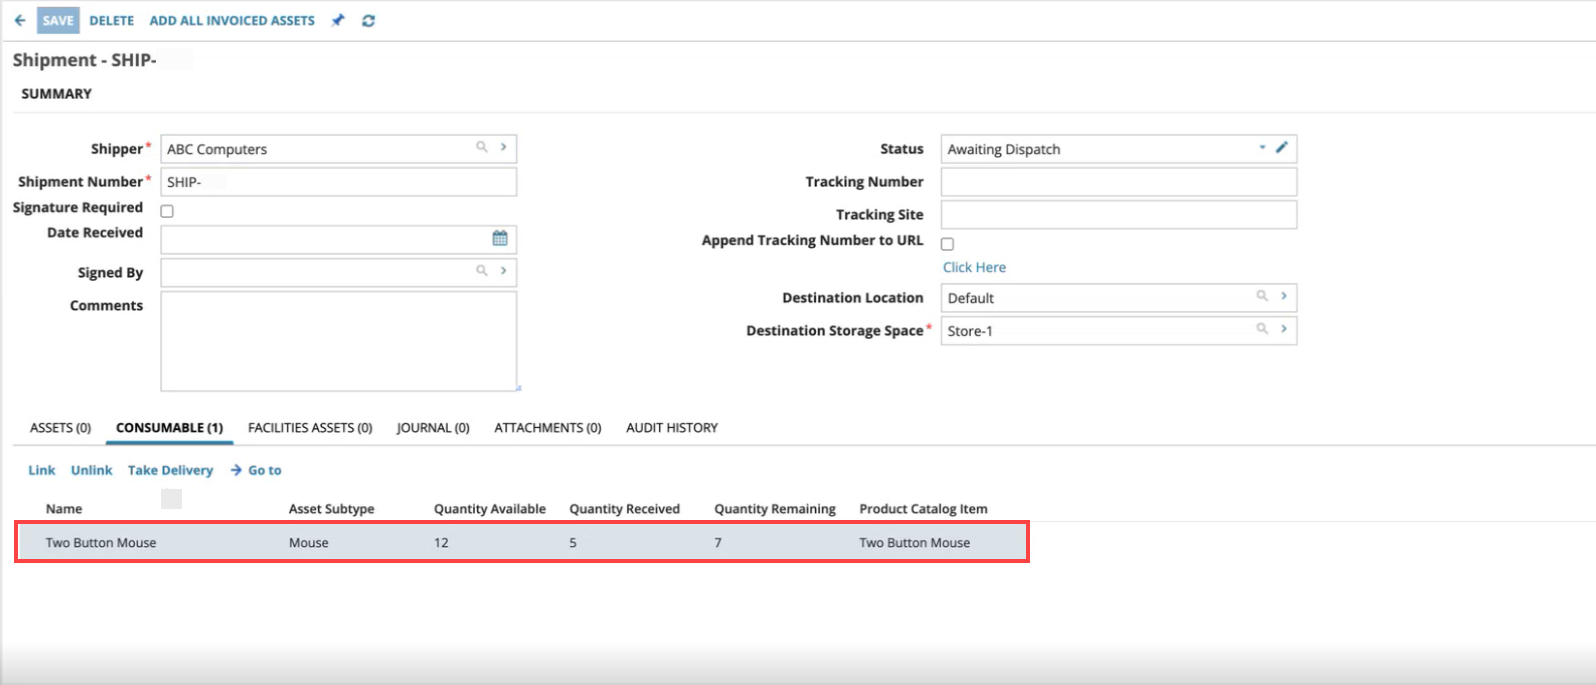
•In the Consumables tab, select Take Delivery
•Enter the required quantity to deliver and click Ok.
When the quantity received is the total quantity available, take delivery button is grayed out.
The Consumables tab is updated with the quantity received and quantity remaining for the destination storage space.
The Storage Space Transaction tab in Hardware Assets window reflects the partial delivery details.
9.To assign consumables for different storage location:
• In the Hardware Assets window, and click link in Storage space tab.
•Select required storage space and quantity then click Save.
The Storage Space Transaction tab in Hardware Assets window reflects all the delivery details.
10.To transfer or change storage location for assigned consumables:
• In the Hardware Assets window, select the storage location to remove and click unlink in Storage space tab.
•Click link and select new storage space and quantity then click Save.
The Consumables tab in Invoice window and Storage Space Transaction tab in Hardware Assets window reflects the updated storage space. The unlinked storage location is removed from the details window.