Scans via smartphones
Ivanti Neurons for ITAM (Drop #22 and above) supports the use of the Ivanti Neurons for ITSM & ITAM smartphone app to scan and track hardware assets. Use the app to scan asset barcodes, edit record details, apply a range of quick actions, and then sync those updates with the database. As of the latest version, you can also take delivery of hardware assets that are part of a purchase order. For details, see Procurement.
By default, supported asset types include computer, mobile device, general asset, peripheral device, and infrastructure (not consumables). To add support for other asset types, the Asset Administrator must first configure forms for them. For details, see the Ivanti Neurons for ITSM help topic Creating a Form.
This app is for use with asset records that currently exist in the database. You cannot use it to scan hardware assets into the database for the first time. To do that, you must use Ivanti's app for dedicated barcode scanners. For details, see Scans via dedicated scanners.
An exception to this is if you're using the app to take delivery of assets that are line items of an existing purchase order. You can scan the barcodes of these new assets because as part of a purchase order, they already exist in the database as template records (which act as placeholders for the newly scanned data). For details, see Procurement.
The app supports these barcode types:
•Linear formats: Codabar, Code 39, Code 93, Code 128, EAN-8, EAN-13, ITF, UPC-A, UPC-E
•2D formats: Aztec, Data Matrix, PDF417, QR Code
The app does not recognize barcodes in these forms:
•1D barcodes with only one character
•Barcodes in ITF format with fewer than six characters
•Barcodes encoded with FNC2, FNC3, or FNC4
•QR codes generated in the ECI mode
Setting up the app
The app is for use in an environment where both Ivanti Neurons for ITSM and ITAM are installed (not an ITAM-only environment). It works on both Android- and iOS-based smartphones.
The app consists of two parts that you need to set up before using:
1.The tenant software, which the Asset Administrator needs to download onto each tenant to be accessed via the app. Download the latest version of the software, called the Mobile Asset Manager content package, from the Ivanti Marketplace. It's recommended that you first test this package on a staging server before using it in a production environment.
In addition, ensure that each app user is assigned the Mobile Asset Manager user role (not the Asset Mobile role).
2.The smartphone software (titled the Ivanti Neurons for ITSM & ITAM app), which each app user needs to download onto their phone from the Google Play Store here (Android) or the Apple App Store here (iOS).
Scanning
With each scan, the app enables you to pull up an existing asset record to edit the details and apply a range of quick actions. By default, supported actions include assigning assets to a new location, user, or financial owner; checking assets into a storage space; transferring assets as stock to a new location; and creating a new incident related to the asset.
The procedures in this section are written for the Android-based version of the app, but the general information works for the iOS version as well.
1.Open the app on your phone. Enter the Tenant URL, then tap Continue.
When launching the app for the first time: If you don't know the URL, you can scan a tenant QR code that will enter the URL for you. For details, see the next procedure.
2.Enter your account username and password to log into the tenant.
3.To begin scanning, tap Scan Assets to display the scanner screen. Focus the barcode viewer (in portrait mode) on an asset barcode and scan the image. The asset record details will display. If the scanned barcode does not belong to a unique asset, you'll get an error message. Continue scanning as many barcodes as needed. If you scan one by mistake, click the x icon to the left of the asset to remove it from the list.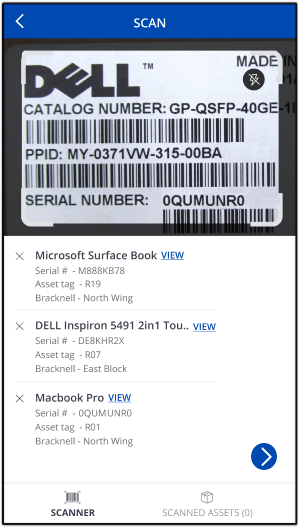
The barcode viewer enables you to zoom in or use a flash if necessary when scanning. To zoom in or out on a barcode, swipe left or right on the zoom slider. Turn the flash feature on or off by tapping the lightening bolt icon in the top right of the viewer.
You can also turn the camera off to prevent accidental scans. Do so by tapping the camera icon.
4.To view or edit the record details of a single asset or to apply a quick action, tap View to the right of the asset. From the asset details screen, you can edit some of the information and apply available quick actions (located at the bottom of the screen). Once you're finished, tap the ![]() icon to return to the scanner screen.
icon to return to the scanner screen. 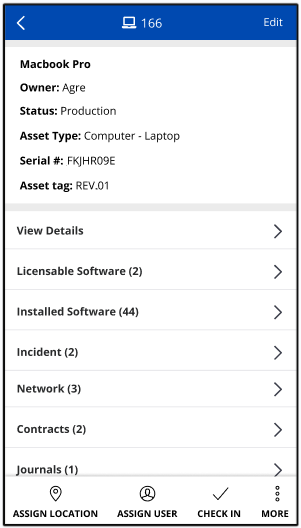
5.Once you're finished scanning, tap the ![]() icon to save the updates.
icon to save the updates.
6.From the scanned assets list, you can update the scan log. Tap the check box next to each asset to update in the log, or tap Select All for a bulk update, then tap Update Scan Log. A record of the scan will be added to the Scan Log workspace, as well as the Hardware Assets workspace > Scan Log tab of the asset record.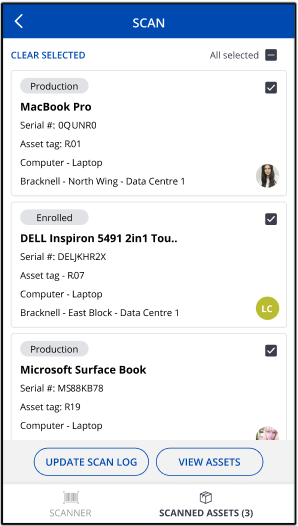
7.To apply a quick action on one or more assets, tap View Assets. This action brings up the assets list, where you can do the following:
•Apply a search filter to narrow the list. Do so by tapping the Assets by Type drop-down and selecting one of the favorite searches. To return to the default view, tap the drop-down again, then tap Assets by Type in the searches list.
•Apply a filter or sort the list by tapping the  icon, adding conditions, then tapping Apply. To remove a filter or sort action, tap the icon again and tap Clear all.
•Apply a quick action to one or more assets at a time. The asset records will be updated with the new values in both the app and the Hardware Assets workspace. Available actions are based on the asset type and current status.
8.To log out, tap the  icon in the title bar, then tap Logout.
When launching the app for the first time, you may not know the tenant URL to enter. You can use the app to scan a tenant QR code that automatically enters the URL for you. Do this just once when launching the app; the app will store the URL for future use. This feature works for both the Android and iOS versions of the app.
If it's more convenient, you can use a QR code generator of your choice to encode the tenant URL as a QR code. There are many online resources for creating QR codes, and you can circulate the generated QR code for quicker access.
To enter the tenant URL via a QR code
You must be logged into ITAM at your desktop and on the app as the same user.
1.Log into ITAM at your desktop as a Mobile Asset Manager (or as a Mobile Analyst or Self-Service Mobile user if using Ivanti Neurons for ITSM).
2.Click the  icon in the upper right corner of the page. A QR code for the tenant will display as shown below:

3.Open the app on your phone, aim it at your desktop screen, and tap Scan Tenant QR to scan the tenant URL into the app.
4.Enter your account username and password to log into the tenant, then begin using the app as you normally would.
To disable the QR code feature
By default, the  icon displays for users assigned the Mobile Asset Manager role, enabling them to scan a QR code to obtain the tenant URL. Asset Administrators can disable this feature if needed.
1.Log in as Asset Administrator.
2.Click the  icon in the menu bar at the top of any workspace. The Configuration Console displays in a new browser tab.
3.In the left navigation pane, expand Build > Global Constants.
4.At the top of the list, click Add to add a new global constant.
5.Name the global constant MobileTenantURLQRCode with a value of False and type of Boolean.
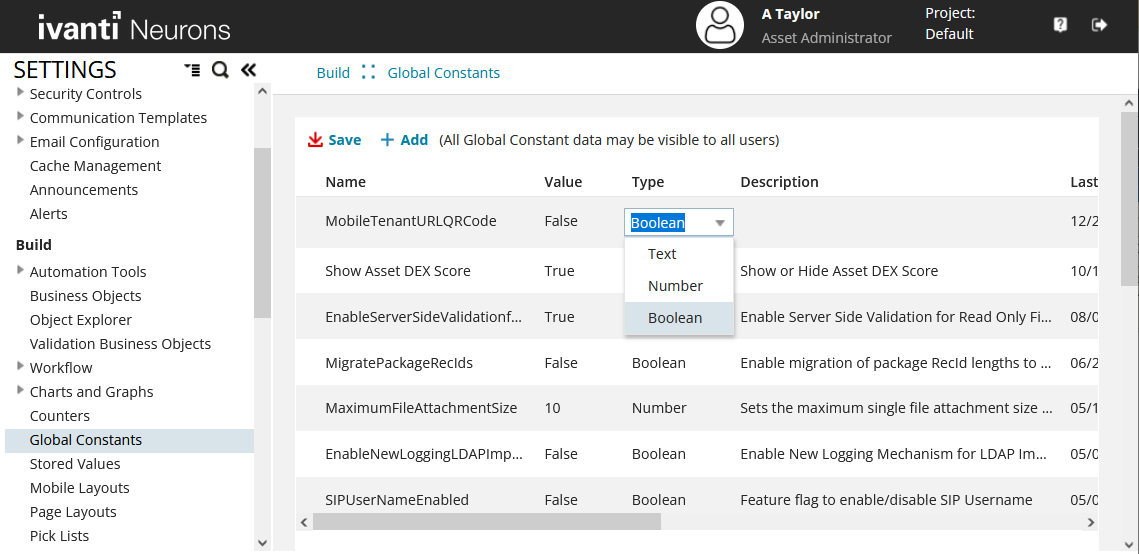
6.Click Save.
Now, when a Mobile Asset Manager user logs into ITAM (or Mobile Analyst or Self-Service Mobile user logs into Ivanti Neurons for ITSM), the icon will not display.
To display the icon again, simply change the value of this global constant to True and save the change.
Adjustable scan settings include:
•Auto Scan: Toggle off the default auto-scan mode to enable manual scans. Once Auto Scan is off, the app will stop scanning barcodes automatically. To scan assets in manual mode, aim the barcode viewer on an asset barcode, then tap the Scan Now button.
•Beep Sound: Toggle on a sound to indicate that a scan has occurred.
•Vibrate: Toggle on a vibration to indicate that a scan has occurred.
To access the Scan Settings screen, tap the icon on the scanner screen and select Settings. Toggle the options on or off, then tap the Apply button at the bottom of the screen.
Offline scanning
The details in this section are written for the Android-based version of the app, but the general information works for the iOS version as well.
If internet connectivity is lost while you’re logged into the app, you can continue to scan barcodes as you would normally. For example:
•If you’re logged in but lose internet connectivity before scanning begins, go ahead and scan. Later, when you’re logged in and back online (using the same user account), the app will automatically sync the scans with the database and display the asset details.
•If you’re logged in but lose internet connectivity while scanning, continue to scan. Later, when you’re logged in and back online (using the same user account), the app will ask if you want to sync the barcodes that were scanned offline or start over. Click Use items to sync the scans with the database, or click Start new to discard those barcodes and start over.
In a third scenario, if you’re not logged into the app and are offline, you can take photos of the barcodes, then use the app to scan the images once you’re logged in and back online. To do this:
•From the app’s Home > Scan Assets > scanner screen, click the  icon (top right of the screen) to open your list of photos. Manually select the photos to scan. The app will automatically scan the barcodes from those images, then fetch and display the asset details. You can perform the actions you would normally, then sync the updates with the database.
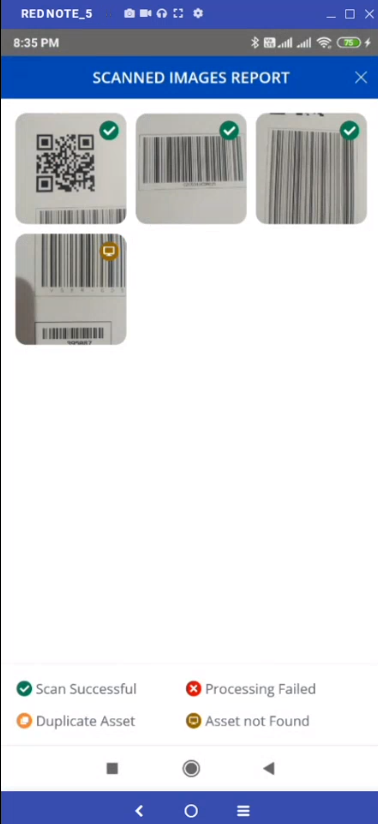
•To view which images were successfully scanned, click View Scanned Images Report (near the top of the screen). If there's a problem, the app will indicate that one of several issues has occurred:
•Processing Failed: The barcode wasn't in focus or was cut off when the photo was taken.
•Duplicate Asset: The barcode is a duplicate of a previously scanned asset.
•Asset not Found: The asset record isn’t currently in the database.
Note that you can’t scan new barcodes into the database with the app. If you attempt this, once you’re back online, the app will be unable to sync those barcodes (since they don’t already exist in the database).
Editing the barcode look-up fields
Asset Administrators have the option of editing the barcode look-up fields that the app uses to identify scanned assets. By default, the serial number and asset tag are scanned. An easy way to edit these fields is to use the procedure below, where you can access the look-up fields via a saved search in the Hardware Assets workspace.
The guidelines for look-up fields are these:
•Look-up fields should match the fields currently defined for the Scan Log workspace. By default, these fields are Asset Tag and Serial Number.
•You can use any number of fields as a look-up, though 2-3 should be sufficient.
•The app requires that at least one field be used as a look-up in the saved search, as shown in the next procedure.
1.Log in as Asset Administrator.
2.In the Hardware Assets workspace, open the saved searches drop-down and click All Saved Searches in the bottom right.
3.Scroll down the list to Barcode Scan Lookup Fields and click Edit. This action opens the following page: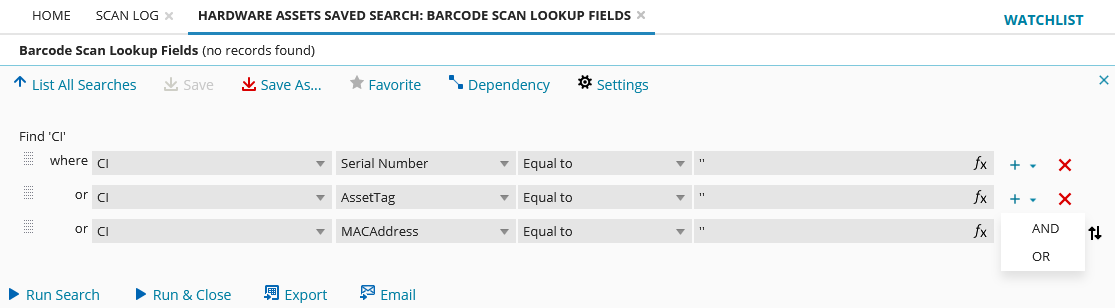
4.Change the look-up fields as needed:
•To add a field, click the icon at the end of a row and select OR. Select a field from the field drop-down. Leave Equal to as is, then use the same expression found in the other rows. Note that sub-queries aren't currently supported.
•To delete a field, click the icon at the end of the row that the field is in.
5.Click Save when finished.
Troubleshooting
Here are a few tips if you're having problems using the app:
The app requires that the Asset Tag field be present in the Hardware Assets workspace. If the Asset Tag field was previously deleted for any reason, the Asset Administrator must recreate it to prevent an error message when users are updating the scan log.
To recreate the Asset Tag field
1.Log in as Asset Administrator.
2.Click the icon in the menu bar at the top of any workspace. The Configuration Console displays in a new browser tab.
3.In the left navigation pane, expand Build > Business Objects.
4.Search for and open the CI (Hardware Assets) business object.
5.Click Fields, then click Add New. For field type, click Text.
6.The original Asset Tag field details are as follows:
•Field type: Unicode Text
•Text length: Variable, max 255
•Field attributes: Nullable, Stored, and Full-text indexed
7.Click Save when finished.
For a quick action to work properly when executed from the app, the fields defined in the quick action's Hide in UI when or Disable in UI when expressions must also be present in the grid view of the asset-properties layout that's visible to the Mobile Asset Manager user role.
If the defaults for the expressions or layout have been customized in a way that the fields no longer match, the Asset Administrator must update the settings in the Configuration Console.
To edit quick action expressions
1.Log in as Asset Administrator.
2.From the Hardware Assets workspace > More drop-down menu (top right of the page), click Edit Actions to open the Configuration Console.
3. In the left navigation pane, expand Lifecycle and select one of the app quick actions, such as Assign to User.
4.Click the Edit button at the top of the page, then edit the Hide in UI when or Disable in UI when expressions as needed (located at the bottom right of the page).
For more details about editing expressions, see the Ivanti Neurons for ITSM help topic About Expressions.
To edit the Mobile Asset Manager layout / grid view
1.Log in as Asset Administrator.
2.Click the icon in the menu bar at the top of any workspace. The Configuration Console displays in a new browser tab.
3.In the left navigation pane, expand Build > Business Objects.
4.Search for and open the CI (Hardware Assets) business object.
5.Click Layouts at the top of the page, then scroll down the list and click MobileAssetManager.Asset.DefaultLayout.
6.Under Views in this layout, click gridView, then edit the fields as needed.
For more details about editing a layout, see the Ivanti Neurons for ITSM help topic Using Layouts.
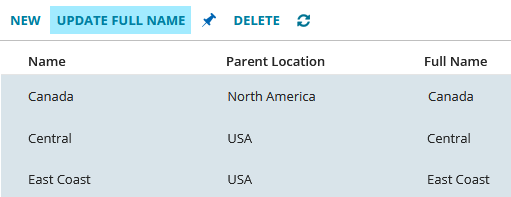
To prevent an error message when users are updating the scan log, the app requires that the locations of all scanned assets match the names of those same locations currently in the database.
Asset Administrator and Asset Manager user roles can update the location names in the database. Do so from the Locations workspace: select all records in the list view and click Update Full Name.