Sonatype Nexus Lifecycle Connector Guide
Summary: How to set up and use the Sonatype Nexus Lifecycle connector in Ivanti Neurons for ASPM.
Overview
The Ivanti Neurons for ASPM platform provides an API-based connector that integrates with Sonatype Nexus Lifecycle, which enables customers to bring in their open-source (OSS) findings into Ivanti Neurons for ASPM to gain visibility of their overall risk due to vulnerabilities in their open-source libraries to enable a simplified and efficient way to manage those vulnerabilities. Ivanti Neurons users can configure the connector to pull scan data from Sonatype Nexus Lifecycle on a periodic basis, as well.
Data from Sonatype Nexus Lifecycle is ingested as Applications and Application Findings in Ivanti Neurons for ASPM. Refer to the data mapping section below for details.
Connector Configuration
Prerequisites
- Requires an active subscription to Ivanti Neurons for ASPM.
- Requires an active subscription to Sonatype Nexus Lifecycle.
- URL used to access the instance of Sonatype Nexus Lifecycle.
User Setup
In order to connect Ivanti Neurons for ASPM to Sonatype Nexus Lifecycle, an API user will need to be created with the following minimum access:
- View IQ Elements - View IQ Elements grants read-only access to most properties of a respective organization/application/repository in order to view the current configuration and policy evaluation state.
View IQ Elements is the minimum permission required for users to be able to browse organization/application/repository-related web pages, including application composition reports.- The built-in Developer role provides this access or a customer role with the above privilege is needed.
Sonatype documentation for managing user permissions can be found here: Role Management
Connections
The following API calls are performed during a connector run to pull security vulnerabilities from Sonatype Nexus Lifecycle into Ivanti Neurons for ASPM.
|
API Type |
Endpoint |
|---|---|
|
Get All Organizations |
/api/v2/organizations |
|
Get All Applications |
/api/v2/applications |
|
Get Vulnerability Details |
/api/v2/vulnerabilities/ |
|
Get All Policies |
/api/v2/policies |
|
Get PolicyViolations |
/api/v2/policyViolations?p={policyIdvalue} |
|
Get Cross Stage Violations |
api/v2/policyViolations/crossStage/{policyViolationIdvalue} |
|
Get Component Details |
/api/v2/components/details |
Platform Setup
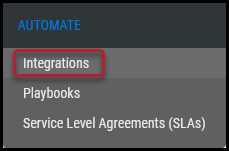
When logged into the platform, navigate to the Automate > Integrations page.
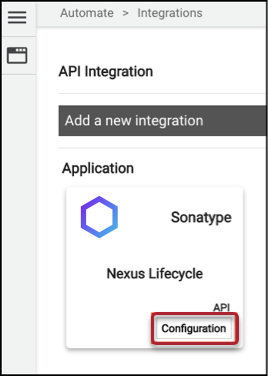
Using the search bar in the upper-right corner of the Integrations page, type Nexus Lifecycle to find the connector. Locate the Sonatype Nexus Lifecycle card under Applications and click Configuration.
Complete the following required fields. These fields include:
-
Connector Name: Connector name for the Ivanti Neurons for ASPM platform.
-
URL: Sonatype Nexus Lifecycle instance URL.
-
User Name and Password: Sonatype Nexus Lifecycle user credentials.
-
Optional SSL: Sonatype Nexus Lifecycle SSL certificate.
-
Network: Network name in Ivanti Neurons. Ingested applications and findings will be associated with this network.
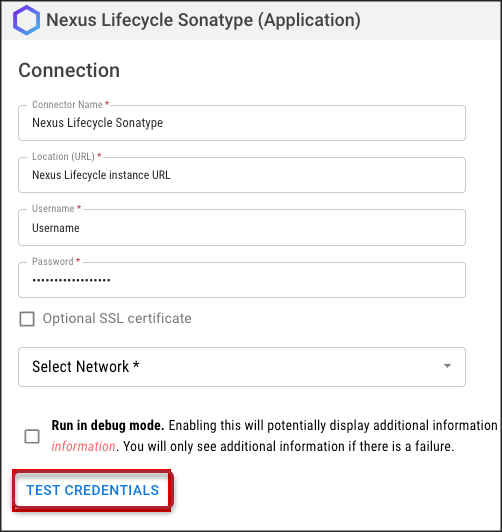
Once the fields have been filled out, click Test Credentials to ensure the connector can connect to the Nexus Lifecycle instance.
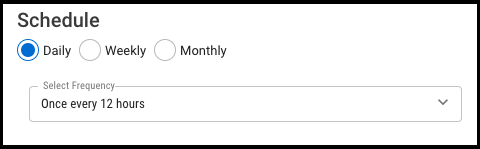
Additional connector configurations, such as Schedule and Optional Configurations can be set up here.
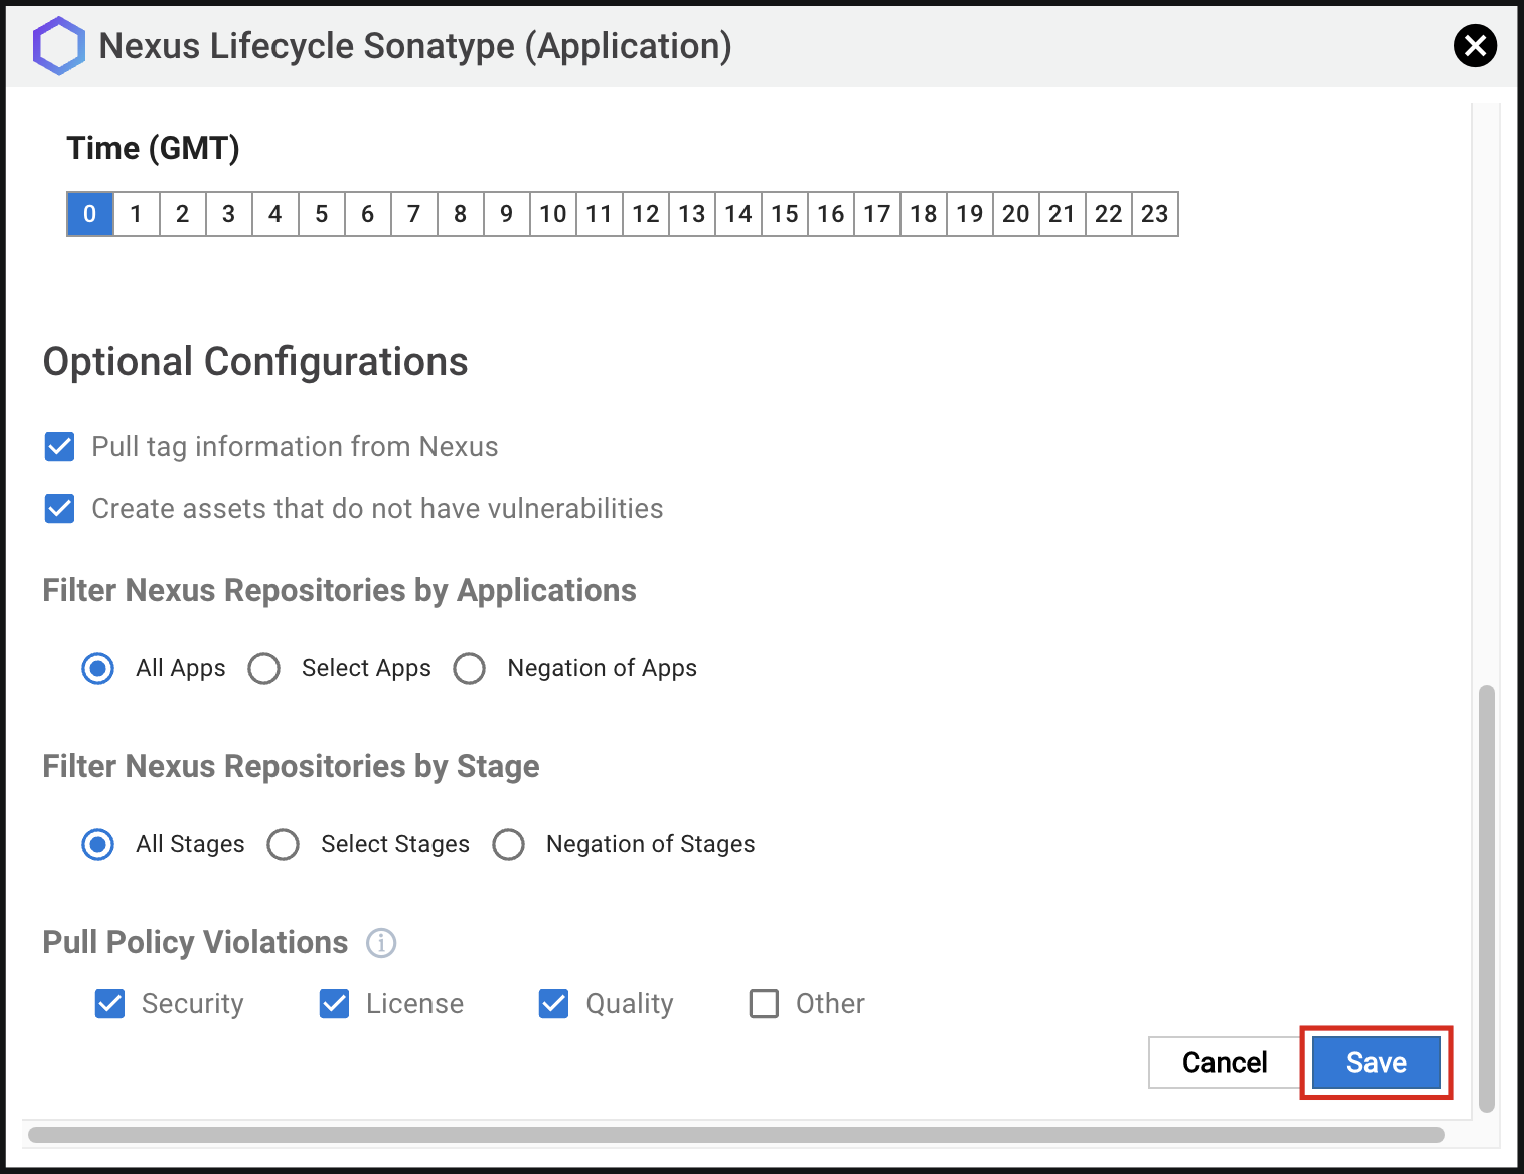
Optional Configurations
- Pull tag information from Nexus: This will create asset tags based on the Sonatype Nexus Lifecycle labels. The default behavior is not to create tags.
- Create assets that do not have vulnerabilities: This will create assets that exist in the Sonatype Nexus Lifecycle platform when there are no vulnerabilities. The default behavior is to only create assets with vulnerabilities.
- Filter Nexus Repositories by Applications: This will allow the connector to only pull information limited to a selection of applications.
- All Apps: This will pull all applications available to the login provided, including those discovered in the future. This is the default option.
- Select Apps: This will present the user with a list of the actual applications available to the login at the moment of the Test Credentials. Data from the chosen applications will be ingested.
- Negation of Apps: This will present the user with a list of actual applications available to the login at the moment of the Test Credentials. Data from the chosen applications will be ignored.
- Filter Nexus Repositories by Stage: This allows the connector to pull only information limited to a selection of stages.
- All Apps: This option pulls all stage types. This is the default option.
- Select Apps: This option presents the user with a list of the available stage types. Data from the chosen stages will be ingested.
- Negation of Apps: This will present the user with a list of the available stage types. Data from the chosen stages will be ignored.
- Pull Vulnerability Information: This allows the connector to specify which types of policy violations will be pulled. By default, all types will be selected.
- Security: This option pulls all security policy violations.
- License: This option pulls all license policy violations.
- Quality: This option pulls all quality policy violations.
- Other: This option pulls all other policy violations.
Once the connector configuration is complete, click the Save button.
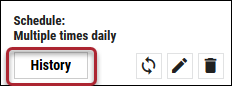
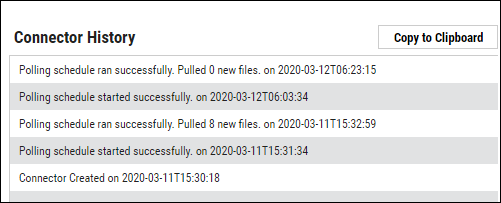
When the connector is set up, a new entry for it appears at the top of the Integrations page. This connector runs once the initial setup is complete. Check the connector’s status by clicking the History button.
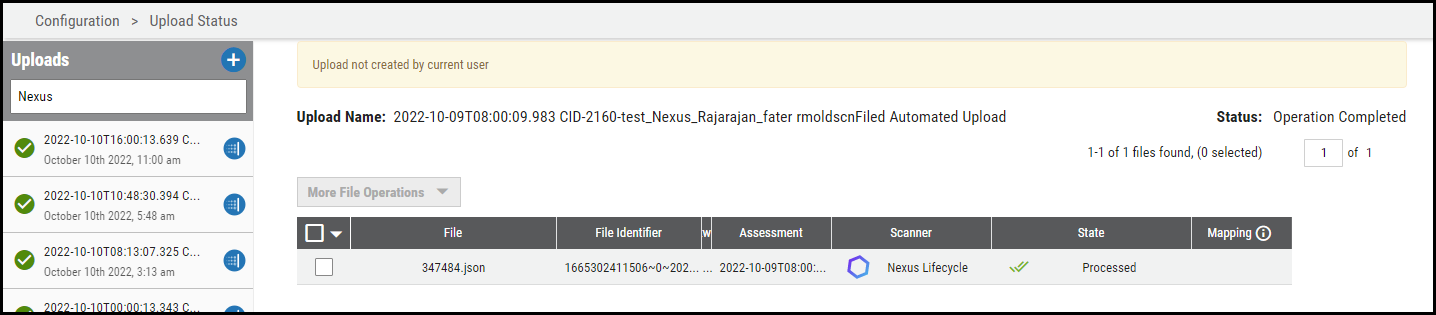
In the Upload Center (navigate to the Settings > Upload page), files pulled from Sonatype Nexus Lifecycle are parsed, aggregated, and filtered for displaying data on the Applications/Application Findings pages.
Editing a Connector Configuration
Connector configurations can be updated at any time after creation. Go to the Automate > Integrations page and select the specific connector you want to update.
Utilizing the Connector
The data from a Sonatype Nexus Lifecycle scan file is ingested into Ivanti Neurons for ASPM as Applications and Application Findings. The Scanner Name associated with these scans is Nexus Lifecycle. Scanner Name can be used as a filter for Applications and Application Findings.
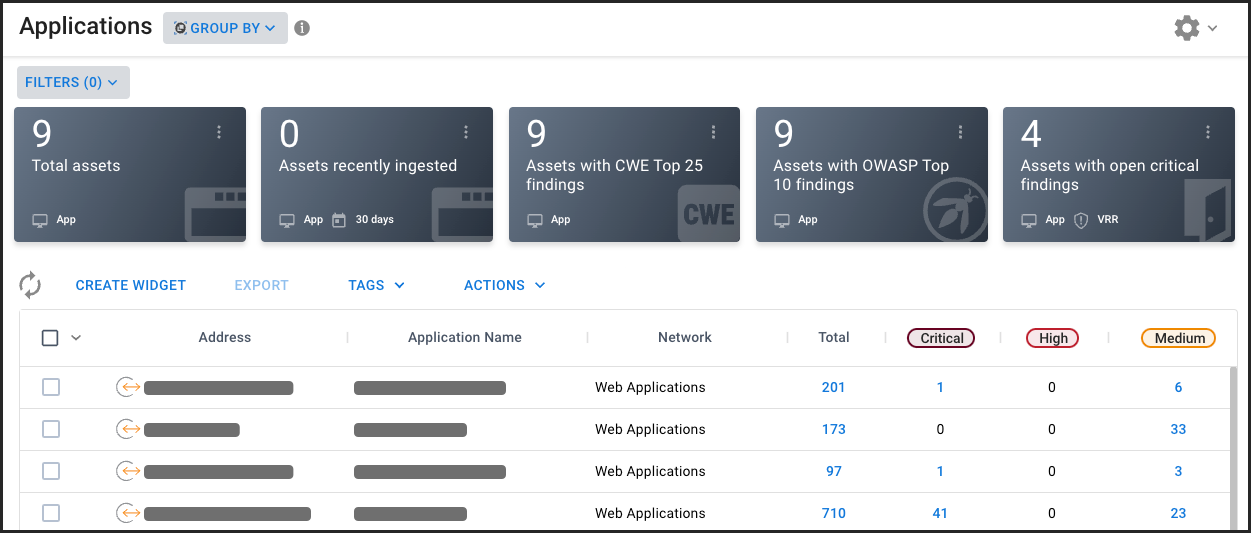
Assets
Asset data extracted from Sonatype Nexus Lifecycle scan files is shown on the Applications page. Project and version details are also extracted from the scan file.
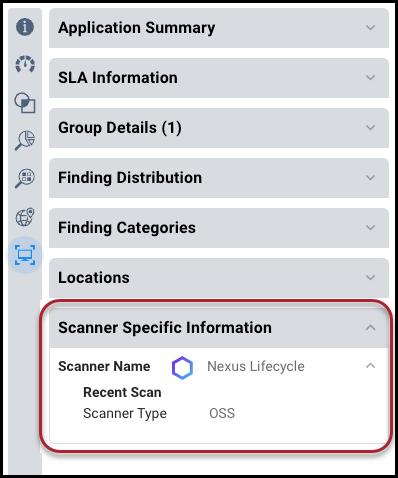
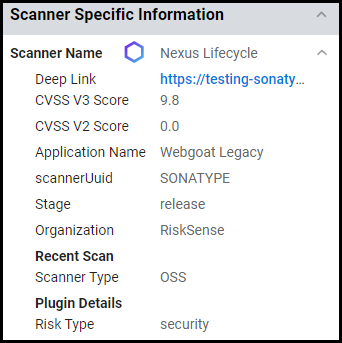
In the Application Detail pane under the Scanner Specific Information section, the scanner is listed as Nexus Lifecycle.
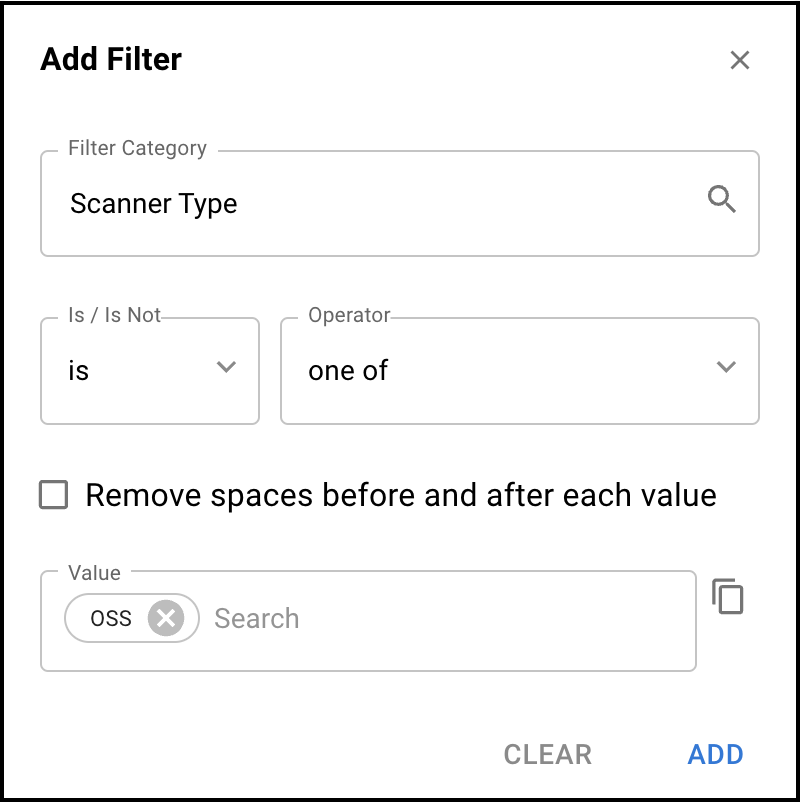
The Scanner Type filter allows you to filter for Open Source Security (OSS) data related to Sonatype Nexus Lifecycle.
Findings
All findings from the Sonatype Nexus Lifecycle scan file are shown on the Application Findings page.
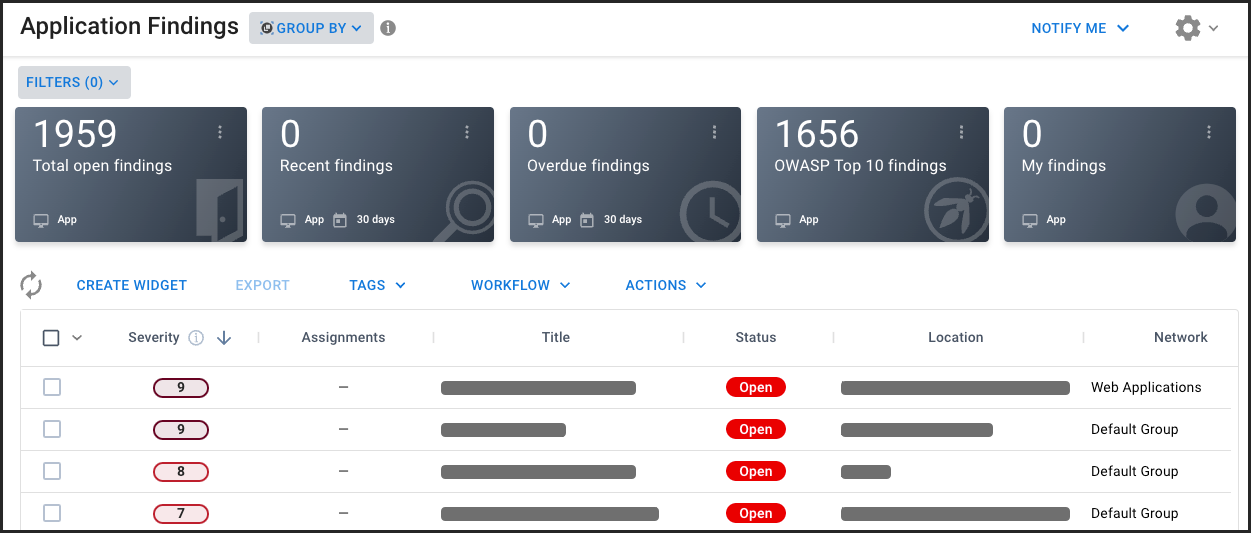
The Finding Type column is available on the Application Findings page. This column provides additional information about each finding, such as OSS findings from Sonatype Nexus Lifecycle.
The Risk Type filter will show the four types of policy types available in Sonatype Nexus Lifecycle, including security, quality, license, and other.
This connector will only pull security-type policy violations at this time, with plans for a release of the other three types soon.
Several new scanner-specific fields are available for filtering and exports.
-
Deep Link - Link to the report in the Nexus Lifecycle platform.
-
CVSS V3 Score - 0.0-10.0 reported score.
-
CVSS V2 Score - 0.0-10.0 reported score.
-
Application Name - Nexus Lifecycle application name.
Severity Mapping
Sonatype Nexus Lifecycle reports severity on the same 0.0-10.0 scale used by Ivanti Neurons for ASPM with no modification.
Connector Data Mapping
This table maps the high-level fields from Sonatype Nexus Lifecycle with that of the Ivanti Neurons for ASPM platform.
|
Section |
Platform Field |
Nexus Lifecycle Field |
Filter |
|---|---|---|---|
|
Applications |
Name |
Name of the Project |
Yes |
|
Address |
Name of the Project + Project stage |
Yes |
|
|
Nexus Lifecycle Application Name |
Name of the Project |
Yes |
|
|
Nexus Lifecycle Stage |
Stage |
Yes |
|
|
Total |
Sum of all findings associated with each project, including security, license, and operational |
No |
|
|
Application Findings |
Title |
Title of each security risk |
Yes |
|
Location |
Package URL |
Yes |
|
|
Scanner Plugin |
CVE or Sonatype Plugin reference |
Yes |
|
|
Source |
Component format |
Yes |
|
|
Nexus Lifecycle Effective License |
Effective License according to Nexus |
No |
|
|
Description (applicable only for security findings) |
Description of Security Risk, Detail Explanation, and Detection Details |
No |
|
|
Possible Solution |
Recommendation and Advisories |
No |