Getting Started with Identity Broker
This is not the latest version of Identity Director documentation.View available documentation.
Install the Identity Broker
Use the file RES Identity Broker 10.1.0.0.msi to install the Identity Broker. Follow the Setup Wizard and provide the requested information.
Setup Wizard
- Specify an installation folder. By default, RES Identity Broker will be installed in C:\Program Files\RES\Identity Broker\.
- In the Configure IIS Binding step, specify the Fully Qualified Domain Name (FQDN, at Hostname) and Port for the Identity Broker.
Example: server.mycompany.com
Machines that access the Identity Consumers (RES portals) must be able to resolve the FQDN you entered at Hostname.
Select an installed certificate for the SSL binding of the website. You can select from a list that is populated with computer certificates from the Personal Certificate Store. The certificate must cover the FQDN of the server on which you install RES Identity Broker.
For test systems, you can use the option
For more information: What types of Microsoft IIS Server Certificates can be used with RES web-portal productsWith a properly configured certificate, no security warnings appear when you visit the Identity Broker website.
In IIS, the installation creates the RES site and deploys the Identity Broker as the web application RES > identitybroker:

If the RES site already exists in IIS, the Configure IIS Binding step is skipped: the binding configuration is already in place.
- In the Configure Other Settings step, specify the Identity Broker Address. The field is pre-filled based on the FQDN you entered at Hostname in the previous step.
This will be the public address of the website running the Identity Broker that your users will access.
Example: https://server.mycompany.com
Optionally, in this step, you can choose to install the Windows Authentication Provider alongside the Identity Broker. - Select Yes if you are installing the Identity Broker on a server that is a member of the Windows domain that will authenticate your users.
- Select No if the server is not a member of the Windows domain that will authenticate your users, or if you plan to use a different Identity Provider.
You can use the separate installer (RES Identity Broker WinAuth 10.1.0.0.msi) to install the Windows Authentication Provider on a different machine. - In the Database Credentials step, provide the database connection details:
- Server: specify the server name, IP address (<IP address>,<port>) or named instance (<server name>\<instance name>).
- Database: specify the database name. If the database does not exist, and the provided user has sufficient permissions, the installer will create a new database with this name.
- Username/Password: specify the (existing) SQL login and password for the database. If a new database must be created during installation, this user requires the Server role of dbcreator (configured in the Microsoft SQL Server Management Studio).
Alternatively, create the database and SQL login in the SQL Server Management Studio before installing Identity Broker. In this scenario, the SQL login does not require the Server role of dbcreator.
If the provided user does not have the required permissions, the installation will fail with the following message:
There is a problem with this Windows Installer package.
If this occurs, verify the permissions of the user, or create a database and user from the SQL Server Management Studio. After that, you will have to start installation from the beginning again.
After installation has finished

The installation creates a URL shortcut to the Identity Broker Management Portal on the desktop. The URL points to the sub-directory identitybroker/mgmt/ui of the Identity Broker Address you configured.
Example: https://server.mycompany.com/identitybroker/mgmt/ui
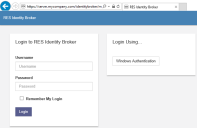
This shortcut opens the login page of the Identity Broker Management Portal.
Directly after installation, this page always contains the Login to RES Identity Broker section.
By default, the local administrator account (admin, with the password unsecured) is enabled. Use this account only for initial setup.
See Manage access to the Management Portal.
The Login Using section, which is available if you chose to install the Windows Authentication Provider in step 3, cannot be used for initial setup.
See also
Copyright © 2019, Ivanti. All rights reserved.