|
Page number
|
- Click the page numbers to navigate the pages of the wizard during configuration.
|
|
Page detail
|
- Page names are not mandatory.
- Optionally, specify a description for each page. This allows you to provide users with additional information about the page and its context in the service. The markup editor supports basic styling functionality like headings, block quotes, color and numbered lists, but also hyperlinks and drag-and-drop.
- Click the edit button (
 )to set a page Active or to Apply condition(s) to the page. )to set a page Active or to Apply condition(s) to the page.
Active pages
- You can set pages to active or inactive. Inactive pages are hidden in the wizard in the Web Portal, Mobile Client and Management Portal. Their configuration is not applied, but stored only. This makes it easier to reuse the configuration of redundant pages at a later stage. You can configure the settings of pages while they are inactive.
Conditions
- You can optionally set one or more conditions on each page that determine if it is displayed or skipped, or even that the entire action is skipped. For example, if users need to provide values for a new employee:
- You can make the page for home address information conditional, based on the value of the person attribute "home address": Skip that page and go to the next one if the attribute contains a value; show the page if it does not.
- You can make a basic set of pages for information that all new employees need to fill out; plus an additional set of pages that is conditional, based on an attribute that specifies a project assignment. If there is no project assignment, the wizard can skip all remaining pages upon completion of the last page of the basic set.
- If you configure a condition, you can compare values as integers or as strings.
- Select Integer to compare values numerical. Only integer values can be compared: non-integer values (e.g. 2.5 or 123abc) resolve as "0". You can compare values from –9,223,372,036,854,775,808 to 9,223,372,036,854,775,807.
- Select String to compare values. This is a binary comparison of characters (case-sensitive). For example, a value "Smith" is not equal to "smith".
- You can base conditions on values, attributes or a combination. You can select only one attribute in each comparison field.
- If you configure a condition for a table service attribute, it uses the initial number of rows; it cannot take into account any rows that are added as a result of the actions in the Provide Information wizard. For example, suppose a table contains device identifiers of a user's mobile phone, and at the start of the Provide Information wizard the user has none, so an empty table with 0 rows. If the user then provides the ID of a mobile phone in the Provide Information wizard in the Web Portal, this is added as the first row of the table. Although the table now contains one row, any pages in the wizard that are conditional based on the number of rows in the table still use 0.
- If you configure a condition for a checklist service attribute, you can base page conditions on the state of checklist service placeholders #Service[{attributename}.{labelname}.state]. This placeholder allows you to resolve the state (True or False) of a specific checklist service attribute option and compare it with a specific value. Based on this comparison, you can then further specify which action should be taken if the condition is met. This allows you to configure pages that are shown or hidden in the Provide Information wizard in the Web Portal, based on the input of the user.
- Multiple conditions can be configured as AND, OR, or combinations of the two. For example, display a page only if:
- [AND] Subscriber is part of Marketing
- AND Subscriber lives in the United Kingdom
- OR Subscriber is part of Support
- AND Requester is the manager of the Subscriber
In this example, line 1 and 2 form a combined condition and line 3 and 4 form another combined condition.
|
|
Attributes
|
Assign service attributes to a page.
- If you assign a list service attribute:
- If you assign an organization service attribute:
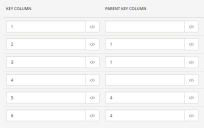
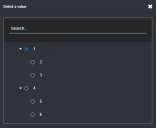
- Select Present as cascading selection lists to show the organization tree of the attribute as a cascading selection list in the Web Portal. This format shows the tree as a cascading list of values that is populated dynamically, based on the end user's selection of a previous value. Cascading selection lists make it easier for end users to select the correct organizational context elements. This option is only shown for organization service attribute that support sub items.
- Use the Min level field to specify the minimum level of the organization tree that end users need to select. For example, if you specify a minimum level of 2, end users cannot continue until they select at least from the 2nd level of the organization tree.
- Use the Max level field to specify the maximum levels of the organization tree from which users can select. For example, if you specify a maximum level of 3, only the first 3 levels of the organization tree are shown.
- Select Must select leaf to enforce that users need to select from the last level in the organization tree before they are allowed to continue. If you select this option, the Min level and Max level fields become unavailable.
- If you assign a date service attribute:
- Select Pre-populate the input field with the current date of the end-user to pre-populate the end user's current date in the input fields in the Web Portal. This makes it easier for the end user to provide information.
- If you assign a datetime service attribute:
- Select Pre-populate the input field with the current date and time of the end-user to pre-populate the end user's current date and time in the input fields in the Web Portal. This makes it easier for the end user to provide information.
- If you assign a file service attribute, users can upload a requested file in a service transaction.
- You can assign multiple file service attributes. This allows users to upload multiple files at once.
- Add a Divider to create groups of service attributes. This makes it easier for the end user to provide information for the required service attribute values in the Web Portal.
- You can configure empty pages that do not contain service attributes. Empty pages are also shown in the Web Portal.
- If the selected service attributes contain mandatory fields, users cannot continue in the wizard in the Web Portal until they provide these values.
- For attributes of the types Text, Date, and DateTime, you can configure user input validation, by checking the Apply a user input validation box.
These conditions will be displayed during the Provide Information workflow action and will allow for additional validation to occur in the Web Portal and Management Portal.
Each condition must be given a Validation text, which lets the user know when their input does not validate the condition.
In the Condition Preview field, you can take a look at all the conditions you have set for a particular attribute.
The attributes used in these conditions can be both marked and unmarked as "reusable" in their definitions.
 Attributes of type Text Attributes of type TextAfter you enable Apply a user input validation for attributes of type Text, you will have the option to insert a regular expression, which needs to be compatible with JavaScript RegEx. You can help your end users by providing an Expression hint text.
In the same section, optionally click on the Add condition button.
You can customize your condition by modifying the Compare type , Operator, Value type, and Value options.
The Value type option allows you to choose between either inserting a manual value or using a service attribute of the same type, configured on the Provide Information workflow action page.
 Attributes of type Date Attributes of type DateAfter you enable Apply a user input validation for attributes of type Date, the Add condition button will be displayed.
Clicking on the button will add a new condition for your attribute and allow you to edit it.
In the same section, optionally click on the Add condition button.
Similarly to attributes of type Text, you can customize your conditions by modifying the Compare type , Operator, Value type, and Value options.
The Value type option allows you to choose between either inserting a manual value or using a service attribute of the same type, configured on the Provide Information workflow action page.
 Attributes of type DateTime Attributes of type DateTimeAfter you enable Apply a user input validation for attributes of type Date, the Add condition button will be displayed.
Clicking on the button will add a new condition for your attribute and allow you to edit it. Customize your conditions by modifying the Compare type , Operator, Value type, and Value options.
If the Compare type is set to Date, the Value type option lets you choose between Manual value or Attribute.
If the Compare type is set to DateTime, the Value type option lets you choose between Manual value (localtime), Manual value (UTC), or Attribute.
Note that all DateTime values are stored in your database in UTC format.
If you select Manual value (UTC), the value entered by the user for that specific attribute within your workflow will be converted to UTC and compared with the value of the conditions already defined for that attribute.
If you select Manual value (localtime), the value entered by the user for that specific attribute within your workflow will remain as it is, while the existing conditions for the attribute will be converted to the local time of the user.
- For attributes of the types Text, Date, DateTime, Organization, List, and Checklist, you can use dynamic attributes, by checking the Add dynamic attributes box.
- Enabling this option will allow you to add conditions that provide users with immediate feedback on their input, on the same Provide Information page, depending on what values they pick and insert for various attributes. These conditions support AND/OR relations.
- Once you have defined the conditions, you can add attributes which will be displayed for the user as responses to the choices and information they input on the page.
The attributes used in these conditions can be both reusable or non-reusable. Additionally, they should only be attributes which have not been added to the page. - For attributes of type Checklist, if you select Manual Value from the drop down list, you need to input multiple values separated by semicolons in the Value field if you want your users have multiple options to select from.
|
 )to set a page
