Configure the Datastore connection

At Setup > Datastore, manage the Datastore connection settings and authentication settings. You can change settings, connect to a different Datastore or create a new one.

The Datastore stores all information of your environment, including licenses and data synchronized from external sources. Upgraded customers may use an Ivanti Automation Datastore.

Configuration

Field

Explanation and Tips

Database type

Select the database type.

Database server

Specify the IP address, hostname or FQDN of the database server.

Protocol encryption

Enables secure communication between the Datastore and the components that connect to it (Microsoft SQL Server only).
See also: Configure protocol encryption

Database name

Specify the Datastore name.

  • If you change the connection to a different Datastore, you also need to point the Transaction Engine to this Datastore. See Command-line options.
  • You can connect to an empty database (a database without any tables) that you have created directly on a database server, not with Identity Director. This database can then be used as an Identity Director Datastore. This is useful if an administrator is only allowed to manage existing databases, not create new ones.

Use Windows authentication

Use Windows authentication for access to the Datastore (Microsoft SQL Server only).

Generate New Encryption Key

Generate a new encryption key for the Datastore.

This key is mandatory if you want to use the Execute PowerShell Script workflow action.

  1. In order for the new encryption key to be applied, you will need to ensure the Load User Profile is set to True.

  2. Once you have verified that Load User Profile is set to True, click Test Connection.
  3. If the connection is successful, click Save.

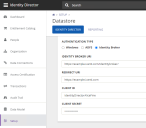
Authentication type

Specify the authentication type you want to use:

  • Windows authentication

    By default, the server that hosts the Management Portal uses Windows authentication.

  • ADFS authentication

    ADFS Authentication requires the availability of a fully-configured ADFS server.

    • In the Login URL field, specify the URL to the ADFS server (e.g. https://[adfs host]/adfs/ls).
    • In the Realm field, specify the ADFS realm that you configured on the ADFS server (e.g. https://identitydirector.example.com/).
    • In the Certificate Authority area, specify the name and the thumbprint of the security certificate on the ADFS server.
  • Identity Broker authentication

    The Identity Broker is a web application that acts as a "broker" for authentication, between Ivanti portals and their configured Identity Provider: it can process authentication requests by means of external authentication endpoints.

    • Identity Broker URI: This field specifies the public web address of the Identity Broker.
      The URI is case sensitive and must always end with a slash (/).
    • Redirect URI: This field specifies the web address of the Web Portal (for example, https://portals.ivanti.com/).
    • Client ID: This field specifies the ID of the Web Portal as configured in the Identity Broker.
    • Client secret: This field specifies the password string of the Web Portal as configured in the Identity Broker.

    Configure Identity Broker as Datastore authentication

    Make sure you configure and enable at least one Identity Provider in Identity Broker before you enable Identity Broker authentication.
    If a portal is configured to use Identity Broker authentication and no Identity Provider is available, users will not be able to access the portal.

    If you install the Identity Broker using the Identity Director installer on the same server as the Management Portal, the connection settings will be pre-configured.

    See the Getting Started with the Identity Broker for further information on installation and configuration of the Identity Broker.

See also