Machine Group Dialog: Bottom Section
When viewing a machine group, the bottom section of the machine group dialog displays the machines that are currently members of the group. The bottom section also enables you to perform actions on individual machines within the group.
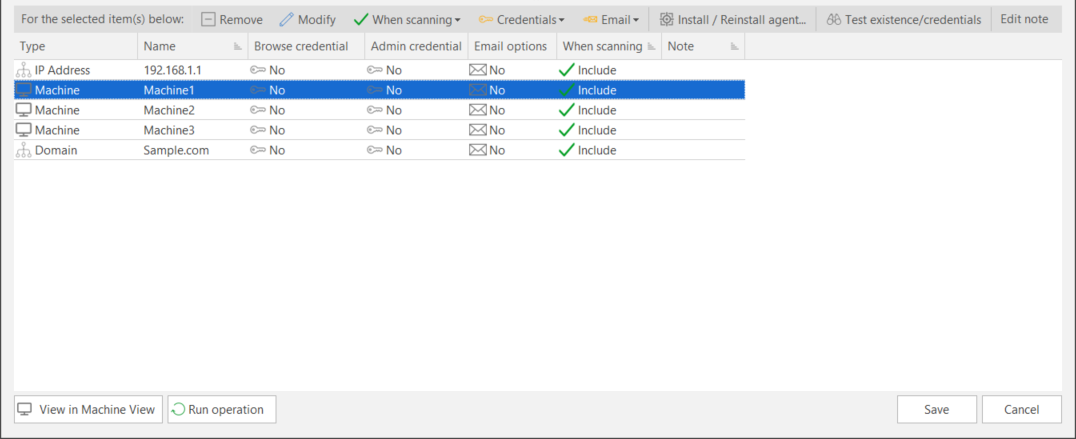
The bottom section contains the following items and capabilities:
- Machine-level buttons: Buttons that perform actions on individual machines within the group.
These actions can also be performed by right-clicking on one or more machines.
|
Action |
Description |
|---|---|
|
Remove |
Removes the selected machines from the current machine group. |
|
Modify |
Enables you to modify the name or IP address of an existing group item. The item is displayed in the middle pane, allowing you to modify the name and then add the item back to the group using the new name. |
|
When Scanning |
Include: The selected machines will be included when scans are performed on this machine group. Exclude: The selected machines will be excluded when scans are performed on this machine group. |
|
Credentials |
- Set Admin Credentials: The ability to provide administrative credentials for the selected machines in the group. Credentials assigned to individual machines will take precedence over credentials assigned to the group. When credentials are applied to the selected machines, the name of the assigned credential is displayed next to the icon. - Set Browse Credentials: Applies only to domains and organizational units. Enables you to provide browse credentials that are used to locate all machines in a specific domain or OU. These credentials may be different than the administrator credentials used to connect to the machines in the domain or OU. When credentials are applied, the name of the assigned credential is displayed next to the icon. - Remove: Removes specified credentials from the selected machines. The credentials icon will become dimmed ( For more information on setting credentials see Defining Credentials. |
|
|
Set email: Defines email options for the selected machines. Defining email options for individual machines overrides any email options defined for the group. The email options enable you to define which reports (if any) will be automatically sent— and to whom they will be sent— whenever the machines are used in a scan. To specify which reports should be automatically sent and to whom they should be sent:
Remove email: Removes all email settings currently applied to the selected machines. |
|
Install/Reinstall Agent |
Installs Security Controls Agent on the selected machines.
See Installing Agents from the Console for more details. |
|
Test existence/credentials |
Performs a power status scan to verify the existence of the selected machines and to verify that the credentials defined for the selected machines can be used to access the machines. |
|
Edit note |
Enables you to add a note to one or more machines in the group. For example, you might use a note to indicate why a certain machine is being excluded from scans that are performed on the group.
|
|
SSH connection |
Enables you to change the SSH connection setting. For more information, see the SSH Authentication topic. |
- The ability to display the machines in the group a number of different ways.
- You can click on a column heading to sort the table by that information.
- You can reorder the columns by clicking and dragging the column headers to new locations. For example, if you want administrator credential information to be displayed in the first column, simply click on the Admin Credentials column header and drag it to the first column.
- You can right-click within a column header and perform a number of additional actions.
When reordering columns, the column header you are moving will always be placed in front of the column you drag it to.
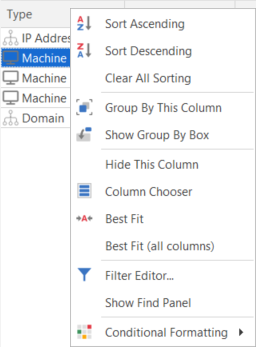
|
Action |
Description |
|---|---|
|
Sort Ascending |
Sorts the selected column in ascending order. |
|
Sort Descending |
Sorts the selected column in descending order. |
|
Clear All Sorting |
Clears the sorting criteria currently set for this column. |
|
Group By This Column |
Groups the table using the data in the selected column. It does this by moving the data into expandable lists that are located in the body of the grid. One expandable list will be created for each possible column value. If you perform this action on any subsequent columns, that data will be presented as nested groups at increasingly lower levels within the expandable lists. If Show Group By Box is enabled, this will also create a "Group By" box in the area immediately above the column headers. TIP: To turn off the Group By This Column feature and revert to the original view: Enable Show Group By Box, drag the Group By boxes back to the column header and then right-click in the column header and select Hide Group By Box. |
|
Show Group By Box / Hide Group By Box |
Displays or hides an area immediately above the column headers that contains "Group By" boxes. One Group By box will be displayed for each column header for which Group By This Column is currently enabled. You can also drag column headers to and from this area. The table will be grouped according to the data in the box. If there are two or more boxes then the grouping will be nested, with the left-most box presented at the highest level, the second box presented at the second level, etc. |
|
Hide This Column |
Removes the column from the table. You can add the column back to the table using the Column Chooser |
|
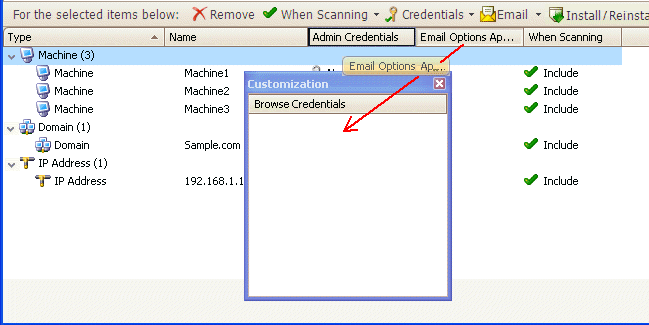
Column Chooser |
Enables you to add and remove information from the table. When you select Column Chooser the Customization dialog is displayed. This dialog is used to store the columns you currently don't want displayed within the table. Simply click and drag the desired column headers from the table to the Customization dialog. For example, if you decide you don't want Browse Credentials Applied and Email Options Applied information displayed in the table, simply drag those column headers into the Customization dialog.
If you decide you want an item back in the table, simply click and drag it from the Customization dialog back to the table. |
|
Best Fit |
Resize the width of the selected column so that all information in the column is displayed in the optimal amount of space. |
|
Best Fit (all columns) |
Resize the width of all columns in the table so that information in the columns is displayed in the optimal amount of space. |
|
File Editor |
The Filter Editor dialog will show any filters that are currently active in the column headers. You can use the editor to modify the existing filter criteria and to build new criteria using the available filter conditions and logical operators. |
|
Show Find Panel / Hide Find Panel |
Displays or hides a search box that you can use to find specific patches or text related to any of the patches contained in the patch data file. Here are a few tips for using the search box:
|
|
Conditional Formatting |
Enables you to apply additional formatting to the table. |
- View in Machine View: Displays this group in Machine View, which shows the most recent scan information for every machine in the group.
- Run operation button: Enables you to initiate an operation