SQL Server Post-Installation Notes
Manually Configuring a Remote SQL Server to Accept Machine Account Credentials
The manual process described here is required only if the automated account creation process failed during product installation.
If you are using Integrated Windows Authentication to access a remote SQL Server, in order for Security Controls to interact properly with the server you must configure the server to accept machine account credentials. The best time to do this is immediately after you have installed Security Controls but before you actually start the program. You can, however, perform these steps after starting the program. Any scans you initiate prior to this that require interaction with a remote SQL Server database will probably fail.
This section describes how to configure a remote SQL Server to accept Windows authentication (machine account) credentials from the Security Controls console. For security purposes, Ivanti recommends using Windows authentication where possible. Microsoft SQL Server Management Studio is used as the editor in the following examples but you can use a different tool if you prefer.
- The Security Controls console and SQL Server must be joined to the same domain or reside in different domains that have a trusted relationship.
This is so the console and the server can compare credentials and establish a secure connection. - On SQL Server, create a new login account for Security Controls to use.
You must have securityadmin privileges in order to create an account. - For your Security Controls database, create a new user login using the console machine account.
- Start Security Controls.
- Perform any troubleshooting as necessary.
- You can use the SQL Server activity monitor to determine if connection attempts are successful when performing a patch scan.
- If you ran Security Controls before creating the SQL Server user account, some services may fail to connect to SQL Server. You should select Control Panel > Administrative Tools > Services and try restarting the services.
- If the connection attempts are failing you can view the messages in the SQL Server logs to determine why the failures are occurring.
To do this: Within the Security node, right-click Logins and select New Login. Type the login name using a SAM-compatible format (domain\machine name). The machine account is your console's machine name and must contain a trailing $.
Do not use the Search option. You must manually type the name because it is a special name.
Make sure you choose Windows Authentication and that the Default database box specifies the Security Controls database.

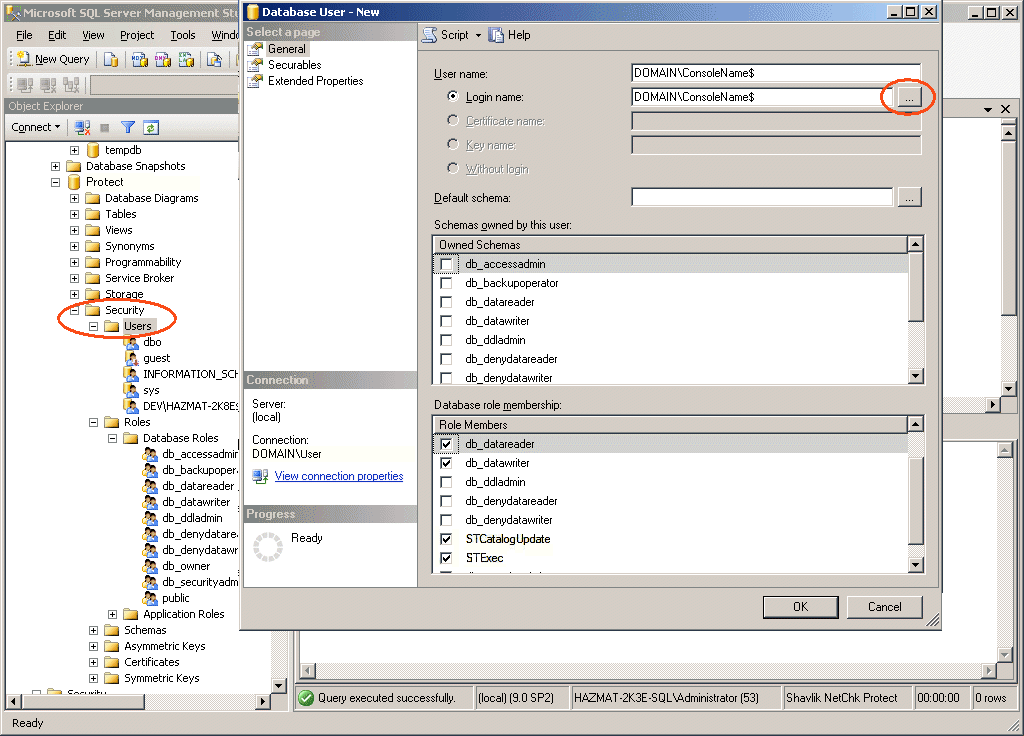
Right-click the Users folder, select New User, browse to find the Login name, and then paste the name in the User name box. Assign the user the db_datareader, db_datawriter, STCatalogUpdate, and STExec roles.
Allowing Other Users Access to the Program
This section also applies if you are using the role-based administration feature.
If you wish to allow other users access to the program, you may need to configure SQL Server so that those users have the necessary database permissions. Specifically, when using Windows integrated authentication, users without administrative rights on the database machine must be granted read and write permission to all tables and views. They must also be granted execute permission to all stored procedures in the Security Controls application database. They may not otherwise be able to start Security Controls.
One way to grant these permissions is to assign your users the db_owner role. For security reasons, however, this may not be the best solution. A safer alternative is to grant execute permission at the database level. You do this by assigning the users in question to the STExec role.
Performing Periodic Maintenance on the Database
Security Controls provides the ability to perform periodic maintenance on the database by automatically removing old scans, rebuilding index files, and performing backups. See Database Maintenance for details.