Using Smart Filter to Filter Information in the Top Pane
Information displayed in the list can be easily filtered to narrow the focus to only those machines of interest. One way to do this is by using the Smart Filter.

The Smart Filter contains several default filters. You can also define your own custom filters.
Another option is to apply filters to individual columns. For more information, see Customizing the Column Headers.
Default Filters
The default filters are identified by a leading asterisk. Default filters cannot be modified or deleted. The default filters include the following:
- *All Machines: All machines are displayed, including servers and workstations.
- *Does not have an Agent Policy: Only those machines that do not have Security Controls Agent installed are displayed.
- *Has an Agent Policy: Only those machines that have Security Controls Agent installed are displayed.
- *Last 7 Days: Only those machines that have been scanned within the last seven days are displayed.
- *Last 14 Days: Only those machines that have been scanned within the last 14 days are displayed.
- *Last 30 Days: Only those machines that have been scanned within the last 30 days are displayed.
- *Last 60 Days: Only those machines that have been scanned within the last 60 days are displayed.
- *Last 90 Days: Only those machines that have been scanned within the last 90 days are displayed.
- *Linux machines: Only Linux machines are displayed.
- *Missing at least 1 patch: Only those machines that are missing at least one patch are displayed.
- *Never patch scanned: Only those machines that have not been scanned for missing patches are displayed.
- *Out of date agents: Only those machines with out-of-date agents are displayed.
- *Out of date patch scans: Only those machines with out-of-date patch scans are displayed.
- *Servers: Only servers are displayed.
- *Today: Only those machines that have been scanned within the last 24 hours are displayed.
- *Windows machines: Only Windows machines are displayed.
- *Workstations: Only workstations are displayed.
Custom Filters
You can create your own custom filters. This is a powerful tool that enables you to specify exactly which machines you want displayed in the top pane. Each custom filter is comprised of one or more rules. You can define as many rules in a filter as needed.
To create a new filter:
- Click the Create a New Smart Filter icon (
 ).
).
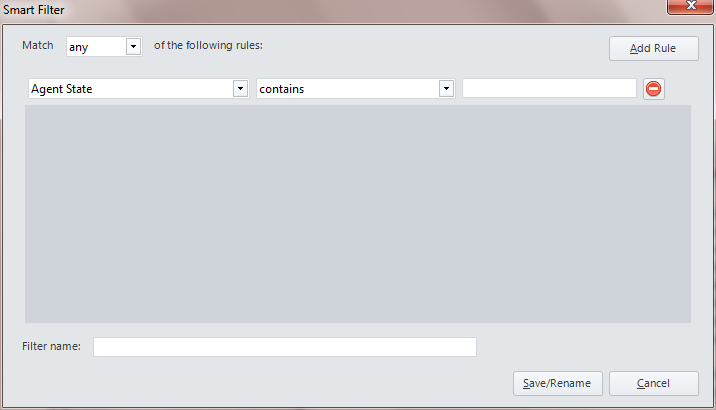
The Smart Filter dialog is displayed. - Specify which rules in the filter must be matched.
- All: Only those machines that match all the rules in the filter will be displayed.
- Any: Machines that match at least one rule in the filter will be displayed.
- Define one or more rules.
To define a rule, select an option in each of the first two logic boxes and then type the criteria in the third box. To add another rule simply click Add Rule. - Type a name for the filter.
- When you are finished defining your custom filter, click Save/Rename.
If you define a rule that does not make sense (for example, "Machine Name is greater than 3") the rule will simply be ignored.
Example
