Performing a New Installation
Disconnected Networks
You can skip this section if you are not installing the console on a disconnected machine.
If you are installing the console on a machine that resides in a disconnected network and you are missing any of the prerequisite software, you must download the software from a connected machine and then manually install it on the disconnected console before you begin the installation process.
In addition, you must manually download the product core files and move the files to the disconnected machine.
- Download the Security Controls executable file to the root directory on a connected machine.
- On the connected machine, download the product core files by opening a command prompt and then typing the following command.
- Copy the entire contents of the
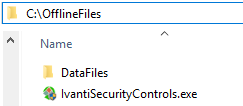
C:\OfflineFilesfolder to a portable device and move the files to the root directory on the disconnected machine. - On the disconnected machine, initiate the installation by double-clicking the Security Controls executable file that is located in the
C:\OfflineFilesfolder.
C:\>IvantiSecurityControls.exe /layout:OfflineFiles
This will create a C:\OfflineFiles folder that contains a copy of the Security Controls executable file plus a \Datafiles sub-folder that contains the related product core files.
The installer will check if the C:\OfflineFiles\DataFiles sub-directory exists. If it does, it will automatically copy the contents of the \DataFiles folder to the proper locations in the C:\ProgramData directory.
See the following section for instructions on completing the installation process, beginning with Step 5.
For more disconnected network information, see:
Installation Process
- Begin the installation process by double-clicking the Security Controls executable file.
- If you are required to enter a user name and password each time you launch your browser and browse the Internet, enable the Proxy settings check box, click the link, and type the necessary credentials.
It may be necessary to specify a domain as part of your user name (for example: mydomain\my.name). These settings can be modified later by going to Tools > Options > Proxy.
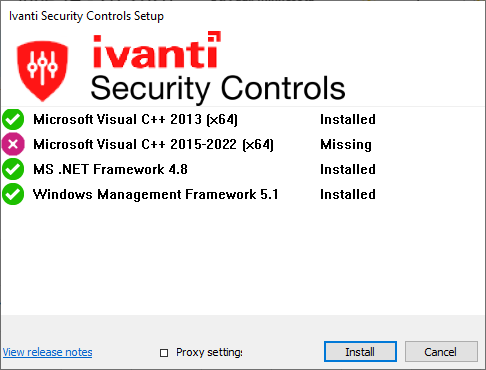
It also may be necessary to modify your HTTP proxy information after the installation is complete. See HTTP Proxy Post Installation Notes for details. - Click the Install button to install any missing prerequisites.
A few of the prerequisites require a reboot after they are installed. In this case the installation program will request a system reboot before continuing. The installation program will restart automatically following the reboot. - (Conditional) If you were missing any prerequisites that required a reboot, to continue with the installation after the reboot click Install.
- Read the information on the Welcome dialog and then click Next.
The license agreement is displayed. You must agree to the terms of the license agreement in order to install the program. - To continue with the installation click Next.
The Destination Folder dialog is displayed. - If you want to change the default location of the program, click the browse button and choose a new location.
- To begin the installation click Install.
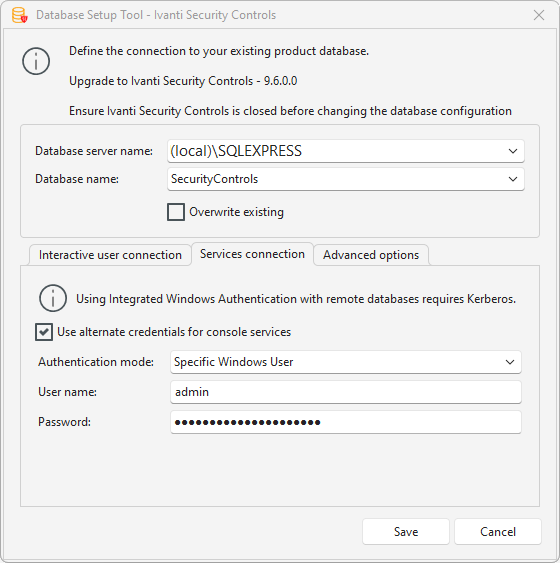
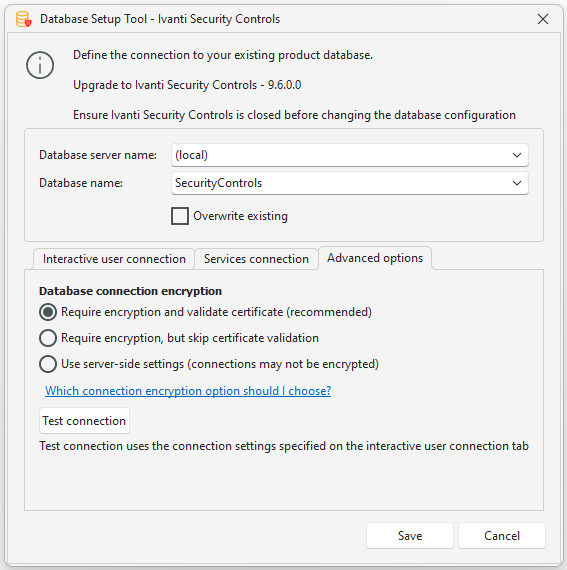
Near the end of the installation process the Database Setup Tool dialog is displayed. - Use the boxes provided to define how users and services will access the SQL Server database.
- Database Server name: You can specify a machine or you can specify a machine and the SQL Server instance running on that machine (for example: machinename\SQLExpress). If SQL Server is already installed, this box will be automatically populated with the local SQL Server instance name. You can also click the dropdown arrow and select Get remote server names to retrieve a list of available servers.
- Database name: Specify the database name you want to use. The default database name is
- Overwrite existing: If you have a previously installed Security Controls database and you want to preserve your existing data, clear this check box. If you have a previously installed database but you want to overwrite the existing data and start fresh, enable this check box.
- Integrated Windows Authentication: This is the recommended and default option. Security Controls will use the credentials of the currently logged on user to connect to the SQL Server database. The User name and Password boxes will be unavailable.
- Specific Windows User: Select this option only if the SQL Server database is on a remote machine. This enables you to provide a specific Windows user name and password combination. This option will have no effect if the database is on the local (console) machine (see Supplying Credentials for more information about local machine credentials). All Security Controls users will use the supplied credentials when performing actions that require interaction with the remote SQL Server database.
- SQL Authentication: Select this option to enter a specific SQL Server user name and password combination that will be used to log on to the specified SQL Server.
- Test server connection: To verify that the program can use the supplied interactive user credentials to connect to the SQL Server database, click this button.
- Use alternate credentials for console services:
- If the SQL Server database is installed on the local machine you will typically ignore this option by not enabling this check box. In this case the same credentials and mode of authentication that you specified above for interactive users will be used.
- You will typically only enable this check box if the SQL Server database is on a remote machine. When the database is on a remote machine you need an account that can authenticate to the database on the remote database server.
- Authentication mode: Available only if Use alternate credentials for console services is enabled.
- Integrated Windows Authentication: Selecting this option means that the machine account will be used to connect to the remote SQL Server. The Kerberos network authentication protocol must be available in order to securely transmit the credentials. The User name and Password boxes will be unavailable.
- Specific Windows User: Select this option to enter a specific Windows user name and password combination. Security Controls's background services will use these credentials to connect to the SQL Server database. This is a good fallback option if for some reason you have difficulties implementing integrated Windows authentication.
- SQL Authentication: Select this option to provide a specific SQL Server user name and password combination for the services to use when logging on to SQL Server.
- Require encryption and validate certificate (recommended): This is the most secure but also the most restrictive option. Your server must be configured for TLS encryption, and the server's root certificate must be installed on the machine running the console. If the certificate has expired or is missing from the console machine, you cannot connect.
- Require encryption, but skip certificate validation: This will still use encryption, but does not check if the certificates are valid or expired. This option is typically used with a local installation of SQL Server or SQL Express.
- Use server-side settings (connections may not be encrypted): This is the least secure but provides the greatest compatibility. This uses whatever you have configured in SQL Server, with no validation.
- Test connection: Tests the connection to the SQL Server database using the supplied database connection encryption settings with the credentials set on the Interactive user connection tab.
- After providing all the required information, click Save.
- Click Next.
The Installation Complete dialog is displayed. - Click Finish.
The Completed dialog is displayed.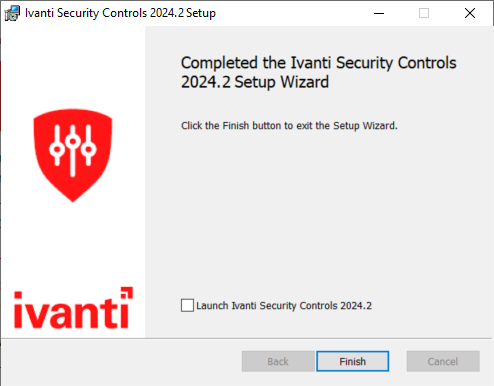
- If you want to start Security Controls immediately, enable the
If you receive a prompt indicating that a reboot is required, click OK and the installation process will automatically resume after the reboot.
If you are missing any prerequisites they are displayed in the Setup dialog. If you are not missing any prerequisites you will skip Step 2 - Step 4 and go directly to the Welcome dialog described in Step 5.
TIP: If you want a shortcut icon to be created and placed on your desktop, enable the Create a shortcut on the desktop check box.
When you are done, click Next. The Ready to install dialog is displayed.
Tip: You can access the Database Setup Tool after the installation is complete by selecting Start > Ivanti

Choose a database server and instance
Choose how interactive users will connect to the database
On the Interactive user connection tab, specify the credentials you want the program to use when a user performs an action that requires access to the database and select the Authentication mode:
CAUTION! If you supply SQL authentication credentials and have not implemented SSL encryption for SQL connections, the credentials will be passed over the network in clear text.
Choose how services will connect to the database
On the Services connection tab, specify the credentials you want the background services to use when making the connection to the database. These are the credentials that the results importer, agent operations, and other services will use to log on to SQL Server and provide status information.
If you choose Integrated Windows Authentication the installation program will attempt to create a SQL Server login for the machine account. If the account creation process fails, see SQL Server Post-Installation Notes for instructions on manually configuring a remote SQL Server to accept machine account credentials. Do this after you complete the Security Controls installation process but before you start the program.
Set Advanced options - database connection encryption
On the Advanced options tab, use the Database connection encryption section to set the encryption you want to use between the console and SQL Server. There are three options that provide different levels of security. You can update these settings later if required by running the Database Setup Tool from the Windows Start menu.
For more information, see Using Encryption Without Validation in SQL Server Native Client on Microsoft's website (opens in a new window).
If the installation program detects a problem with any of the specified credentials, an error message will be displayed. This typically indicates that a user account you specified does not exist. Make a correction and try again.
The program will create, link to, or upgrade the database. When the database operation is complete the Database Installation Complete dialog is displayed.