Security Controls Cloud Synchronization Options
The Tools > Options >Security Controls Cloud Sync tab is used to register your Security Controls console with the Security Controls Cloud service. Registering the console is the first step you must perform when configuring and using the Security Controls Cloud synchronization feature. After the registration process is complete, the console will be able to upload agent policy information to the cloud service and it will be able to receive agent-related information that is reported to the cloud service by agents.

|
Field |
Description |
|---|---|
|
Create a Security Controls Cloud account |
If you do not have a Security Controls Cloud account, you can create an account by clicking this link or by going to https://isec.ivanticloud.com/web/. You can configure your Security Controls agents to use Security Controls Cloud as a cloud-based source for checking in and receiving policy updates. |
|
Security Controls Cloud account |
Select the credential (the user name and password pair) that you use to authenticate to your Security Controls Cloud account. If you have not defined your Security Controls Cloud credentials within Security Controls, you can do so by clicking New. For more information, see Defining Credentials. |
|
Register this console |
Uses the specified credentials to contact your Security Controls Cloud account and register the Security Controls console. When the process is complete the message This console is registered is displayed. You can also find a record of the registration within Event History. |
|
Unregister and delete all my data |
Unregisters the console and deletes all policy and agent data that resides on Security Controls Cloud. IMPORTANT! Any agent that communicates with the console solely via Security Controls Cloud will be effectively orphaned and will eventually uninstall itself. |
|
Force full update now |
Initiates an immediate update of your Security Controls Cloud account. Current copies of all agent policies that are configured to use Security Controls Cloud are synchronized with Security Controls Cloud. You should perform this action only if you have a concern that the agent policy data contained on the cloud service is not up to date. Outbound port 443 must be available to complete this action. |
|
Registered consoles / Agent keys |
These two tabs show the console machines and agent keys that are being managed by Security Controls Cloud. For more information, see the next section, How to Install Cloud Agents. |
|
Advanced |
This tab is used to control the rate at which data is uploaded from the console to the cloud. Do not change the default settings unless you are experiencing synchronization issues or you are directed to by Ivanti Support. You can configure the following:
|
How to Install Cloud Agents
Tip: You can perform these same steps from the Cloud. For more information, see Installing Agents from the Cloud.
If you are using Security Controls Cloud synchronization, you have the ability to install a Security Controls Agent from the cloud. This is particularly helpful if you have target machines that are away from the corporate network and unable to contact the console.
Requirements
- The target machine must have Internet access
- The Security Controls console must be registered with Security Controls Cloud
- Outgoing TCP ports 80 (http) and 443 (https) must be available when communicating with Security Controls Cloud
- The URL isec.ivanticloud.com must be accessible when communicating with Security Controls Cloud
- There must be at least one agent policy that is configured to allow synchronization with Security Controls Cloud
- You cannot install a cloud-based agent on a Security Controls console machine
- Each user that installs an agent must have administrator access on their target machine
Installation Instructions
On the Security Controls Console
- Select Tools > Options >Security Controls Cloud Sync.
- On the Registered consoles tab, verify that your Security Controls console is registered with Security Controls Cloud.
- Select the Agent keys tab.
- Click New key.
The Create a New Cloud Agent Key dialog is displayed. Use this dialog to create an activation key that can be used to install one or more agents. - Provide all necessary information and then click Create key.
The agent key is created. - Email the agent key to the desired users.

|
Field |
Description |
|---|---|
|
Console name |
Select the Security Controls console that will be used to manage the agent. TIP: If the console does not contain a user-friendly name that has some significance to other users, before proceeding you might consider changing the name within Security Controls and then re-registering the console with Security Controls Cloud. |
|
Policy |
Select the agent policy that you want to assign to the agent. Only those policies that are configured for synchronization with Security Controls Cloud will be available for selection. |
|
Assigned group |
Type the name of the group to which the agent machine will be assigned within Machine View and Scan View. You might assign all Cloud agents to the same group, or you might choose to group the agents with other machines that share similar attributes such as physical location or the same agent policy. After the agent checks in with the console, you will be able to use the Assigned Group column in Machine View to sort the grid and easily locate the Cloud agents. |
|
Max. number of installations |
Specify the maximum number of agent installations you will allow to be performed using this agent key. Example: Assume you want to install agents on all of the machines at a remote site. You are not certain how many machines are at the site but you are confident that there are fewer than 10 machines. By specifying a maximum of 10 installations for this key, you are enabling all the machines at the remote site to install agents and yet limiting the number of license seats that can be consumed using this key. You cannot install an unlimited number of agents because the Security Controls console will not allow you to exceed your license count. |
|
Expires after (hours) |
Specify how long the key can be used to install new agents. For example, if you know that an administrator will be at a remote site for two days to help with the agent installations, you can specify that the key is only valid for 48 hours. This allows you to control your exposure to other people consuming license seats from the console. |
Use the Copy key to clipboard button to copy the key and then paste it into your email message. You message should also include a web link for downloading the agent installation program and detailed instructions on how to install the agent. Here's a sample message:
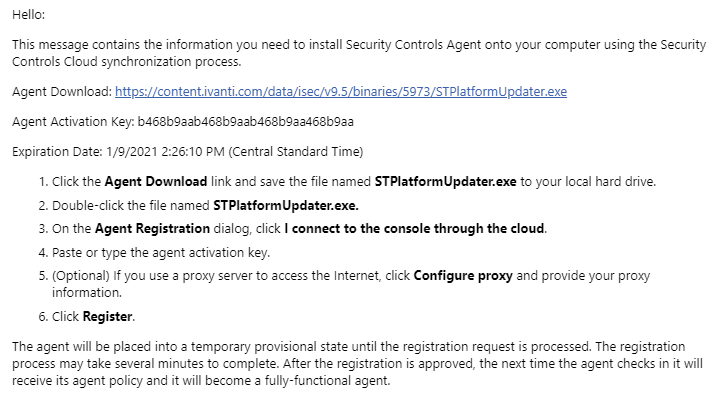
On the Target Machine
- Log on to the target machine using an administrator account.
- Open the Security Controls Cloud Sync email message that contains the agent key and the installation instructions.
- Use the instructions to install and register the agent.
You will install the agent, specify that you are connecting to the console through the cloud, paste the activation key, and then click Register. - Wait for the agent registration process to complete; this may take up to 20 minutes or more to complete.
The agent will be initially placed into a temporary provisional state while the registration is processed. During this time the Security Controls console will learn about the registration request, verify that enough license seats are available, and provide the Security Controls Cloud service with the necessary files. After the registration process is complete, at the next check-in time the agent will retrieve its assigned agent policy from the cloud and will become a fully-functional agent.
If you do not have access to the Security Controls Cloud Sync email message but you have a Security Controls Cloud account, you can create your own agent key by opening a web browser on the target machine and then following the instructions in the From your web browser section in the Installing Agents from the Cloud help topic. After the key is created and while you are still logged in to Security Controls Cloud, click the Download Agent link that is located to the right of the new key; this enables you to download the agent installation program to the target machine.