Performing an Agentless Patch Scan
Show me!
A video tutorial is available on this topic. To access the video, click the following link:
How to Scan for and Deploy Patches (06:16)
Overview
Performing a patch scan is only a click away. The Ivanti Security Controls interface allows you to work with the application in several different ways. Quick and simple scans can be performed directly from the Agentless Operation dialog. More advanced scans can be enabled by creating unique machine groups and scan templates.
Do you want more detailed information? See the How to Initiate a Patch Scan topic in the Security Controls Help.
Try it yourself
- Select New > Agentless operation.
- In the Select/confirm targets area, select My Machine.
For this initial scan you are only scanning the console machine (a.k.a. My Machine). The results from this scan will be used when evaluating other areas of the program. - On the Patch tab, verify that Security Patch Scan and Now are both selected.
- Click Scan now.
- Review the scan results by clicking the View results link.
The scan is performed using the credentials of the currently logged on user. Valid credentials must be specified when performing scans and deployments on other machines.
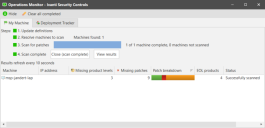
This will immediately begin a scan of your machine using the default scan template. During the scan process the latest patch data files are automatically downloaded and the Operations Monitor dialog shows the current status of the scan.
Your next step
Go to Scan View and review the scan results.
Do you want to perform a more thorough agentless patch scan?
Scanning many machines at once will obviously take much longer to perform than scanning just a single machine. It might be best to do this after you have completed your first pass through this evaluation guide.
Scanning just the console machine provides a quick and easy introduction to a patch scan, and it works well for an initial evaluation. If you prefer a more realistic demonstration, however, feel free to perform a scan of multiple machines in your network.
As an added benefit, if you specify an IP range, a domain or your entire network as your scan target, you are likely to discover machines you didn't even know you had in your organization!
- 1Select New > Machine Group.
- Type a name for the machine group (e.g. TestScan).
- On the IP Address/Range tab, specify a known range of IP addresses in your network and then click Add range.
You might specify a range that includes 40 or so machines, something like 192.168.1.1 - 192.168.1.40. - In the lower pane, select the IP address range you just created and then select Credentials > Set admin credentials.
- Click New and define a credential that can be used to access all of the machines in the IP range.
For details on providing credentials, see the Supplying Credentials topic in the Security Controls Help. - Click Assign.
- On the Machine Group dialog, click Save.
- Select New > Agentless Operation.
- In the Select/confirm targets area, select the machine group you just created.
- On the Patch tab, verify that Security Patch Scan and Now are both selected.
2.Click Scan now.
