Scan Information Tab
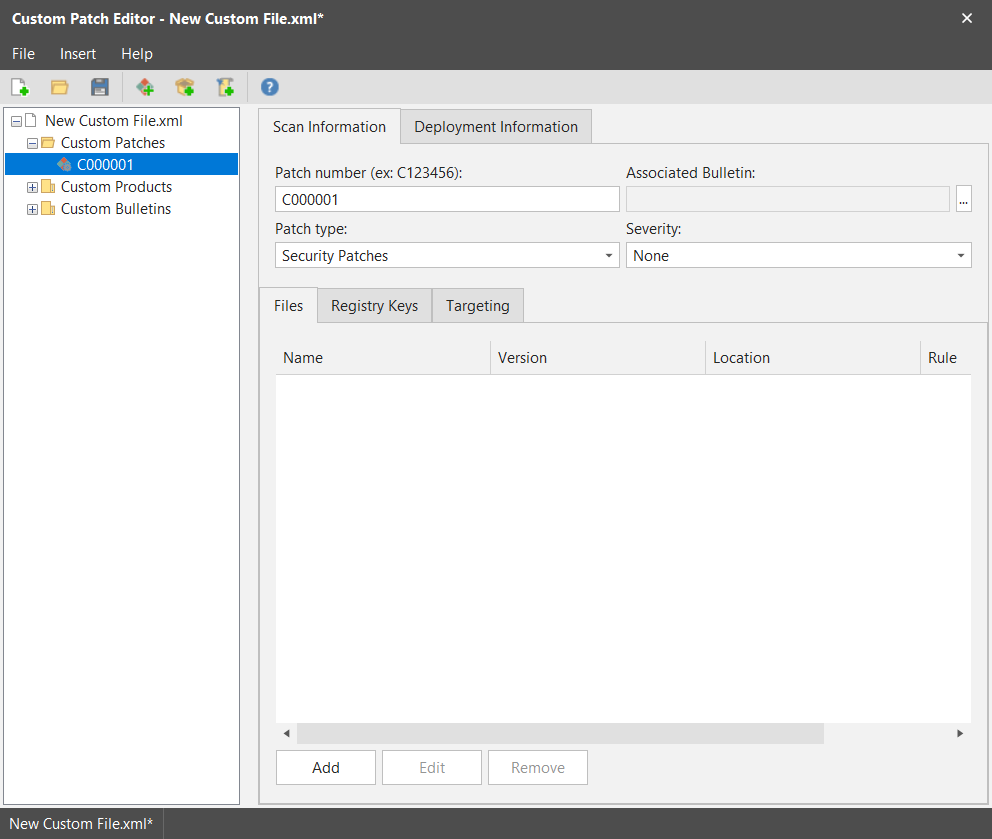
When creating a custom patch, two major tabs are used in the right-hand pane. This topic describes the options and sub-tabs contained on the Scan Information tab.
This tab contains two sub-tabs that enable you to specify criteria for determining whether or not a patch is installed. You must use your own discretion in determining whether to specify detection criteria on the Files tab, the Registry Keys tab, or both. If your requirements are that a specific file version and a specific registry key value must both be detected in order to declare that the patch is installed, then by all means do it. The recommendation, however, is to keep things as simple as possible. If detecting an old file version is criteria enough to determine that a patch is required, you probably don't need to also specify registry key information (and vice versa).
If you do not specify registry key information, patches that were not installed by Security Controls will be reported as Effectively Installed. In order for Security Controls to display a patch as Effectively Installed you must use a scan template that scans for both missing and installed patches. See Creating a New Patch Scan Template for more information.
|
Field |
Description |
|---|---|
|
Patch Number |
An identifying number for this patch. You can follow whatever numbering convention you want when defining the patch number. The only rule is that the number must be no more than 10 alphanumeric characters. Although it is not mandatory for the number to be unique, in almost all cases it makes sense to make it unique. Only in extremely rare cases is it advisable to assign the same patch number to two or more patches. The patch number specified here will be the number shown within the Security Controls interface when referring to the patch. It is also the identifier used by such things as patch groups when specifying which patches belong to a certain group. As a point of reference, the patch number is akin to the knowledge base number (or QNumber) used to identify patches in the Microsoft world. By default the first patch in the custom XML file is C000001. This number is automatically incremented for each new patch. |
|
Associated Bulletin |
You must associate each patch with an existing bulletin. The bulletin can be one that you created or one that was issued by another vendor. To see the list of all available bulletins, click the Browse button ( |
|
Patch Type |
Specify the types of patch you are creating.
|
|
Severity |
Assign one of the following four severity levels based on the perceived threat of the vulnerability related to the patch.
|
|
Files tab |
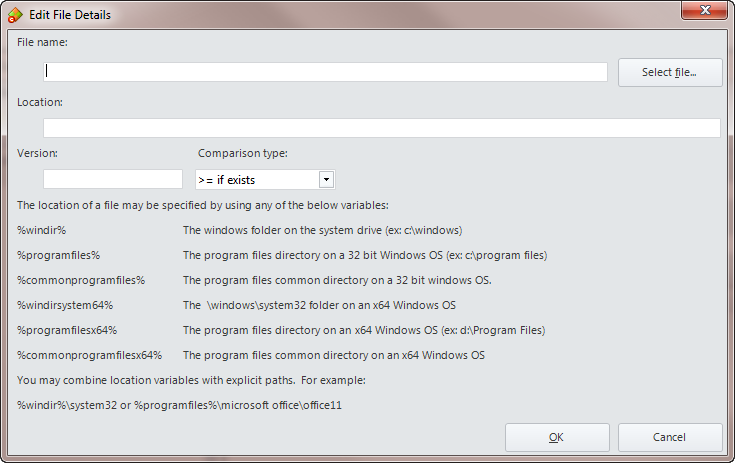
One of the ways to determine if a patch should be installed is to check the version number of the affected file on the machines being scanned. The Files tab is used to specify the file version information. If you also specify criteria on the Registry Keys tab, the tests on that tab must also be satisfied in order for the patch to be installed.
After clicking Add or Edit, the Edit File Details dialog is displayed.
|
|
Registry Keys tab |
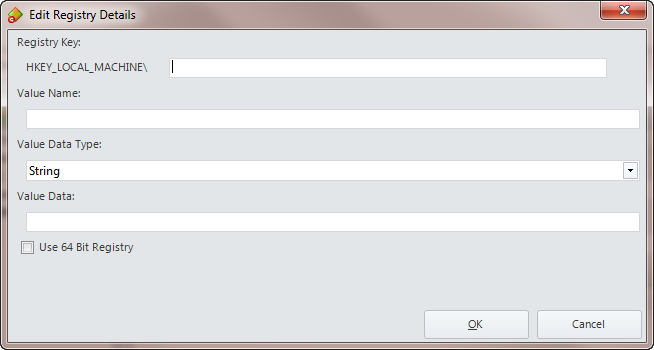
Another way to determine if a patch should be installed is to check for the data defined on certain registry keys on the machines being scanned. The Registry Keys tab is used to specify the registry information. If the scanned machine satisfies the criteria specified here then the patch will be applied. If you also specify criteria on the Files tab, the tests on that tab must also be satisfied in order for the patch to be installed.
After clicking Add or Edit, the Edit Registry Details dialog is displayed. To get the most current registry information we recommend using the Microsoft Registry Editor (regedit), a tool for viewing settings in your system registry. You can copy the required information from this tool to the appropriate fields in the Edit Registry Details dialog.
|
|
Targeting tab |
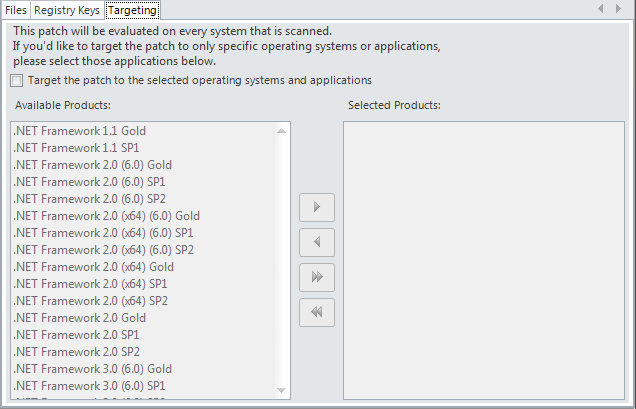
This tab enables you to specify which products apply to this patch. By default all available operating systems will be evaluated. You can greatly speed the evaluation process if you can narrow the list of products. Targeting the patch to a limited number of products can be a real time saver during the scan process as it eliminates the scanning of unnecessary products. Said Another Way: If you do not specify any products in the Selected Products list, the patch will be associated with all available operating systems. The program will scan for the patch regardless of what is installed on the target machines. This can be useful if you want to perform a mass distribution of the patch, but it can also be quite time consuming. If you specify one or more products in the Selected Products list, the patch will be associated with only those products and not with any unspecified operating systems. TIP: After importing a new custom XML file, you can use Patch View to verify the custom patch is associated with the correct product(s). To narrow the list of products:
|
When complete, save and then validate the XML file (see Saving and Validating Your Changes).


