Maintenance Window
The Maintenance Windows feature allows organizations to define specific time periods for performing planned maintenance activities, such as patching or configuration changes. The feature helps to avoid disruptions during critical times, reducing risk and maintaining stability in production environments.
You can define one or more Maintenance Windows (MWs) to control timing of the rolled out updates. When an update is available, the Agent checks if it is within the timespan of MW and updates it. If the updates do not fall within the time span of MW, it waits until the next MW.
You configure maintenance windows tasks on the Maintenance Window tab. You can edit an existing maintenance window, or you can create a new task by clicking Add a Maintenance Window.
To create a Maintenance window:
-
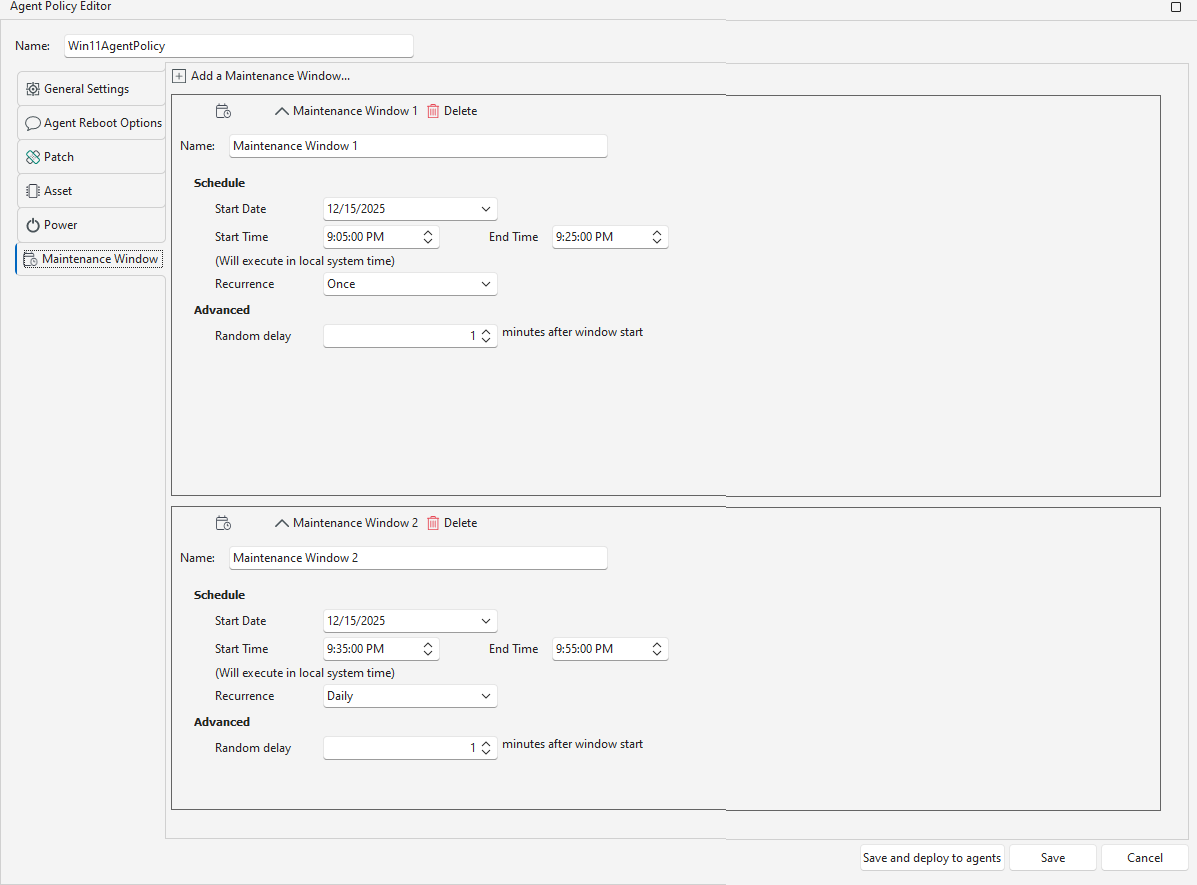
On the Agent policy Editor, click Maintenance Window tab and Add a Maintenance Window.
The Maintenance Window screen appears. -
Enter a name for the maintenance window in the Name field.
-
Perform the following to set the schedule:
- Start Date: The system selects the current date by default. To change it, type a new date or click the date list to pick one from the calendar.
- Start Time: Select the time to begin the maintenance window.
- End Time: Select the time to end the maintenance window.
-
Choose how often you want the maintenance task to run. By default, it is set to Once, meaning the task runs only once at the scheduled date and time. If you select Recurrence, the system runs the maintenance window on a repeating schedule for up to five years from the chosen Start Date.
- Daily - The task runs on the Start date, then the next task runs everyday at the time you set in the MW.
- Weekly - Select the day(s) of the week on which you want to run the maintenance window at the scheduled time.
- Monthly -
- On day – Choose the exact day of the month for the maintenance window. For example: If you select Day 10 the maintenance runs on 10th of every month.
- On the – Choose a specific week and weekday, plus an optional offset in days. For example: If you select On the 2nd Tuesday, and set an offset of 1 day, the maintenance runs on the Wednesday following the 2nd Tuesday of each selected month.
- Advanced: You can set the Random delay of number of minutes. This adds a specified minutes of delay after the scheduled maintenance window starts. This may be useful in distributing the tasks or events to avoid simultaneous start.
-
Click Save or Save and deploy to Agents.
After you add the maintenance window, you can edit or delete it. The maintenance window is saved only when you save the Policy.
The agent follows these rules when installing updates:
-
If a maintenance window is not defined in the policy, updates and installations run immediately.
-
If updates have been deferred for more than 72 hours, the agent overrides the maintenance window and starts the update process. This action may prompt users to restart their devices outside the scheduled window.
-
If the device is within the defined maintenance window, updates and installations run as scheduled.
-
If the policy is changed, the agent installs new engines immediately, regardless of any maintenance window.
-
If an update is triggered by a reboot task, new engines are installed whether or not a maintenance window is set.
This behavior helps to ensure devices are updated in a timely manner. Users might receive prompts to restart during daytime hours if updates have been previously deferred for three or more days, or if there has been a policy change.