Checkmarx Static Application Security Testing (SAST) Connector Guide
Summary: How to set up and use the Checkmarx Static Application Security Testing (SAST) connector in Ivanti Neurons.
Checkmarx Static Application Security Testing (CxSAST) is an enterprise solution that performs static analysis of custom code to uncover security vulnerabilities.
Ivanti Neurons provides an API-based connector that integrates with Checkmarx SAST, enabling the customers to bring their SAST (security) findings. It allows the customers to gain visibility into their overall risk due to vulnerabilities in their source code and enable a simpler, more efficient way to manage those vulnerabilities.
Supported Versions
Ivanti Neurons supports the following versions of Checkmarx SAST:
-
Version 9.0.0 and above.
User Prerequisites/Checkmarx SAST Setup
Checkmarx SAST is deployed as an on-premises solution. For Ivanti Neurons to communicate and pull data, the following access is required:
-
A user account with at least read access to scan results and the ability to generate reports from these scans. Set the user to the SAST Reviewer role in Checkmarx. This user should also have API access.
-
RiskSense On-Site Application (ROSA) OVA setup. More information on ROSA is available here.
Checkmarx SAST Connector API Calls
The following API calls are performed during a connector run to pull security vulnerabilities from Checkmarx into Ivanti Neurons.
|
API Type |
Endpoint |
|---|---|
|
Authentication |
cxrestapi/auth/identity/connect/token |
|
List Projects |
cxrestapi/projects |
|
List latest scan for each project |
cxrestapi/sast/scans?last=1&scanStatus=Finished&projectId=<projectId> |
|
Fetch reportId from each scan |
cxrestapi/reports/sastScan |
|
Fetch report details from each reportId |
cxrestapi/reports/sastScan/<reportId> |
Configuring the Checkmarx SAST Connector in Ivanti Neurons
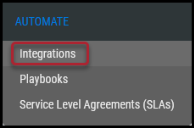
Navigate to the Automate > Integrations page.
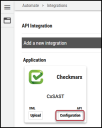
Using the search bar in the upper-right corner of the Integrations page, type CxSAST to find the connector.
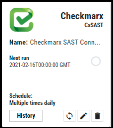
Locate the Checkmarx CxSAST card on the page and click Configuration.
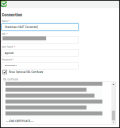
In the new window under Connection, complete the required fields, as described below.
-
Name: The connector’s name.
-
URL: The URL to access the Checkmarx SAST instance. Enter the domain name along with the port (if any).
-
For instance, if the login URL for the Checkmarx instance is https://<domain name: port>/CxWebClient/Login.aspx, then the connector’s URL should be just the domain name with port (if applicable): https://<domain name: port>/
-
-
Username: Username used to access the connected system.
-
Password: Password for the user.
-
SSL: Optional instance SSL certificate in base64 format.
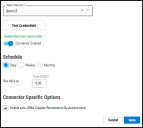
Click Test Credentials to verify the credentials are correct and have access to make API calls to the Checkmarx SAST system.
Configure the desired schedule for the connector to retrieve results from the Checkmarx SAST instance and optionally turn on Enable auto URBA (Update Remediation by Assessment).
Click the Save button to save the connector’s configuration and create the connector. Once saved, the connector is now visible on the Integrations page under Currently Configured Integrations.
Clicking the History button displays the connector details for each pull. The Sync button allows users to perform an on-demand sync. The Edit button allows the user to edit the connector configuration. The Delete button allows the user to delete the connector.
Once files have been processed on the Uploads page, the user can view the ingested data by navigating to the Applications and Application Findings pages.
Mapping Checkmarx SAST fields in Ivanti Neurons
This table depicts the high-level mapping of Checkmarx SAST fields in Ivanti Neurons.
|
Ivanti Neurons Fields |
Checkmarx Fields |
|---|---|
|
Application Name |
ProjectName |
|
Normalized Severity |
Severity Index from Checkmarx has a scale of 0-3. It is then converted into a scale of 0-10 with a specific logic. Contact Ivanti Neurons Support for more details. |
|
Plugin Source Status |
State. The field gives an integer value, and here is the corresponding mapping: 1 → TO_VERIFY 2 → NOT_EXPLOITABLE 3 → CONFIRMED 4 → URGENT 5 → PROPOSED_NOT_EXPLOITABLE |
|
Scanner Severity |
Severity Index |
|
Scanner Plugin |
SimilarityId |
Ivanti Neurons Tags
The following fields from Checkmarx SAST are converted into Ivanti Neurons tags. These tags are used for searching, playbook automation, and better visualization in Ivanti Neurons Dashboards.
-
Status
-
False Positive
-
Scan Type
-
Team
Note: All these tag names are prefixed with the field name to ease the searching process.
Common Fields in Ivanti Neurons
The following fields in Ivanti Neurons are defined for Checkmarx SAST, and here are their default values:
-
Scanner Name will be CheckmarxSAST.
-
Finding Type will be SAST.
Vulnerability Date Information in Ivanti Neurons
Within Ivanti Neurons, several dates are available on the Findings pages. When importing Checkmarx SAST data, the following criteria are used to populate these date fields.
-
Discovered On is the CheckmarxSAST scan’s start time.
-
Last Found On is when RiskSense had last seen the finding.
