Creating a Workflow from the Workflows Page
Summary: How to create a workflow from the Workflows page in Ivanti Neurons
Workflows can be created from two locations in Ivanti Neurons: the Workflows page and the findings pages (i.e., Host Findings or Application Findings).
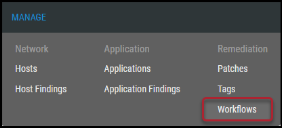
To create a new workflow from the Workflows page, navigate to the Manage > Workflows page.
On the Workflows page, click the Create button in the upper-left corner of the list view.
In the Create Workflow window, fill out the following fields.
-
Workflow Type: Type of workflow to create. Select from Acceptance, False Positive, Severity Change, or Remediation.
-
Select Asset Type: Finding type. Select from Host Findings or Application Findings.
-
Name: Workflow name.
-
Scope Override Authorization: Allow findings to be added/removed from the workflow. Select from None or Authorized. By default, this is set to Authorized to allow users to add findings to this workflow.
-
Compensating Control: Select the compensating control from the drop-down list.
-
Expiration Date: Date workflow expires. All workflows require an expiration date. You can use the slider to select one or you can enter a date manually.
-
Select Approvers: Select one or more approvers from the list. Selected approvers receive a notification to approve the workflow. This is an optional field.
-
Reason: Reason why workflow is submitted.
-
Description: Workflow description.
-
Attachment: Attach supporting evidence to the workflow.
Once complete, click Submit. Your new workflow now appears on the Workflows page.


