RiskSense On-Site Appliance (ROSA) v1 OVA (Legacy): Overview
Summary: High-level overview of the legacy RiskSense On-Site Application (ROSA) v1 OVA.
Ivanti Neurons no longer sets up new ROSA v1 connections; this documentation provides information for legacy connections to ROSA v1. View the ROSA v2 article for our current solution.
ROSA v1
RiskSense On-Site Appliance (ROSA) v1 is a virtual machine that allows the Ivanti Neurons platform to securely connect to an on-premises scanner or ticketing system and ingest vulnerability data or create tickets in a ticketing system.
The OVA can also be used for Ivanti Neurons to conduct managed scanning. This is only done for customers who subscribe to Ivanti Neurons Managed Scanning. In this case, it provides a secure connection back to the RiskSense Labs and the scanner we are using to perform the scan.
How it Works
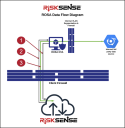
ROSA v1 is designed to allow a secure connection from the customer's internal network directly to the Ivanti Neurons platform. This is accomplished by creating a secure SSH tunnel over port 443 to transmit the required scan data to the platform for ingestion.
As a Managed Scanning OVA, outbound SSH traffic over port 10555 would be required for scan connection.
Warning: Sending SSH traffic over port 443 can often be blocked by your perimeter firewall. Please ensure that the ROSA v1 IP and the Ivanti Neurons platform IP are whitelisted to communicate via SSH over port 443 through these devices.
ROSA v1 not only works for the ingestion of scan data but will also allow a user to configure a connector to access and submit tickets.
Step 1. ROSA v1 establishes a secure SSH tunnel with the Ivanti Neurons platform.
Step 2. The Ivanti Neurons platform establishes a connection using documented APIs of a third-party source through the SSH tunnel (these connections must be pre-configured by Ivanti Neurons staff upon support request).
Step 3. Once a successful connection is made to the third-party software through the secure tunnel, data can be pushed or pulled depending on the third-party software, its capabilities, data sources, and configured integration with the Ivanti Neurons platform.
ROSA v1 Requirements
The Ivanti Neurons platform offers users that have an on-premises solution the ability to ingest that data into the platform. It can also be used to securely facilitate managed scanning. We provide the ROSA v1 in the form of an Open Virtual Appliance (OVA). This creates a secure connection from your internal network to the Ivanti Neurons platform.
The Ivanti Neurons-provided OVA will be sent digitally to you. Below are the hardware specifications and requirements needed for the OVA:
OVA Virtual Machine (VM) Requirements:
-
Online always.
-
Network access to all data sources.
-
Outgoing SSH traffic on port 443 (10555 for Managed Scanning).
-
Dedicated VM resources recommended.
-
VM Requirements:
-
4 vCPU
-
4GB RAM
-
20GB Disk
-
-
Network Information Required from Customer
-
Customer’s public IP address for whitelisting.
-
ROSA v1 Installation
The OVA contains three packaged files:
-
ovf: The virtual appliance file that contains all the VM configurations and hardware requirements.
-
vmdk: The disk image for the .ovf that contains the operating system and software for the device.
-
mf: A manifest file for confirming the previous two files is accurate and unchanged.
All three files must be used in the deployment of the OVA. In VMware vCenter or ESXi, all three files can be deployed as an OVA template.
Device Setup
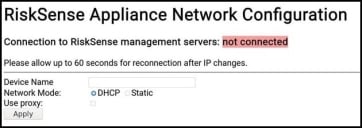
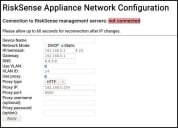
Boot up the device. At the configuration screen, provide the necessary information to configure the network settings.
Device Name: Name of the device
Network Mode: Select between DHCP and Static.
DHCP: If the network location you are deploying the ROSA v1has dynamically assigned IP addresses, select this option.
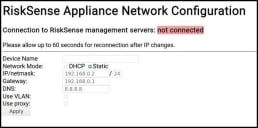
Static: If you are statically assigning the IP address to the ROSA v1device, select this option and complete the following network configuration options that are displayed.
IP/netmask: Provide the static IP address that is to be assigned to the device. For the subnet mask, provide it in CIDR notation.
Gateway: Provide the default gateway address for the subnet that the device is in.
DNS: Provide the IP address for the local DNS server for domain name resolution.
Checking the Use VLAN box adds an additional field for completion. Complete the following field.
VLAN ID: VLAN identification tag for internal network access. For establishing connectors with the platform, this is likely not necessary if you have established routes to the scanners or applications you are making connectors for.
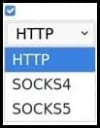
Checking the Use Proxy box adds additional fields for completion. Complete the following fields.
Proxy Type: Supported protocols for the proxy include HTTP, SOCKS4, and SOCKS5.
Proxy IP: IP address for the proxy server.
Proxy Port: Port the proxy server listens on.
Proxy Username (Optional): Username for proxy (if needed).
Proxy Password (Optional): Password for proxy (if needed).
Edit the configuration to update the network configuration as needed. Update the network settings and click Apply. If the provided whitelisting is accurate, then the device will connect within one minute, as illustrated below:
Frequently Asked Questions
What communication protocols are used for ROSA v1?
ROSA v1 communicates via TCP using the SSH Protocol through port 443.
For Managed Scanning, it communicates using the SSH Protocol through port 10555.
What if our virtual environment does not support the OVA format?
Please contact Ivanti Neurons Customer Support for other ROSA v1 deployment options.
What are the minimum access controls I can give to ROSA v1?
ROSA v1 needs to be able to communicate back to Ivanti Neurons outbound on port 443. Managed Scanning needs to communicate over port 10555.
ROSA v1, as a secure tunnel to your scanner, will also need to be able to reach the services you wish to connect to, e.g., Tenable.SC, Jira, Nessus, Nexpose.
For updates, the following addresses must be reachable:
-
http://us.archive.ubuntu.com/ubuntu
-
http://archive.canonical.com/ubuntu
-
http://security.ubuntu.com/ubuntu
