Tanium Connect Manual Upload Guide
Summary: How to manually upload Tanium data to Ivanti Neurons RBVM/ASPM/VULN KB.
Overview
The Ivanti Neurons platform supports the manual upload of findings data for endpoints in CSV format created from the Tanium Comply and Data modules. Tanium users can use some of the predefined reports in the Tanium Comply module and generate findings data files for their endpoints that provide information on existing endpoint vulnerabilities (CVEs) along with CVE details.
Below is the definition of the accepted columns for each dataset; additional information about naming requirements is provided below with the specific source.
Tanium Comply Data - Exported from Tanium Data
| Name | Tanium Column Name | Required? |
|---|---|---|
| Computer Name | hostname | Yes |
| Operating System Generation | os_family | Optional |
| Operating System | os_product | Yes |
| Tanium Client IP Address | ip address | Yes |
| CVE | plugin/title/cve | Yes |
| First Found Date | first discovered date | Yes |
| Last Seen Date | last discovered on | Yes |
| MAC Address | mac_address - optional | Optional |
| Computer ID | tanium_computer_id | Yes |
Tanium Comply Data - Exported from Tanium Connect
The platform can recognize a Tanium file as long as the name contains one of these terms: “tanium_comply”, “taniumcomply”, or “tanium-comply”. Term matching is case insensitive.
Tanium Comply data exported from Tanium Connect currently (changing in a future release) requires the file to be named “tanium_comply.csv”.
| Name | Tanium Column Name | Required? |
|---|---|---|
| Computer Name | hostname | Yes |
| IP Address | ip address (IPv4) | Yes |
| Operating System Generation | os_family | Optional |
| Operating System | os_product | Yes |
| CVE | plugin/title/cve | Yes |
| First Found Date | first discovered date | Yes |
| Last Found Date | last discovered on | Yes |
| Title | title | Yes |
| Remediation | solution | Optional |
| Details | description | Optional |
Manual Upload Steps
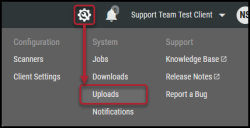
Once logged into the platform, navigate to the Configuration ( ) > Uploads page.
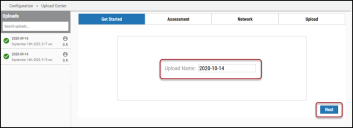
In the Get Started window, enter the Upload Name and click Next.
Select an assessment to associate with this scan. Either select an available assessment or create a new one. To create a new assessment, click the Create Assessment button. Fill out the fields in the Add a New Assessment window and click Submit. You can now select the new assessment from the list. Select the assessment to associate with this scan from the list and click Next.
Select a network for this scan. Either select an available network or create a new one. To create a new network, click the Create Network button. Fill out the fields in the Add a New Network window and click Submit. You can now select the new network from the list. Select a network from the list (use the search field to find a network) and click Next.
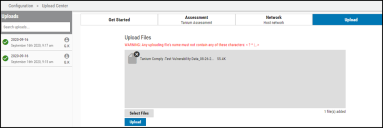
There are two ways to add scan files on the Upload Files page. Either drag and drop the file in the gray Drag files here or click the Select Files button and search for the scan file on your computer. Once the file has been added, click Upload.
To start the upload, verify all information is correct and click Start. When parsing succeeds, the status changes to Operation Complete. Once the data successfully parses, Tanium data can be found on the Manage > Hosts and Manage > Host Findings pages in Ivanti Neurons RBVM/ASPM/VULN KB.


