Open topic with navigation
Other automated requests
The Asset Content pack includes several request processes you may find helpful for automating routine tasks for your system. These processes include request forms linked to workflows that trigger either system or manual tasks. These resources are ready to use after you configure specific details for your environment. The information below provides summary information about three requests: Server rack request, Virtual server request, and Asset Reservation request. It also explains the basic steps and prerequisites that must be completed to enable these processes on your system.
Server rack request
This process uses a set of pre-configured workflows (included in the Asset Content pack) to gather details an IT technician needs when a server arrives and needs to be installed. These details include what name the machine should be given, what IP address should be assigned, what rack it should be installed in, who will be the administrator, and so on.
The process gathers the necessary information from the appropriate individuals and then populates a single form, which can easily be accessed by the IT technician or other authorized users.
By default, any user can submit this request, but it can be restricted by the ALM administrator by changing the security properties of the Server rack request form in the Design console.
The manager of the requested application must approve the request before it is submitted to the network manager, security administrator, or datacenter manager. Once the necessary information has been collected, the request is sent to the IT technician to fulfill. The actual fulfillment is a manual task to be completed by the IT technician.
Setup for the request
Assign a manager for applications associated with the request:
- In the Web console, select Asset tab > Supporting resources > Datacenter installation > Application
Add catalog items or use the default server models already included in the catalog item list:
- In the Web console, select Asset tab > Supporting resources > Catalog items > Catalog item
Add locations:
- In the Web console, select Asset tab > Supporting resources > Organization > Location
Add racks:
- In the Web console, select Asset tab > Supporting resources > Datacenter installation > Rack
In the Design console, the Datacenter form includes a hyperlink control called “Avocent MergePoint® Infrastructure Explorer”. This link can be configured to point to the Avocent MergePoint Infrastructure Explorer server at your site. If you do not have an Avocent MergePoint Infrastructure Explorer server, this link can be removed from the Datacenter form.
Configure or remove the link:
- In the Design console, select Form tab > Server rack installation > State changes > Data center
To submit the Server rack request:
- From the Home tab in the Web console, select Requests, then select Server rack request.
- Select an application. This is the main application that is being requested. It may require sub-components that are requested in the details.
- Below the Request details table, click “+” to add a new request detail.
Multiple request details can be added to each request. Note that each request detail line item has its own state transition map and several required fields that must be completed. Some of the fields are already populated.
- Enter the date the request is needed by.
- Select a Server catalog item for the type of server being requested.
- Server application type is the sub-application that is needed to fulfill the main application request. For example, an SAP system will require a database, application server, and a web server, so for SAP, these three detail items would need to be added to the details table.
- Select a Server OS type.
- Select the Environment.
- Select a Backup schedule.
- Click OK to save the request details.
- Click Submit to submit the request.
For the request to complete successfully:
- The request must be approved by the manager of the application that was selected for the request. If the request is approved, the role of Network manager will be sent an e-mail request to fill out a form called “Network information.” This task will also appear in the Network manager’s Tasks list. If the request is denied, an e-mail is sent to the requester indicating that the request was denied.
- The Network manager must fill out the network information for the request and submit the form.
- The Security administrator gets a request to fill out a form called “Request credential information”. This is sent via e-mail and should show up in the security administrator’s task list.
- The Security administrator fills out the Credentials information and submits the form.
- The Data center manager receives an e-mail with a request to fill out a form for Datacenter information. The Data center manager fills out the Datacenter information and submits the form.
- A manual task is sent to the IT technician to fulfill the request. Comments and time are required before the manual task can be marked as completed. Once the task is completed, the request is sent to the fulfilled state.
- The requester receives an email about the details of the fulfilled request.
Below is an example of the state transition map for the Server rack request details. Each request detail line item must go through this cycle before the process is complete.
Virtual server request
The purpose of this process is to gather information for the installation of a virtual server, as requested by a user. The associated workflows automate the gathering of the appropriate information for the type of machine needed.
This process is integrated with Asset Lifecycle Manager's VMware integration features. The workflow uses the VMware Clone action to create a new VMware image from an existing VMware image. This action will only work for customers who have an ESX server; otherwise the workflow would need to be modified to include a manual task for that part of the process.
By default, any user can submit this request, but it can be restricted by the ALM administrator by changing the security properties of the “Virtual server request” form in the Design console.
The user requests an application that the virtual servers will be used for. Multiple virtual machines can be requested. For example, if the user is selecting virtual servers for an SAP application, they would need to request multiple servers; one for the database, another for the Web server, and one for an application server. These line items would go into the request details.
The manager of the requested application must approve the request before it is submitted to the networking and VMware administrators. The Network administrator and the VMware administrator must both take action before the request can be fulfilled.
Once the request has been fulfilled, the requested VMware machines will have been created, and the requester receives notification that they are available.
Setup for the request
Assign a manager for the applications associated with the request:
- In the Web console, select Asset tab > Supporting resources > Datacenter installation > Application.
Update the Virtual server installation workflow for your environment:
- In the Design console, select Process tab > Workflows > Virtual server installation > State Changes > Fulfilled
You can use this workflow to automate cloning a VMware image, or you can modify the workflow to create a manual task for the VMware administrator to manually create a VMware image.
Configure Virtual data storage items for your vSphere environment:
- In the Design console, select Form tab > Data lists > Datacenter installation > Virtual datacenter storage
To submit the Virtual server request:
- From the Home tab in the Web console, select Requests, then select Virtual server request.
- Select an application for this request. The request should have a manager assigned to it.
- Below the Request details table, click “+” to add a new request detail.
- Fill in the required fields for the request detail.
- Click OK to save the request details.
- Click Submit to submit the request.
For the request to complete successfully:
- The request must be approved by the manager of the application that was selected for the request.
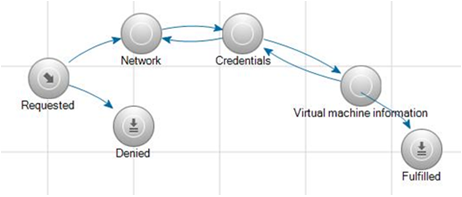
- If the request is approved, the Network administrator receives an e-mail request to fill out a form called Virtual network information. If the request is denied, the requester receives an e-mail indicating the request was denied.
- The Network administrator fills out the network information to create a new virtual machine to fulfill the request.
- The Security administrator receives a request to fill out a form called Virtual credentials information. This form is sent via e-mail and should appear in the Security administrator’s task list. The Security administrator fills out the credentials information and submits the form.
- The VMware manager receives the Virtual machine information form.
- The virtual machine information form includes an option to clone an existing image. If this option is selected and the form is submitted, the Fulfilled workflow kicks off and automatically clones an existing VMware image.
- If the Clone existing VMware image option is not selected, a manual task is sent to the specified IT Technician.
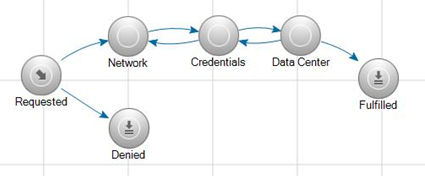
Below is an example of the state transition map for the Virtual server request details. Each request detail line item must go through this cycle before the process is complete.
Asset Reservation request
This request allows a user to submit a request to reserve one or more assets for a specified period of time. For example, a technician in a test lab could reserve a server or a set of computers for development or testing purposes. Or someone could use it to reserve items such as a video projector or a laptop for an upcoming conference.
By default, any user can submit this request, but it can be restricted by the ALM administrator by changing the security properties of the Asset Reservation Request form in the Design console.
Setup for the request
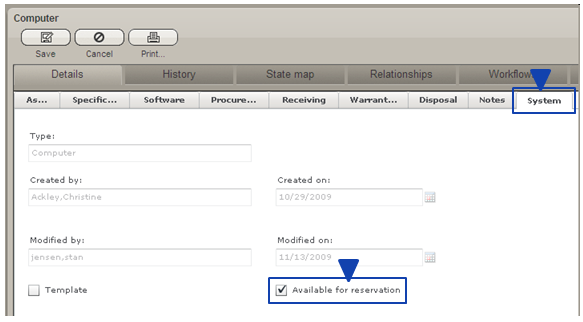
In order for an asset to be "reservable", it must first have been marked as Available on the System tab of the Asset instance's Details tab page. The asset must also have an assignment in the Catalog item field on the Asset tab.
To submit the Asset reservation request:
- From the Home tab in the Web console, select Requests, then select Asset reservation request.
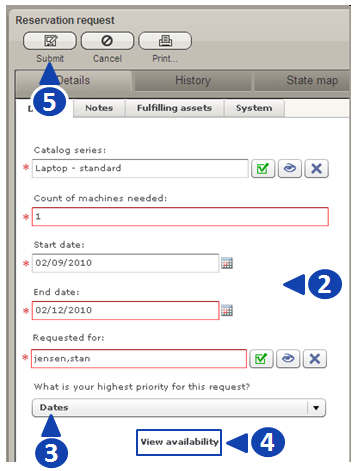
- On the Reservation request form, fill in the details for the catalog series, how many, the start and end date, etc.
- Specify whether Number of machines or Dates is a higher priority.
- Click the View availability link at the bottom of the request form.
The Asset availability calendar lets you check whether the items you need may be available for the specified dates. The calendar only indicates how many of these items are available on the specified dates; it does not guarantee that the same item is available on all requested days.
- Click Submit to submit the request.
For the request to complete successfully:
- When the request is submitted, an e-mail is sent to the Asset manager for approval, with a link to the Request form. The approving manager must open the form, click the Fulfilling assets tab, and then click the Select fulfilling assets link. This lets the Asset manager view a list of assets that are available throughout the entire requested time frame.
- The Asset manager selects the assets to be reserved and clicks Add, then clicks Save. This marks the items as reserved, which removes them from the Availability calendar and from the report showing available assets. It also adds them to the table in the Reservation request form.
- The Asset manager (or fulfilling agent) needs to change the Lifecycle state to Fulfilled, and then click Save. This sends an e-mail to the Requester to inform them that the request has been approved and the assets are reserved.
- If the fulfilling agent modifies the request before saving it, the Lifecycle state needs to be changed to Modified.
- If the request needs to be denied for any reason, the Lifecycle state needs to be changed to Denied.
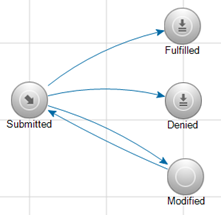
Below is an example of the state transition map for the Asset Reservation request. As indicated for the Modified state, if the request needs to be changed or updated during processing of the request, it can be resubmitted until it is eventually approved or denied.