Barcode web-form wizard
Use this wizard to create barcode web forms, which help you enter custom data into the inventory database via a web browser. Web forms are especially useful for tracking the status of a device throughout its lifecycle. You can begin a device's life in inventory by entering its barcode into a web form as soon as it arrives at your dock. When it's time to retire a device, you can create forms that move records out of inventory and into Asset Control for archiving. Along the way, you'll have the inventory records needed for reporting and auditing purposes.
Web forms are made up of two parts—the form itself and a web group that the form or forms are assigned to.
- Web form: Use this wizard to create the web forms. Design each form for a specific purpose, such as adding a new Dell system to inventory. On the form, set up one or more fields for entering the device barcode and other identifying information. If you have other system types to add, such as IBM and Acer, you need to create a web form for each of these as well (by either reusing the Dell form or creating a new one based on other inventory requirements).
- Web group: Use the barcode web-group wizard to create a web group specifically for these forms. (Continuing with the above example, you would name the group "Add New System.") A web group is simply a group that is assigned one or more web forms. You can assign the same forms to multiple groups, reusing them as necessary.
You can launch a web group by opening the Barcode Web Group > All Rules folder, right-clicking a web-group rule, and selecting Run now. You can then copy the group's URL and use it to access the group form from another device's web browser. From that browser, you can enter information into the form fields about the device you want to inventory, then click the Save button. The web-group rule will run and import the new data into the inventory database.
You also have the option of using a barcode scanner to obtain the same type of information, which you can then import into inventory using the barcode CSV import wizard. For more information, see Barcode CSV import wizard.
Open the wizard by right-clicking Barcode Web Form in the DTS tree and selecting New rule. Enter a unique name and description for this rule, then select the database where the rule will store the data it gathers. On the continuing wizard pages, enter the following information:
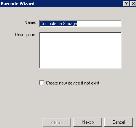
Use this page to enter a name and description for the web form.
Name: Name the web form you're creating. This is the name that will appear on the web page.
Description: Provide a description of the web form.
Create new device if not exist: A new device record will be created in inventory if the key attribute (such as a barcode or serial number) doesn't already exist in the database.
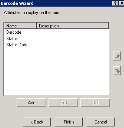
Use this page to add the information (database attributes) that will appear on the web form. You can reorder attributes in the list using the arrow buttons. The order that the attributes appear here will be the order they appear on the web form.
When you're finished adding all attributes that will appear on the form, click the Finish button. Your new barcode web-form rule will appear in the Barcode Web Form > All Rules folder. To complete the process, you can use the barcode web-group wizard to create a web group for your forms.
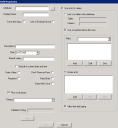
From this page, you can customize the properties for information fields appearing on the web form. You must complete this page for each field that appears on the form.
Attribute: A database attribute that the form will use as a field. Click the ellipsis (…) button to select the attribute from the attribute browser.
- Display name: The name of the attribute as you want it to appear on the web form.
- Save after input: Saves the field data after control passes to the next field on the form (by the end user pressing Enter, Tab, or clicking another location). You typically select this option for the last visible field on the form.
- Link to existing device: The key field that is used to look up a device record in the database. Ordinarily, this is the first field on the form. If a record is found, the form populates with the values for that device.
Description: The attribute description that will appear on the web form. This option is useful if you need to give more details about an attribute, such as where to find an asset tag or how to enter a model number correctly.
- Type: The attribute's data type, which is validated as the end user changes fields.
- Default value: A default value that should appear in the field if no value is present in the database. For example, when creating a form for "Add IBM System," you could make the default value for the Computer.Manufacturer attribute "IBM." When adding a default value, you would also want to select the Static value check box so that end users can't edit the field.
- Default to current date and time: If the attribute is a DATETIME data type, a time stamp is created indicating when the form was saved. This is useful for when you want to store the time the save occurred, without the field appearing on the form. (In this case, you'd also select the Don't show on form check box).
- Static value: A field value that the end user can't change. For example, if you add a default value, you would most likely select this option as well.
- Required: A value that the end user is required to enter for the form to be saved.
- Don’t show on form: A field that should not appear on the form, which is useful for fields that have a Static value that you don’t want the end user to see or change.
- Read only: A field value already stored in the database that the end user can't change.
- Keep after save: When the form is saved, this value is not cleared. Normally after a save, all values are cleared. This option is useful for an end user who is barcode scanning many similar items at one time. If the values such as manufacturer and model are left up after the form is saved, that person can continue to rapidly scan all similar items instead of editing the form every time.
Run a rule group: An option to run a rule group after saving this field, which can be useful any time you want a post-processing action to occur. For example, if you add a new Dell device to inventory, you can call a rule group to run the warranty and manufacturer parts rules that pull down information from the web about the device.
You would normally run a rule group on the last field in the form. However, as long as the attributes that will be used in the group have already been saved, you can run a group on any field.
Validation string: A regular expression that is used to check data entered by the end user. You must use proper regular-expression syntax. Click the Edit button to open a dialog where you can select a validation string to use.
Use a list of values: Instead of allowing free-form entry of text by an end user, select this option to create a drop-down list of values.
- Link to a table in the database: Link to a column in a database table instead of manually entering all of the values to appear in the drop-down list. For example, if you want to display all login names, you could specify the Computer table and the LoginName column.
- Link to another field in this form: You may have multiple fields that are related and want to have different drop-down lists depending on what a user selects in another field. For example, one list may be a list of manufacturers, and the linked field may be a list of device types for those manufacturers. It's possible to use database columns in a linked field.
- Create a list: A list of values that will appear in a drop-down list to the end user. You must manually enter these values by clicking the Add button.
- Allow free text typing: Allows the end user the option of entering a new value instead of using the drop-down list.


