Licensed software wizard
You can use a licensed software rule to group related software products that a single license can typically cover. A number of these rules install by default, but you may want create new ones for your own specific needs.
For more information about licensed software rules, see Licensed-software rules overview.
DTS also has a software-license import wizard; don't confuse that wizard with this one. Software-license import rules enable you to import software licenses from .CSV files into Management Suite's software license monitoring (SLM) tool.
Open the wizard by right-clicking Licensed software in the DTS tree and selecting New rule. Enter a unique name and description for this rule. On the continuing pages, enter the following information:
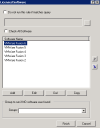
Use this page to create a list of related software products that can be grouped to share a single license.
Do not run this rule if matches query: Enables you to include a query that will skip this rule completely if another rule already covers this product. Click the ellipsis (...) button to build or import an existing Ivanti query.
Check all software: Scans all listed products and returns all that are found. This option is useful when grouping products together that don't share licenses. For example, each version of Autodesk Autocad requires its own license, but you may find Autocad easier to manage if all versions are grouped into one rule.
Click the Add button to define the software products that you want to group in this list. As you add products, use the up/down arrows to reorder them in the list. The products are searched from top to bottom, so order is significant. Put the product with the most comprehensive license at the top and order them appropriately. For example, list Microsoft Office Professional Plus first, followed by Professional, then Standard, and so on.
Groups drop-down list: Runs a DTS group if no product is found in the list (optional).
When you're done, click the Finish button. Your new rule will appear in the Licensed Software > All Rules folder.
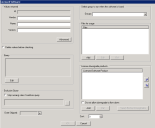
Use this dialog to define each product that you added to the licensed software list. The most important element is the product ID and its components, which provide built-in normalization. Normalization helps standardize product names, which is necessary for accurate reporting.
Because DTS is integrated with Management Suite's software license monitoring (SLM) tool, all found products that match the criteria below will be automatically added as products in the SLM console.
Vendor, Name, and Version text boxes: Enter the name of the software vendor, the product name (including edition information; for example, Office Professional), and the product version. The information you enter will make up the ID, which is the critical value returned. The ID must be unique for all products.
Advanced button: Switches the values-returned area into a fully customizable values area. You still need the above listed items, but you can customize them to return other attributes as well.
Delete values before checking: Deletes the licensed software values before the rule checks to see if they exist (optional).
Query: Click the Edit button to build a query that determines if the product is installed. For example, if a suite is to be detected, but each application is installed separately, you may need to have a group of AND statements for each part of the suite.
Exclusion query: Click the ellipsis (...) button to build a query that determines if a device does not need to check for this software. For example, if a suite is installed and is already detected, you may not need to check for an individual part of the suite.
Stop running rules if matches query: Stops the rule from searching for any more of the listed products if the exclusion query matches.
Date shipped: Select the date that the vendor started shipping the product (optional).
Groups: Select a DTS group that will run when the software is found (optional).
Files for usage: Click the Add button to add one or more executable files that check for product usage. Note that these files do not determine if the product is installed.
License downgrade products: Click the Add button to select the software products that this license can be downgraded to. The list is made of products for which rules have already been configured and is recursive. For example, if you add Microsoft Office Pro 2010 to your product, all products that Office Pro 2010 can downgrade to will be added as well. List order is important, because the downgrade occurs by cost and how products are listed; if costs are the same, the list order takes precedence.
Do not allow downgrade to flow down: Select if you don't want DTS to do recursive downgrades. In most cases, you will not want to select this option. By allowing recursive license downgrades, you don’t have to list every possible downgrade.
View effective downgrades button: Click to view all products that this license can downgrade to. The list order here is the order the licenses will be added to SLM and the order that licenses will be loaned.
Cost: Select a price that represents the relative value of the product, which may or may not match the actual price paid. This option is designed to allow you to sort the downgrade licenses. License downgrades are applied to the most expensive product first.
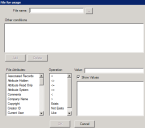
From this dialog, you can select the executable files that check for product usage.
File name: Click the ellipsis (...) button to add the file(s).
If there's more than one version of the executable file(s) you've chosen: In the Other conditions text box, click the Add button to add the file version to be used to determine usage. You may have multiple versions of an executable on a device, such as several versions of Microsoft Office's Winword.exe. However, with effective licensing, most of the time it doesn't matter which version of a file is executed, just that any file licensed by that product or its downgrades was used.
While it's possible to use many attributes to check for a file (such as date, size, and so on), we recommend just searching for a particular filename, which is the only required entry in this dialog.


