Map list wizard
You can use a map list rule as a quick way to create a new attribute based on a different attribute. For example, if you have a number of subnets in your network, each one can be mapped to a particular city. You can then map each default gateway to a city.
Open the wizard by right-clicking Map list in the DTS tree and selecting New rule. Enter a unique name and description for this rule, then select the database where the rule will store the data it gathers. On the continuing pages, enter the following information:
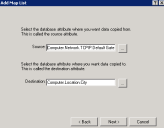
Source: The database attribute used to map the values. Continuing with the prior example, this would be Computer.Network.TCPIP.Default Gateway Address. Click the ellipsis (…) button to select the attribute from the attribute browser.
Destination: The database attribute where the mapped values will be stored. For example, this might be Computer.Location.City. Click the ellipsis (…) button to select the attribute from the attribute browser.
On this page, you'll find Destination and Source panes, which show the attributes that you selected on the previous page. You can add more attributes to either pane by clicking the ellipsis (…) button.
Add map button: Opens a dialog where you can enter a new mapped value, which is a destination value. For example, if you're mapping default gateways to cities, this might be Boston.
Add value button: Adds the values that cause the mapped values to be written to the destination attribute. First select a mapped value in the Destination pane, and then select a value in the Source pane. Click Add value to add the value below the mapped value in the Destination pane's tree structure. Continuing with the prior example, the value might be a gateway of 192.168.0.1.
Click the Finish button. Your new rule should appear in the Map List > All Rules folder.

