Start the console
To start the console
- Click Start > Programs > Ivanti > Ivanti Management Console. (The actual program name may be different depending on the Ivanti product that's installed and the license used to activate your core server.)
- Enter the user name and password. Management console users must either be in the Windows "LANDesk Administrators" group on the core server or they must have been added through the console's User management tool (Tools > Administration > User management). For more information, see the topics under Role-based administration overview.
If you're connecting to a remote core server, follow the normal Windows rules for remote login (i.e., if the user is local to that core server, just enter the user name; if the user is a domain user, enter the domain name\user name).
- Select the core server you want to connect to.
- Click OK.
The console opens with the layout (size, position, open tool windows, etc.) that was being used the last time this user logged out.
For additional consoles, the credentials you use to log into Endpoint Manager must match the credentials used for any drives you have mapped to the core server. Otherwise, you might see a "Multiple connections" error in the console login dialog.
About the Login dialog
Use this dialog box to launch the console and connect to a core server.
- Username: Identifies an Ivanti management console user. This might be an administrator user or some other type of user with restricted access
- Password: The user's password. NOTE: If a Ivanti console administrator changes the password of another user, for example an additional console user, the new password doesn't take effect until that user restarts their console. At that point, the user would enter their new password to log into the console.
- Core server: Specifies the core server you want to connect to.
Logging in from remote consoles
Endpoint Manager versions 2020.1 SU2 and 2019.1 SU6 (or newer) require that remote consoles have a secure trust relationship with the core server. The first time a remote console connects to a core, you'll see an Untrusted core dialog box.
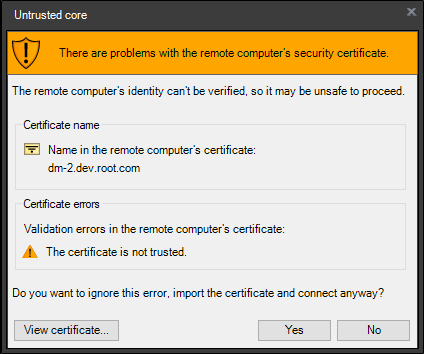
This dialog box refers to the IIS certificate on the core server bound to port 443. Clicking Yes imports the certificate into your local certificate storage. You won't see this dialog box again unless the certificate changes on the core server. If you don't click Yes, you won't be able to log in.
When logging in from an additional console, you must specify the core server name exactly as it appears in the core server's certificate.
The core server name from the certificate shows in the Untrusted core dialog box, or you can manually check the certificate contents on the core server. The Core server name you provide at login must be one from the certificate's Subject Alternative Name field, or if that doesn't exist, the Subject field.
Single Sign-on into the Ivanti console
With single sign-on, a user can log onto the Ivanti console without having to enter a username and password. If the user is the logged in user, the Windows credentials will pass through and the console will not prompt the user for login information.
To enable Single Sign-on
- On the core server, launch the Ivanti Manacgement Console.
- Click Configure > Services to open the Configure Software Services dialog box.
- On the General tab, in the Single Sign-on field, select Only.
- Click [OK.