Client certificate-based security

Ivanti® Endpoint Manager 2016 introduced a new client certificate-based security model for Windows-based devices. When this security model is active, only devices with valid certificates can decrypt secure core server data.

In version 2020.1, this security is enabled by default and setup no longer asks if you want to enable it. If you're upgrading to version 2020.1 or newer and haven't enabled client certificate-based security in an earlier version, you need to follow the steps in this topic.

If you enabled client certificate-based security in version 2016 or newer and are upgrading to a more recent Endpoint Manager version, you don't need to follow the steps in this topic.

If Endpoint Manager version 2016 or newer is the first installation of Endpoint Manager in your network environment, you can safely enable client certificate-based security because older agent versions won't be present.

If you have devices with older agent versions and you enable client certificate-based security, those devices won't be able to decrypt secure data from the core server and many agent features won't work correctly.

Once client certificate-based security is enabled, it can't be disabled.

Follow these steps to enable client certificate-based security

1.Assess readiness and update devices running older (9.x) agent versions

2.Approve client certificates

3.Enable client certificate-based security on the core server

4.Re-encrypt core server component passwords that clients use

5.(If you use core synchronization): Copy new encryption keys to other core servers

Step 1: Make sure managed Windows devices are ready

The Security settings dialog box (Configure > Security) includes a chart showing the certificate-based authentication success rate for managed devices. When managed devices attempt a secure connection to the core server or when the security scanner (vulscan.exe) runs, the connection results are saved to the device inventory. This happens even if the new security model isn't enabled yet.

Devices not in an Authentication succeeded state won't be fully manageable after the new security model is enabled. Usually it's older device agents causing devices to be in other states. Don't enable the new security model until your devices are ready for it.

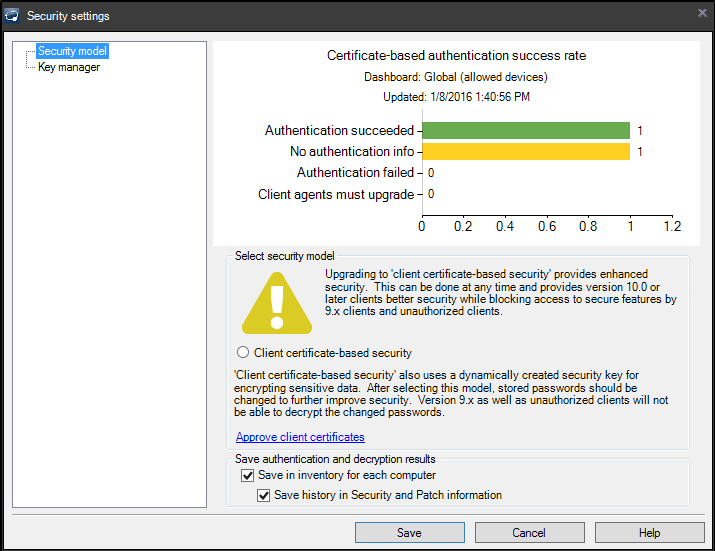
The chart in this dialog box summarizes connection attempt results:

  • Authentication succeeded: The device has version 2016 agents, is securely connected, and is ready for the new security model. Ideally all devices are here.
  • No authentication info: The device hasn't attempted a secure connection or the security scanner hasn't reported connection results back to the core yet. Note that if your core server doesn't have agents installed on it, the core will appear in this list and that's OK.
  • Authentication failed: The device tried to authenticate and couldn't for some reason. Usually this happens because the device hasn't received client certificate approval (Configure > Manage client access), as discussed in the next section.
  • Client agents must upgrade: The device can't authenticate because it's running older (9.x) agents.

Double-click items in the chart to view associated devices in the network view. The dynamically generated query for an item you double-clicked appears under Queries > My queries > Chart-generated queries. You can use this view to more easily target or troubleshoot devices.

More connection details may be available in the device inventory under Ivanti Management > Client certificate-based security > Authentication status.

Step 2: Approve client certificates

Endpoint Manager 2016 agent installation also automatically generates client security certificates. Previously this was something administrators had to do manually after agent installation. When a device with a security certificate first communicates with the core, the core adds an "unapproved" entry for that device in the Client access dialog box's Manage client certificates tab. Administrators can then approve or block core access for those certificates.

When client certificate-based security isn't enabled, unapproved devices function normally but they can't communicate through a Cloud Services Appliance (CSA) until they are approved.

When client certificate-based security is enabled, unapproved devices won't be able to decrypt secure data from the core server and many agent features won't work correctly.

When you approve a device's certificate, the core won't get an authentication status update from that device until it runs a security scan, triggering a new authentication check.

You can view the Certificate approval status chart for more information on approval progress and status (Tools > Security and Compliance > Security activity).

To manage client certificate approvals

1.Click Configure > Manage client access.

2.Select the valid unapproved devices and click Approve selected.

3.Click Close.

Step 3: Enable client certificate-based security on the core server

If you've made sure your environment is ready for client certificate-based security and you're ready to enable it, do the following.

To enable client certificate-based security

1.Click Configure > Security.

2.View the chart and read the warnings. Make sure you understand and are ready to upgrade.

3.Click the Client certificate-based security radio button so it's enabled.

4.If you want to save authentication and decryption results, select the choices you want.

5.Click Save.

6.Carefully read the security settings warning dialog box that comes up.

7.Click OK to activate client certificate-based security. Click Cancel if you aren't sure you're ready. Once activated this can't be disabled.

Step 4: Re-encrypt core server component passwords

When you enable client certificate-based authentication, the core server creates a new and unique encryption key that it will use for encrypting new data. Data that hasn't changed since you enabled the new security model will still be encrypted the old way. To re-encrypt important core server component passwords that are shared with managed devices, change them after enabling the new security model.

To update preferred server passwords

1.Click Tools > Distribution > Content replication/Preferred servers.

2.In the properties for each preferred server, change the password.

To update credentials stored in software packages

1.Click Tools > Distribution > Distribution packages.

2.On the toolbar, click Bulk package credentials update.

3.Enter the Domain\User and Password information.

4.Click Update.

To update distribution and patch agent passwords

1.Click Tools > Configuration > Agent settings.

2.In the tree, click Distribution and Patch.

3.Edit each distribution and patch agent setting, and on the MSI information page update the MSI and run-as credentials.

Step 5 (if you use core synchronization): Copy new encryption keys to other core servers

If the core server you're configuring uses core synchronization, you'll see an additional warning about needing to copy encryption keys to those other core servers. Once data is encrypted with the new encryption keys, target core servers won't be able to decrypt that data until you do this.

Securely copy the .xml encryption keys from this folder to the same folder on your target cores:

  • C:\Program Files\LANDesk\Shared Files\keys\Compatible

Since these are encryption keys, treat them carefully. Only the core server should be able to access them.