Add custom WMI items to inventory scans
The inventory scanner can scan for WMI (Windows Management Instrumentation) data items and add their values to the core database. This data is then displayed in the inventory summary.
Use this option if there are inventory items for Windows devices that you can't find in the standard inventory summary provided with Endpoint Manager.
To add WMI items to the inventory scan, you'll need to be familiar with the WMI classes and instances, and you'll need to know which namespace a class is part of. Use a tool like Microsoft CIM Studio or PowerShell (in Windows 7 and later) to browse the WMI classes.
For each class, you can scan for one or more properties and return those values in the inventory tree.
For example, the following is a WMI class for a media port connector. It contains three properties. The namespace, class, and inventory display path are defined in the top section of the dialog box. The properties are added individually and are all listed in the Properties box in the middle of the dialog box.
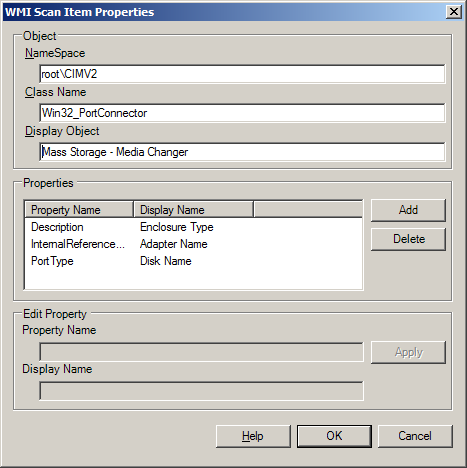
After this custom data item is defined and it has been made available to managed devices (by clicking the Make available to clients button on the toolbar), a managed device that has a media port connector will include this item in the inventory summary. In the inventory tree, the item is listed under Mass Storage > Media Changer. It will display three data items: Adapter Name, Disk Name, and Enclosure Type.
To add a WMI item for inventory scanning
- Click Tools > Reporting/Monitoring > Manage software list.
- Expand Custom Data and click WMI items.
- Click the Add button on the toolbar.
- Enter Object data as described below.
- To add a property, click Add. Enter a the Property Name and Display Name as described below. Click Apply to add the property.
- When all data is complete, click OK.
WMI items include the following data:
- NameSpace: The WMI name space. Typically this is
root\\CIMV2, but it can be another namespace. - Class Name: The WMI class name.
- Display Object: The description of where the data will be displayed in the inventory tree. Items are listed in hierarchical order and must be separated with " - " (space dash space) to accurately be displayed in the inventory. The first item you type here is the name in the inventory tree that will contain the data, such as "Custom Data".
Each item can have one or more properties that the scanner searches for.
- Property Name: The name that identifies the WMI property.
- Display Name: The name used in the inventory tree to identify the WMI property. This name appears one level below the Display Object in the inventory tree.
NOTE: After you have changed any items in the core's Manage software list, you must click the Make available to clients button to update the product definition files used by the inventory scanner. The next time devices do an inventory scan, the scanner gets the updated product definition files from the core server and applies any changes.