Additional inventory tasks and troubleshooting
This topic provides additional information about inventory scanning, as well as some troubleshooting tips. It includes the following information:
- Lauching the inventory scanner
- Scheduling an inventory scan task
- Scanning standalone devices
- Adding inventory records to the core database
- Creating MIF files
- Scanning for custom data on Macintosh devices
- Troubleshooting the inventory scanner
Lauching the inventory scanner
Launching LDISCN32.EXE directly with no parameters triggers a default command line that is the equivalent of :
LDISCN32.EXE /NTT={server} /S={server} /I=HTTP://{server}/ldlogon/ldappl3.ldz
To disable the default command line above, use /L-
To scan only to an output file use the following:
LDISCN32.EXE /L- /v /o=output.txt
Scheduling an inventory scan task
If a device is running the Endpoint Manager agents, you can schedule a script that triggers an inventory scan on the device.
To schedule an inventory scan
- Click Tools > Distribution > Scheduled tasks.
- On the toolbar, click the Schedule inventory scan
 button.
 - Configure task targets and the start time in the Scheduled tasks window.
The inventory scanner script is located in the \Program Files\LANDesk\ManagementSuite\Scripts directory. The script is a Windows .ini file that you can edit with any text editor. If you need to change the options or parameters within the script, open it and follow the instructions contained within it.
Scanning standalone devices
To scan a standalone device
- Copy the inventory scanner utility, a software description file (usually LdAppl3.ini), and the following files to a thumb drive or other accessible location: ldiscn32.exe, elogapi.dll, loc32vc0.dll, and processrunner.dll.
- Run the scan with the /O= parameter specifying the path and filename of the output file.
- At the command-line prompt, enter a unique name for the device. This name appears in the Description field in the core database. For example:
LDISCN32.EXE /F /V /L- /O=c:\%computername%.scn
- Copy the resulting scan file to the core server's ..\ManagementSuite\ldscan folder so it gets added to the database.
To scan a device that has network access to the core server
- Map a drive (N: for instance) to the ldlogon directory of the core server you want the scan to show up in.
- Click Start > Run and paste in this command after substituting your core server name where necessary:
N:\LDISCN32.EXE /NTT=CORESERVERNAME /S="CORESERVERNAME" /I=HTTP://CORESERVERNAME/ldlogon/ldappl3.ldz /F /V /L- /SYNC
Increasing the number of inventory scan threads on the core server
By default, the core server uses four core server threads for inventory scan processing and one thread for miniscan processing. You can change these defaults if your core server is underutilized and the defaults aren't high enough for your environment.
To change the number of inventory scan threads
-
On the core server, click Configure > Services.
-
On the Inventory tab, click the Advanced settings button.
-
Click either the DB threads or DB Mini Scan Threads items, enter the value you want, and click Set. Review the on-screen help information for more detail about these items.
-
Click OK to close the Advanced setttings dialog box.
-
On the Inventory tab, click the Restart button to restart the inventory service.
Adding inventory records to the core database
You can add inventory information from a standalone device or separate inventory files by running the inventory scanner from the operating system command line.
To add inventory records from a file to the core database
- Run the scan utility with the /S=, /T=, and the /NTT= parameters.
Creating MIF files
If you need a MIF file that stores a device's inventory information, you can create one by running the appropriate scanner at the command line.
To create a unicode MIF file, use the /MUNI option. To create a non-unicode MIF file, use the /M option.
To create MIF files
-
Enter this at a DOS prompt:
LDISCN32 /MUNI /V
Scanning for custom data on Macintosh devices
You can gather custom data from devices running the Ivanti agent for Macintosh and process it into inventory. The information is saved in XML files within a specific directory on the client device. Use the information below to create custom data XML files in the correct location to be processed into inventory.
For information on an alternate custom data solution for Macintosh, see the Community article: Macintosh Agent Custom Data.
NOTE: The implementation of custom data with the Ivanti agent for Macintosh doesn't use custom data forms. Custom data form tasks can't be deployed successfully to devices running the Ivanti agent for Macintosh.
Custom data XML file
Before you can add custom data to an inventory scan from a device running the Ivanti agent for Macintosh, you must first create a custom data XML file in the proper format. This section outlines the correct format to enable a custom data XML file to be processed without error.
Custom data XML file rules
XML files used to store custom data must comply with the following rules. Custom data XML files that do not correspond with all rules will not be processed into inventory.
- Custom data XML files can have any name, but must end with the .xml extension. For example:
Phone Numbers.xml
- The first line in a custom data XML file must be an XML declaration. For example:
<?xml version="1.0" encoding="UTF-8"?>
- All start tags within a custom data XML file must have a corresponding end tag. For example:
<Home>(123) 456-7890</Home>
- All tags within a custom data XML file must not have spaces. For example:
<Phone_Numbers></Phone_Numbers>
- All elements within a custom data XML that represent a single line of information must be wrapped within a parent element. For example:
<Phone_Numbers><Home>(123) 456-7890</Home></Phone_Numbers>
- In the event there is no content in an element in a custom data XML file, the element name will not be displayed as a custom data item in inventory. For example:
<Home></Home>
- In the event there is no content in any of the elements nested within a parent element in a custom data XML file, the parent element name will not be displayed as a node under custom data in inventory. For example:
<Phone_Numbers><Home></Home><Work></Work></Phone_Numbers>
Single-entry custom data XML file
Custom data XML files can be created to insert a single entry into the custom data section of inventory. To do this, the tags of each element in a custom data XML file must be named with the string that is to be displayed in inventory. Then the set of elements must be nested in parent elements with tags named to represent the string that is to be displayed under custom data in the tree view in inventory.
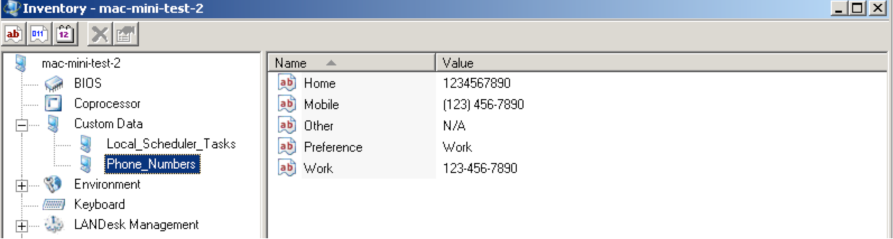
For example, if a custom data XML file were to be used to collect telephone numbers, the following XML format would result in the inventory record pictured below:
<?xml version="1.0" encoding="UTF-8"?>
<Phone_Numbers>
<Work>123-456-7890</Work>
<Mobile>(123) 456-7890</Mobile>
<Home>1234567890</Home>
<Other>N/A</Other>
<Preference>Work</Preference>
</Phone_Numbers>
Multiple-entry custom data XML file
Custom data XML files can be created to insert multiple entries into the custom data section of inventory. To do this, the tags of each element in a custom data XML file must be named with the string that is to be displayed in inventory. Then each set of elements must be nested in parent elements with tags named to represent the string that is to be displayed under custom data in the tree view in inventory.
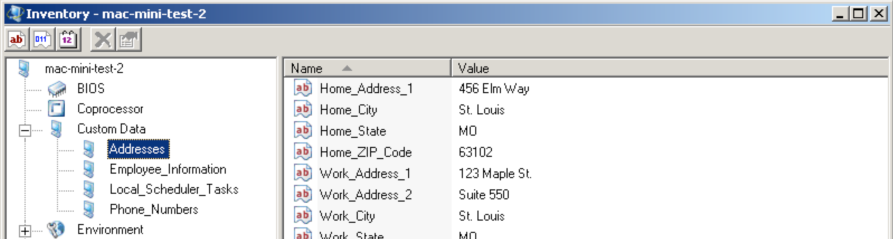
For example, if a custom data XML file were to be used to collect employee information, the following XML format would result in the inventory record pictured below:
<?xml version="1.0" encoding="UTF-8"?>
<Phone_Numbers>
<Work>123-456-7890</Work>
<Mobile>(123) 456-7890</Mobile>
<Home>1234567890</Home>
<Other>N/A</Other>
<Preference>Work</Preference>
</Phone_Numbers>
<Addresses>
<Work_Address_1>123 Maple St.</Work_Address_1>
<Work_Address_2>Suite 550</Work_Address_2>
<Work_Address_3></Work_Address_3>
<Work_City>St. Louis</Work_City>
<Work_State>MO</Work_State>
<Work_ZIP_Code>63102</Work_ZIP_Code>
<Home_Address_1>456 Elm Way</Home_Address_1>
<Home_Address_2></Home_Address_2>
<Home_Address_3></Home_Address_3>
<Home_City>St. Louis</Home_City>
<Home_State>MO</Home_State>
<Home_ZIP_Code>63102</Home_ZIP_Code>
</Addresses>
<Employee_Information>
<Title>Sales Representative</Title>
<Employee_ID>4562</Employee_ID>
<Manager>Bob Smith</Manager>
<E-Mail>[email protected]</E-Mail>
</Employee_Information>
Custom data directory
Every custom data XML file to be processed into inventory must be saved in the custom data directory, which is located at /Library/Application Support/LANDesk/CustomData on every device running the Ivanti agent for Macintosh.
After a custom data XML file has been processed into inventory, the file remains in the CustomData directory. This allows for subsequent full scans (and delta scans with Force software scan enabled) to include information from custom data XML files saved in the custom data directory.
Inventory
During the software portion of an inventory scan, a check is made of the CustomData directory. Any XML files in the CustomData directory will be processed into custom data and included in the inventory scan sent to the core.
Inventory scan types
Custom data XML files that are in the CustomData directory are processed during all full scans, and are also processed during delta scans that include software scanning.
Inventory logging
The portion of an inventory scan that looks for and processes custom data XML files is recorded in LANDESK.log as ldscan : Scanning for custom data. If the custom data XML files in the CustomData directory are formatted properly, there will be no further entries in LANDESK.log regarding custom data. However, if there is an error, it will be recorded in LANDESK.log as ldscan: Error opening or loading the CustomData file:filename.xml as XML.
An error while processing a custom data XML file will not prevent other custom data XML files saved in the custom data directory from being processed. Likewise, errors processing custom data XML files will not prevent an inventory scan from completing or being sent to the core.
Inventory on the core
Custom data information in inventory, for a device running the Ivanti agent for Macintosh, will be updated when the custom data XML files containing information are updated and an inventory scan that updates custom data is executed on the client.
Be aware that custom data information removed from custom data XML files is not removed from inventory records on the core. To remove unwanted custom data information from an inventory record on the core, delete the record and send a new full scan from the device that the record represented.
Troubleshooting the inventory scanner
This section describes common inventory scanner problems and possible solutions.
The inventory scanner hangs
- Make certain that you aren't including the old /DELL or /CPQ options on the command line. These options are no longer supported.
- Scan to a file using the /O= parameter. This may show a conflict with the network card or the network.
A device's hardware scans correctly, but its software doesn't
- Verify that the core database is configured to do a software scan now, and use the /f parameter to force a software scan.
- Scan to a file using the /O= parameter. This should list all of the software at the end of the file.
The network view provides inventory data for only some devices
To view device information, ensure that your devices have been scanned into the core database. Devices appearing without information haven't been scanned into the core database.
To view a device's inventory data in the network view
- Configure the device.
- Scan the device into the core database.
Specifying the number of days to keep inventory scans
By default, the core server keeps inventory scans for devices until you delete them. You can have the core delete inventory scans for devices if the device hasn't submitted a scan for the number of days you specify. Doing this can remove devices that are no longer on your network.
To specify the number of file revisions to keep in the core database
- Click Configure > Services > Inventory.
- Specify the number of days you want to keep inventory scans.
- Click OK.