Patch Automation
Patch Automation (Tools > Security and Compliance > Patch Automation) is a tool that greatly simplifies and automates monthly patch campaigns. With Patch Automation, you're guided through the patch campaign creation process. You decide who gets patched when. You can easily monitor what will be patched in real-time as the patches are accumulated.
When the campaign patching steps begin, you see the patch success rate as it happens, and you decide when the campaign steps progress to successively broader test groups. Once you’ve created a Patch Automation campaign process that works for your organization and risk tolerance, it can be automated each month with reduced supervision.
IMPORTANT: If you're using this tool for the first time, make sure you follow the configuration steps in Before using Patch Automation.
Once you configure a patch campaign, each month the campaign automatically repeats. You configure when the patch campaign begins. For example, if you configure your campaign to begin two days after patch Tuesday, Patch Automation will accumulate all patches until the date you chose. You can have as many patch campaigns as you want. Each campaign is independent.
Standalone single patch campaigns are also available that you can run on demand. These campaigns don't automatically repeat.
Custom patch campaigns only run once. These campaigns are based on vulnerability groups you've already created that you then select in the campaign. Custom campaigns can be helpful if you want to run a campaign that isn't centered around vendor security.
The campaign for each month begins with a vulnerability download phase, where vulnerabilities that will be covered by that campaign month are identified and downloaded. The first step in the first campaign allows you to configure how many additional days of vulnerabilities to consider, since you may want that first campaign month to cover vulnerabilities discovered before you created the campaign.
Note that the patch binaries will be downloaded based on your Endpoint Manager configured policy. Using the recommended setting of daily scans for all vulnerabilities ensures patch binaries are downloaded before the patches are deployed to endpoints. Patches that don't support automatic downloads may still require a manual download.
The monthly deployment phase then begins and campaign steps start executing in the order they appear on the Patch steps page. You can configure as many campaign steps as you want. Each step can have its own targets and patch acceptance criteria. You control whether step progression happens automatically if the acceptance criteria are met or manually based on a right-click.
We recommend at a minimum you configure these steps for each campaign:
- A small pilot group to make sure nothing major is broken.
- An extended pilot group to identify rarer issues.
- A production group that deploys to everyone.
For each campaign, do the following:
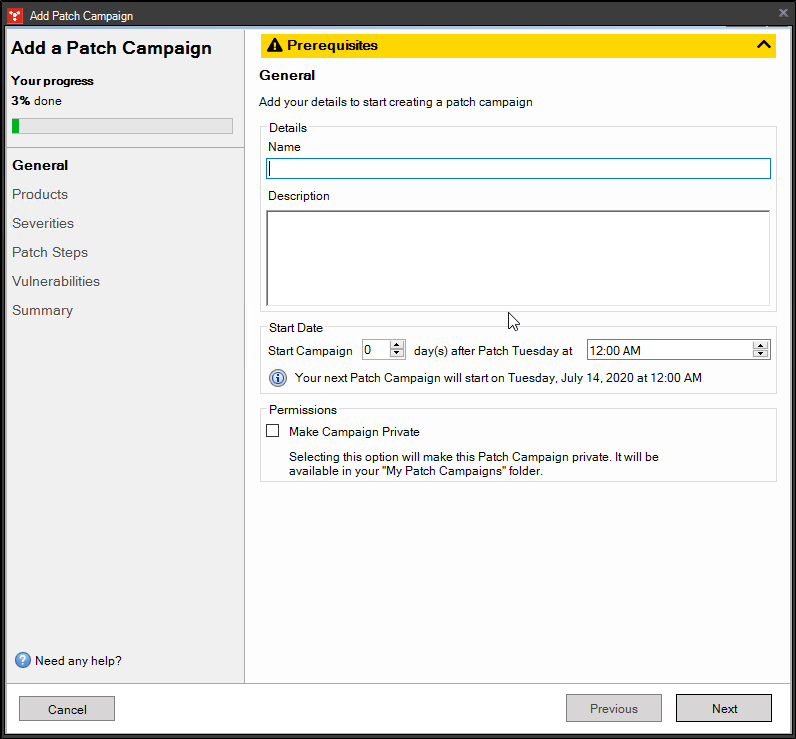
- On the General page, name the campaign and define when a patch campaign starts each month, based around each patch Tuesday. There is a Single Patch Campaign option you can choose.
- On the Products page, select the products you want to gather patches for during the campaign. Use the Search product box to quickly find specific products.
- On the Severities: page, select the vulnerability severities you want to patch. Use the Search severity box to quickly find specific severities.
- On the Patch steps page, add and configure test group steps (Pilot, Extended Pilot, Production, and so on). Read the next section for more information on campaign steps.
- On the Auto Fix page, you can make autofix global and you can select a scope that includes the devices you want autofixed. This option can be useful if you don't want devices like servers to use autofix.
- On the Vulnerabilities page, configure how you want to handle content downloads for the first month. Use this if you want to add patches that became available before you started the campaign. After the first month, content for each month will be downloaded automatically.
- On the Summary page, review the campaign summary to make sure it's configured the way you want it.
For each campaign step on the Patch steps page, do the following.
- Click the Add step button to add a new step. Start with a pilot group who will get the patches first. On the final step, you can use the Enable global autofix option if you want the campaign to apply to all devices after the initial smaller deployment steps complete successfully. This requires Enable autofix to be enabled in the deployed Distribution and Patch agent settings.
- On the Details tab, name the step and add targets that the step will deploy to.
- On the Acceptance criteria tab, select the amount of time you want to stay in that step. When the step starts, a scheduled repair task runs on the targeted devices for that step. The step then waits for the time you specified. At the end of that time, it calculates the success rate. Define what is a successful test. Success triggers a move to the next group, such as Pilot group to the Extended Pilot group.
- On the Approval and updates tab, select whether you want to automatically move to the next available step or if you want to manually confirm each step by right-clicking it in the summary view. You can also configure email notifications when a step completes.
Understanding acceptance criteria
The Acceptance criteria tab for each campaign step has two options:
-
Deployment success rate: Each patch that is part of this campaign must be successfully deployed to the assigned devices. If the patch isn't applied (installed) successfully it's considered a failure. Note that if an endpoint was offline for the entire duration of a step, that doesn’t count as a failure.
-
Reported good patch ratio: Requires and uses the "collect data on good patches" feature. It detects application crashes or freezes and reports that data to the core server. The ratio applies only to endpoints where the patch installed successfully. For example, if only 50% of endpoints install a patch successfully, it's still possible to have a 100% good patch ratio if there are no detected crashes or manual reports for that patch.
The "collect data on good patches" feature only works with third-party (not Microsoft and not .msu format) Windows application patches. If the patch is a Microsoft Windows Update .msu file or if it's for a different operating system, it doesn't count towards reported good patches.
You can make progress to the next step automatic if acceptance criteria are met, or manual if you want to review the results and then decide whether to proceed.
Viewing patch campaign progress and status
When you first create a campaign, it's in the scheduled state, where it begins accumulating patches that will be part of the campaign. The campaign steps won't start until the next patch Tuesday interval, adjusted for the days of offset you specified. As each month completes, the tool automatically creates a new campaign for the next month in a scheduled state. There are six possible scheduled states: Active, Scheduled, Pausing, Paused, Completed, and Failed.
Here are some tips on viewing campaign status:
- Clicking on the main campaign gives status for the campaign overall.
- Clicking on the monthly campaign items underneath a campaign gives you status for the month you clicked.
- Underneath each campaign you can also see the campaign's vulnerabilities and target devices.
- Use the Vulnerabilities view to right-click and Approve, Disapprove, or Reset approval status. Changing the approval status is mostly useful for manually approved steps. Deployment success rate is calculated only when the step is finished.
- If a step is paused, either manually or because it is waiting to be manually approved, you can use the Vulnerabilities view to individually Approve or Disapprove each vulnerability. Approving a vulnerability includes it in the success rate calculation. Disapproving a vulnerability removes it from the success rate calculation and from deployment for that campaign.
- You can also use the Vulnerabilities view to do a patch impact analysis or create a repair task.
- The Vulnerabilities view's Step affected computers right-click option shows you which computers are affected by the selected vulnerability. This is a snapshot that is created at the end of each step.
- Use the Devices view to see total patches, patches deployed, and patches failed for each device.