Create custom security definitions
If you no longer need a custom definition, you can delete it. Deleting a custom definition removes its information and associated detection rules from both the core database and Patch and Compliance tool window. (Exporting does not remove the definition information.)
As with purging known vulnerability information, deleting custom definitions does not remove any downloaded associated patch files. Patch files must be removed manually from the patch repository.
To delete custom definitions, select one or more, and then click the Delete selected custom definitions button in the toolbar.
 To create custom definitions
1.Click Tools > Security > Patch and Compliance.
2.From the Type list, select All Types or Custom Definitions. (The Create custom definition toolbar button is available only with one of these two types selected; or with the Blocked Applications type selected, if you want to create a custom blocked application definition.)
3.Click the Create custom definition toolbar button. An editable version of the properties dialog box opens, allowing you to configure vulnerability settings.
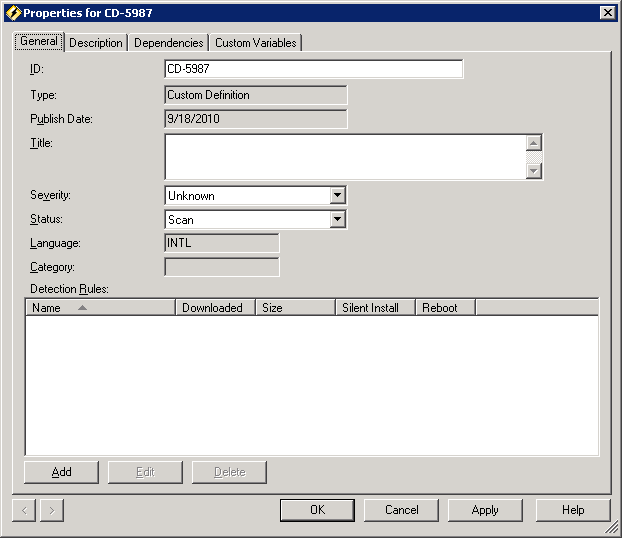
4.Enter a unique ID and Title for the vulnerability. (The system-generated ID code can be edited.)
5.The Type is a Custom Definition and can't be modified.
6.Specify a Publish date.
7.Enter a descriptive title for the vulnerability. This title displays in vulnerability lists.
8.Specify the Published severity level. Available options include: Unknown, Service Pack, Critical, High, Medium, Low, Not Applicable, Unknown, no override and Preview Pack. You can also override the published severity level if your risk assessment is different.
For more information, see Severity.
9.Specify the Status for the vulnerability. When you specify a status, the vulnerability is placed in the corresponding group in the tree view (see All items (definitions in the tree view)).
10.The language settings for user-defined vulnerabilities are automatically set to INTL (International or Language neutral, which means the vulnerability can be applied to any language version of operating systems and/or applications).
11.The Detection Rules list displays all the rules used by this vulnerability. If you're creating a new custom vulnerability, configure at least one detection rule that is used by the security scanner to scan devices for the vulnerability. To add detection rules, click Add. (See the procedure below for instructions.)
12.If you want to provide additional information about this vulnerability, click Description and type your comments in the text box and/or enter a valid web address where more information is posted.
13.If you want to include prerequisites for this custom vulnerability definition (and see any other definitions that are dependent on this vulnerability), click Dependencies and configure the prerequisite definitions.
14.If you want to create or edit your own custom variables for this custom vulnerability definition, click the Custom Variables tab and configure the custom variables.
15.When you're done specifying attributes for the custom vulnerability, click OK.
As with known vendor vulnerabilities, custom vulnerabilities should include one or more detection rules that tell the security scanner what conditions to look for when scanning managed devices. Follow the steps below to create a detection rule for a custom vulnerability.
You can do the same things with a custom vulnerability definition as you would with a known vulnerability from an industry source. You can set the vulnerability's status to Scan or place it in the Scan group to be included in the next security scan, place it in the Don't Scan or Unassigned group, view affected computers, enable Autofix, create a repair job, or clear scan/repair status. To choose an option, right-click a custom vulnerability definition to access its shortcut menu.
To create custom detection rules
1.Right-click a custom definition, and then click Properties. (Or double-click the vulnerability definition.)
2.Click the Add button located under the Detection Rules list. An editable version of the Rules Properties dialog box opens at the dialog box's General Information page, allowing you to configure a detection rule.
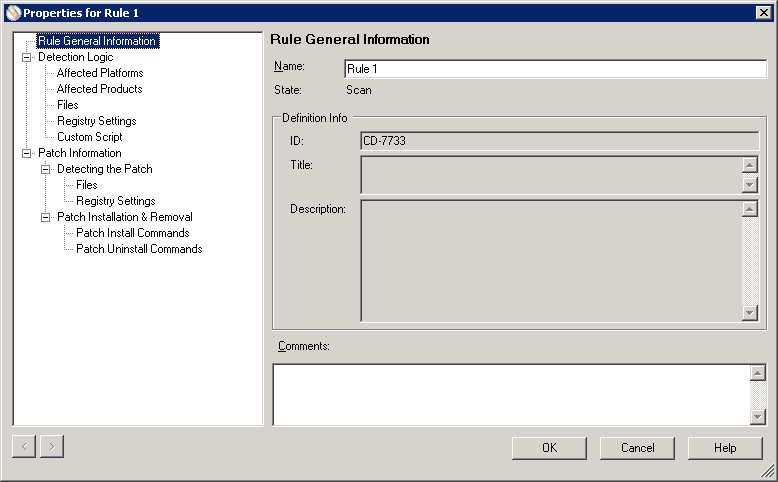
3.At the Rule general information page, enter a unique name for the rule. The rule's status can't be modified here. To change the status of a detection rule, right-click the rule in any list view, and then click Enable or Disable, depending on the current state. The rule's definition information can't be modified here either. However, you can enter any information you want in the Comments box.
4.Use the various pages of the rule properties dialog box to define the detection rule, as described in the rest of this procedure.
5.Open the Detection logic pages.
6.At the Affected platforms page, select the platforms you want the security scanner to run on to check for this detection rule's definition. The list of available platforms is determined by the vulnerabilities you've updated via the Patch and Compliance tool. Click Load default platform list to add the available platforms to the list. You must select at least one platform.
7.At the Affected products page, associate the rule with one or more specific software applications. First, click Configure to open the Selected affected products dialog box where you can add and remove products in the Affected products list (this list can be shortened if you like, by selecting the check box at the bottom of the dialog box). The list of available products is determined by the content you've updated. You don't need to have a product associated with a detection rule. Associated products act as a filter during the security scan process. If the specified associated product is found on the device, the scan quits. However, if the product is found, or if no products are specified, the scan continues to the files check.
8.At the Query filter page, you can optionally specify a query that includes only the devices that you want the custom detection rule to return results for.
9.At the Files page, configure specific file conditions that you want the rule to scan for. Click Add to make the fields on this page editable. The first step in configuring a file condition is to specify the verification method. The fields on this page depend on the verification method you select. To save a file condition, click Update. You can add as many file conditions as you like. For a detailed description of this option, see About the Detection logic: Files used for detection page.
10.At the Registry settings page, configure specific registry conditions that you want the rule to scan for. Click Add to make the fields editable. To save a registry condition, click Update. You can add as many registry conditions as you like. For a detailed description of this option, see About the Detection logic: Registry settings used for detection page.
11.At the Custom script page, you can create a custom Virtual Basic script to assist with detection for this detection rule. A script can access the security scanner's following runtime properties to report results: Detected, Reason, Expected, and Found.
NOTE: Use the Use editor button to open your default script editing tool associated with this file type. Upon closing the tool, you'll be prompted to save changes in the Custom Script page. If you want to use a different tool, change the file type association.
12.At the Patch information page, specify whether the vulnerability associated with this detection rule can be repaired or just detected on your managed devices. If you select the repair option, the Patch download information and Repair information fields become editable.
13.If you can repair by deploying a patch, enter the URL to that patch file and specify whether it can be downloaded automatically. (You can attempt to download the associated patch file at this time by clicking Download, or you can download it at another time.)
14.Also, if you can repair by deploying a patch, enter a unique filename for the patch file and specify whether the patch requires a reboot to complete remediation and if the patch requires user input during remediation. (For a detection rule that includes remediation, we strongly recommend you create a hash for the patch file by clicking Generate MD5 Hash. The actual patch file must be downloaded before you can create a hash. For more information on the hash, see About the Detection rule: General information page.)
15.For a rule that allows remediation, you can configure additional commands that are run during the remediation process on affected devices. To configure additional commands, click the Patch install commands page, and then click Add to select a command type and to make the command's argument fields editable. Additional patch install commands are not required. If you don't configure special commands, the patch file executes as it normally would by itself. For a detailed description of this option, see About the Patch install commands page.
To create a blocked application definition
1.Click Tools > Security > Patch and Compliance.
2.From the Type list, select Blocked applications.
3.Click the Create custom definition toolbar button. An editable version of the properties dialog box opens, allowing you to configure the settings.
4.Provide the Filename for the application that you're blocking. The security scanner will check the file header, so even if the filename has been changed on the managed device, the application is blocked.
5.Type a Title and Summary information for the definition. These are for your convenience in organizing the definitions.
6.To put the definition in a Category, select an existing category from the drop-down list or type a new category in the field.
7.If desired, specify a specific version or range of versions of the application that you want to block. This option is only available for devices using a Windows operating system. It is disregarded when the definition is applied on a Mac.
8.Select the Affected platforms to limit the number of devices scanning for the definition.
9.Click the Block status tab to set the status for the definition. By default, the definition is Block (global).
NOTE: To change the status after the definition has been created, drag the definition from the current folder to the new folder in the Blocked applications tree.
10.Click OK.