Configuring SQL server replication for rollup cores
Ivanti® Endpoint Manager uses native SQL Server replication to roll up data from core servers to a rollup core server. SQL Server replication is almost real-time and extremely efficient, so your rollup database content will be much more current than it was with the old rollup database utility that was used prior to Endpoint Manager 9.6.
Prerequisites
The following pre-requisites must be performed before using SQL Server replication in a rollup core scenario.
- Make sure the Endpoint Manager Setup program's Replication option is installed on each DBMS SQL Server (publishers and subscriber) that you want to participate in replication. You can verify this by running the SQL Server setup.exe.
- One of the limitations of SQL Express is that it cannot act as a publisher in a replication topology. Therefore, you cannot replicate data from a Endpoint Manager core server using SQL Express as the back-end database.
- Make sure KB2840628v2 is installed (publishers and subscriber DBMS servers). Under “Microsoft .NET Framework 4 Client Profile” updates. If you have KB2840628 installed, make sure it is KB2840628v2. Reinstalling will update it to v2.
Step 1: Create Windows accounts (publisher and subscriber DBMS servers)
Using the following table, create Windows user accounts on the machines you have installed Microsoft SQL Server. The "publisher" is the SQL Server hosting the core server’s database. The "subscriber" is the SQL Server hosting the rollup database.
| User name | SQL Server | Notes |
|---|---|---|
| ldms_snapshot | Publisher | Used by the replication Snapshot Agent |
| ldms_logreader | Publisher | Used by the replication Log Reader Agent |
| ldms_distribution | Publisher and Subscriber | The passwords must match on both the Publisher and Subscriber or the Publishers’ Distribution Agent will not be able to connect to the Subscriber database. |
Step 2: Create a replication share and assign Windows user permissions (publisher DBMS servers)
On the SQL Server hosting the core server’s database (publishers) navigate to the SQL Server folder and create a folder named ReplData if one doesn’t already exist. The default location is:
C:\Program Files\Microsoft SQL Server\MSSQL.X\MSSQL\
Share this new folder as ReplData and make sure that the following users have the following permissions in both the Advanced sharing permissions (the Sharing tab) and the Group or user names portion of the Security tab.
| C:\Program Files\Microsoft SQL Server\MSSQL.X\MSSQL\ReplData | |
|---|---|
| Account name | Permissions |
| <computer_name>\ldms_snapshot | Full control |
| <computer_name>\ldms_distribution | Read |
Step 3: Grant Modify permissions to the distribution user in the SQL Server COM directory (subscriber DBMS server)
On the SQL Server hosting the rollup core server’s database (subscriber), navigate to the SQL Server folder and locate the COM directory. The default location is:
C:\Program Files\Microsoft SQL Server\<latest version>\COM
While highlighting the COM folder, right-click and choose Properties. On the Security tab, add the distribution user to the Group or user names section and click Modify to give the user all rights except for Full control.
| C:\Program Files\Microsoft SQL Server\<latest version>\COM | |
|---|---|
| Account name | Permissions |
| <computer_name>\ldms_distribution | Modify | Read & Execute | List folder contents | Read | Write |
Step 4: Configure SQL Server Agent to start automatically (publisher and subscriber DBMS servers)
On the publisher, the SQL Server Agent service needs to start automatically in order for replication to succeed. Do the following:
- Open the Windows Services dialog by clicking on Start > Run and entering services.msc.
- Double-click the SQL Server Agent (MSSQLSERVER) service and change the Startup type to Automatic.
- Click Start to start the service.
Step 5: Allow the SQL Server port to communicate through your public firewall (publisher and subscriber DBMS servers)
On the publisher and each subscriber:
- From Windows Control Panel, launch Windows Firewall. On the left side, click Advanced settings to open the Windows firewall with advanced security dialog box.
- Click on Inbound Rules, and on the right click New Rule.
- Click Port and click Next
- Click TCP, and next to Specific local ports enter the TCP port number that the SQL Server Agent is configured to use (the default port is 1433). Click Next.
- Click Allow the Connection and click Next.
- On the Profile page, make sure you leave the options selected (Domain, Private, or Public) that are required in your environment to ensure that all of the SQL Servers can communicate with each other. Click Next.
- Name your rule so you know what it is, something like "SQL Server Replication." Click Finish.
Step 6: Run the replication definition tool and enter database credentials and publisher information (subscriber DBMS server)
On the subscriber, run the Ivanti replication utility:
C:\Program Files\LANDesk\ManagementSuite\LANDesk.Database.Replication.exe
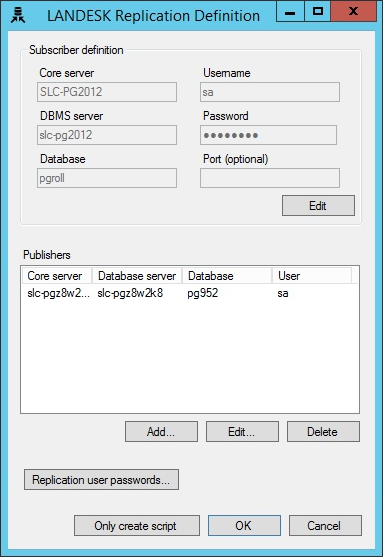
Use this utility to enter the database server Windows authentication credentials and publisher definitions.
IMPORTANT: Clicking OK in the replication utility drops all tables in the rollup database so that replication data can be rebuilt from all publishers. Depending on your database sizes, this may take a while. If you haven't made changes in the utility, click Cancel to exit it instead so the rebuild doesn't happen.
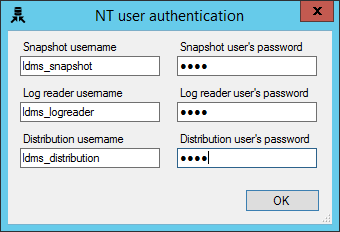
To enter database server Windows authentication credentials
- In the Ivanti replication definition utility, click Replication user passwords.
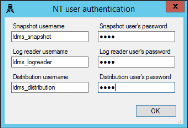
- Enter your snapshot, logreader, and distribution usernames and passwords.
- Click OK.
To enter publisher definitions
- In the Ivanti replication definition utility, click Add.
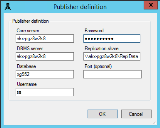
- In the Core server field, provide a descriptive name. This field is only used to help you organize your publishers.
- Fill in the remaining fields and click OK. If the information you entered isn't correct, the utility will show an error message.
- Repeat for each core server publisher.

Step 7: Start replication in SQL Server Management Studio on the publishers
Inside SQL Server Management Studio on the publishers:
- Expand Server > Replication > Local Publications. Right-click on [DB]: LANDesk and choose View Snapshot Agent Status.
- If it hasn’t started yet, click Start.
- Verify it was successful.
- Right-click on Replication and choose Launch Replication Monitor. Verify it is running and that no errors have occurred.
At this point, replication is working. You can further verify it by querying your rollup database.
Notes
- If you upgrade a core that is also a publisher, the upgrade will stop replicating the core's database and you will need to rerun LANDesk.Database.Replication.exe to reinitialize the replication process.
Changing the replication schedule
By default, the subscriber pulls transaction logs from the publishers every 30 seconds. You can change this schedule if necessary. Each publisher has its own replication schedule and they don't all have to be the same.
To change a publisher's replication schedule
- On the subscriber, open SQL Server Management Studio and click SQL Server Agent > Jobs.
- Right-click the job you want to modify and click Properties.
- Open the Schedules page, double-click the replication schedule, and make your schedule modifications.
Troubleshooting
I can't open the Endpoint Manager console after replication due to a licensing error.
You must have at least one 9.6 or later core server listed as a publisher. That core server must be authorized.