Viewing license allocation status
Use the Products>Allocations page to track the costs of providing IT support to groups across your organization. Some groups require more help managing their product licenses than others. By establishing a chargeback cost for the level of support provided, you can bill back that amount to each group, justifying the work you do and controlling asset management costs along the way.
To set up license allocations, you first need to select existing computer groups or define new ones as "allocation units" that represent specific offices, departments, or locales within your organization that you want to bill for IT support. You can then allocate a number of licenses, product by product, to those groups. Allocated licenses are simply an estimate of the number of licenses you think a group will need on a regular basis, most likely based on past support you've provided. You can then tie chargeback costs to the allocated licenses. These costs are a monetary estimation of the time and effort you spend supporting products on devices, and they will vary by group. Use this data for reference and reporting.
The Allocations page also shows the actual number of product installations on a group's devices, the number of licenses purchased by a group, as well as overage. Overage occurs when more products are installed on a group’s devices than the number of licenses you’ve allocated to them. Overage can be useful for seeing if a group has over-installed a product, requiring either the purchase of more licenses or an increase in the number of allocated licenses.
Getting started
Before you can see license allocation data in the Products>Allocations page, do the following:
- Go to Administration>Computer Groups to edit an existing computer group or define a new one as an allocation unit. You'll most likely want the group to represent a specific office, department, or locale within your organization. Remember, when you define a group in the SLM console, you're simply choosing a name to associate with an existing device group or query previously created in the Endpoint Manager network view. For more information, see Defining a computer group.
- Go to Products>Monitored to edit the products that are associated with the group. While editing a product, you can allocate licenses and the chargeback unit prices for each group defined as an allocation unit.
Viewing license allocation status
To view the status of license allocations within a computer group
- Click Products > Allocations. The groups you've defined as allocation units will appear in the list.
- To find a specific product or group in the list, type at least three characters of the name in the Search box.
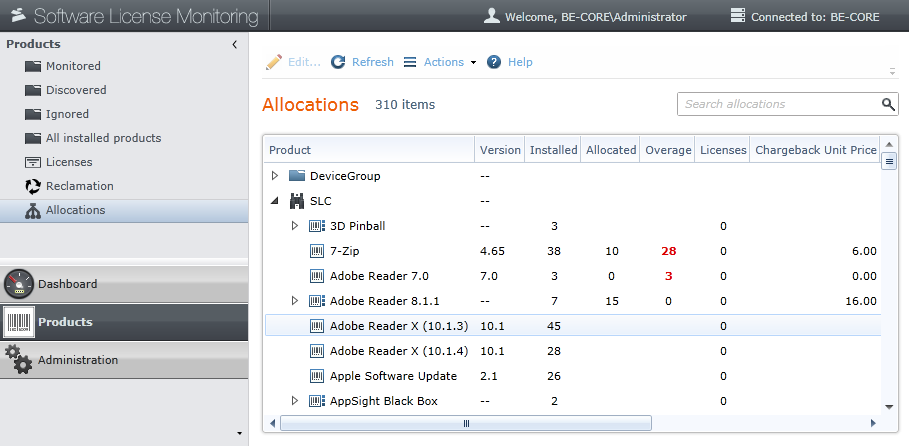
The license allocation data is listed by computer group. Expand the group name to see product data in the following columns:
- Version: The version number of the allocated product.
- Installed: The number of devices with the product installed within a group.
- Allocated: The number of product licenses you have allocated to a group; it's your best estimate of how many licenses a group needs based on the IT support you provide. The allocated number and the chargeback unit price determine the chargeback total.
- Overage: The number of devices with the product installed within a group, minus the allocated number of licenses. If these numbers don't match, the overage appears in red showing that a group has more installations than it was allocated. In this case you may need to allocate the group more licenses, which will increase their chargeback total.
- Licenses: The number of licenses available for use, as purchased by a group. A group may have purchased more licenses than it currently needs; the allocated number more closely reflects the true number of licenses being used.
- Chargeback Unit Price: The estimated cost of supporting a single license of this product for a group. This cost will vary by group, depending on the type of support you provide.
- Chargeback Total: The total chargeback amount for all allocated licenses of this product for a group.
- Manufacturer: The name of the product manufacturer.
- Type: The type of product installed or the type of computer group, based on whether it's created by query or device-group parameters in the inventory database.
Creating reports
Once you've set up and saved license allocation data so that it appears in the Products>Allocations page, you can export the data to a CSV file or print reports that show allocation details for groups, individual products, or multiple ones.
To save data in comma-separated value format or as a printable report
- Click Products > Allocations.
- To export data or print reports at the group level, select a computer group in the list (and all of the products under that group) and right-click it. Select Export selected items to CSV or Printable report of search results.
- To export data or print reports at the product level, expand a computer group in the list. Select one or more product names in the list and right-click. Select Export selected items to CSV, Printable report of allocations for selected product, or Printable report of search results.