Add servers to the core synchronization list
Before you can use core synchronization, you need to configure the list of servers you want to synchronize with. Cores communicate via HTTPS and authenticate with a username and password you provide for each core.
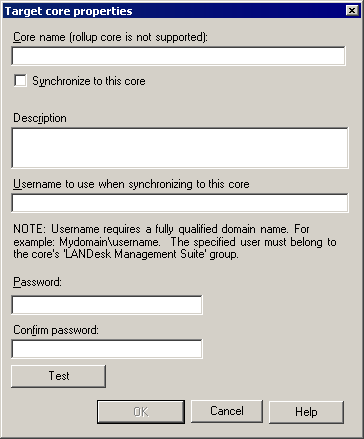
To add a core server to the synchronization list
- Click Tools > Administration > Core synchronization.
- Right-click the Core servers tree item and click Add target core.
- Enter the Core name.
- Select Synchronize to this core to enable core synchronization when you exit the dialog box. You can select or clear this option later on to selectively enable or disable synchronization to that core.
- Enter a Description.
- Enter the fully-qualified domain name for the user account to use when synchronizing (domain\username). This account should have full console privileges and it must be a member of one of the local LANDESK user groups on the target core.
- Enter and confirm the Password for the account you provided.
- Click Test to confirm your configuration.
- Click OK.
IMPORTANT: Rollup core servers use the scheduler service credentials to authenticate for synchronization. On rollup cores, these scheduler service credentials must be a member of a group with console administrator privileges on the source core servers. If the credentials don't have these privileges, you'll see task handler errors in the source core server's synchronization log. For information on how to change the scheduler service credentials, see About the Change login dialog box.