Windows Autopilot
Endpoint Manager 2021.1 SU1 introduces a new, streamlined, and more powerful Windows Autopilot experience. Windows Autopilot helps you set up new devices or reassign existing ones. Autopilot isn't a full provisioning tool. It expects that Windows 10/11 is already installed, and that the Windows out-of-box experience (OOBE) setup is ready to be run the next time the device turns on.
When Windows Autopilot provisions a device, there are two main phases:
-
Applying selected setup choices automatically that would normally be shown to the user, such as region or keyboard layout selection.
-
Enrolling the device into Windows MDM, installing any configured applications, applying policies, and joining the device to Active Directory.
Once you've completed the steps in Prerequisites and Installation, you can begin using Endpoint Manager's Autopilot support. Here's how it works:
-
Create Azure AD groups that contain devices you want to target for Autopilot deployment. If you want to target all devices for Autopilot, you can skip this step.
-
Create a deployment profile that defines settings for domain join type, how the device will be provisioned, the end-user experience, and AD group assignment.
-
If you want to deploy applications as part of a deployment profile, create an application definition.
-
Import devices by obtaining a .CSV file with device hardware hashes or having an OEM partner directly input device hashes into your organization's Azure AD tenant. Add the imported devices to an Azure AD device group that has a deployment profile.
-
Sync your changes with Azure AD. When devices sync with AD they are ready for deployment.
Before you can use Endpoint Manager's Autopilot support, your organization needs an Azure Active Directory P1 license or higher, and you need to complete the configuration steps described here: Getting started with Windows device management.
In Azure, make sure that Intune MDM isn't enabled. You can verify this by checking in Azure Active Directory under Mobility (MDM and MAM) and clicking Microsoft Intune. The MDM user scope and MAM user scope should be set to None.
Endpoint Manager's Autopilot implementation does require a Microsoft Intune license for application deployment. Note that because of the way Endpoint Manager Autopilot integrates with Microsoft, you shouldn't use the Intune user interface to modify Endpoint Manager Autopilot configurations.
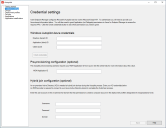
Once you've completed the Azure AD setup, you need to provide your Microsoft Azure tenant credentials, consisting of the Directory (tenant) ID, Application (client) ID, and the Client secret.
If you'll be working with an OEM that is pre-provisioning (white glove) new devices for you, you also need to provide your MDM application ID. In Azure, you must use a verified domain in the Application ID URI, and this domain can only belong to one Azure tenant.
To find your MDM Application ID
- In a browser, log in to the Azure AD Portal.
- Use the expandable menu on the left side of the screen to navigate to Azure Active Directory.
- Select Mobility (MDM and MAM) in the left menu.
- Click your Ivanti MDM application.
- Click On-premises MDM application settings.
- The Application (client) ID field contains the MDM Application ID.
Devices that need to connect to both an on-premises Active Directory and an Azure Active Directory require hybrid-join configuration. In this case, you also need to provide credentials for an on-premise Active Directory account that has permissions to create a computer account in the deployment profile's designated OU (organizational unit).
To enter Azure AD configuration information
Autopilot provisioning profiles are assigned to Azure AD groups. Alternatively, if you plan on having a single provisioning profile for all devices, you can choose All devices as the target and you won't need to configure groups.
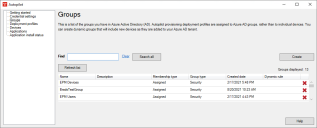
The Groups page shows available groups in Azure and you can add or remove groups from this page.
If you're creating a group for use with a deployment profile, you must use the Security group type. Group members must have a device hardware hash in Azure to receive a deployment profile.
If you'll be using a single deployment profile, you don't need to create or configure groups. Instead, you can select the All devices option in Create deployment profile > Group assignment.
The group list shows up to 100 groups. If there are more than 100 groups that could display, click Load more at the bottom. This adds the next 100 groups to the list. Use the Find box to filter visible groups. If you want to look for a specific group, enter the group name and click Search all.
To create an Azure AD group
-
In the Autopilot window, click Groups.
-
Click Create. For more information on the options here, see About the Create Azure AD group page.
-
On the Create Azure AD group page, enter the AD group Name that you want. This is required.
-
Enter a group Description.
-
Enter a Mail nickname.
-
Select a Group membership type:
-
Use Assigned when you want membership and permissions to be assigned individually for each user.
-
Use Dynamic device if you want membership to be assigned automatically based on device rules. This option opens the Dynamic membership rule builder.
-
Use Dynamic user if you want membership to be assigned automatically based on user rules. This option opens the Dynamic membership rule builder.
-
If you chose a dynamic group membership type, use the Dynamic membership rule builder.
-
Click Save.
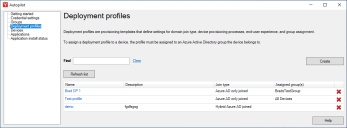
Deployment profiles are provisioning templates that define settings for:
-
Domain join type
-
Device provisioning process
-
End-user experience
-
Group assignment
To create a deployment profile
-
In the Autopilot window, click Deployment profiles.
-
Click Create.
-
On the Basics page, enter a profile Name and Description. Click Next.
-
On the Out-of-box-experience page, configure the deployment type, account type, and language/region preferences. Click Next.
-
On the End-user status page, configure the status page behavior and error handling. Click Next.
-
On the Group assignment page, select whether the profile should be assigned to No devices, All devices, or Selected groups. Click Next.
-
On the Overview page, review your selections and click Create profile.
There are several ways to import device hardware hash information into Endpoint Manager's Autopilot.
-
Use a PowerShell script to extract device information and put it in .CSV format. For an example, see the script link in this page from Microsoft's documentation.
-
Manually extract device information directly from the device, as described here.
-
An OEM partner provides you with a .CSV file of purchased devices.
-
An OEM partner directly inputs device hashes into your organization's Azure AD tenant.
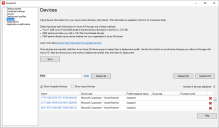
In the Autopilot window, click Devices.
Any changes you make to group membership won't take effect until you click the Sync button on the Devices page. This can take 15 minutes or more per device, depending on how quickly Azure can process the changes. Click the Refresh button to update the list from Azure.
Click a device in the list to see details and a list of groups that device is a member of. The Show Autopilot devices option shows imported Autopilot devices. The Show Azure devices option shows the devices you would see in Azure's Devices view.
In version 2022 SU3 and newer, when you click on a device in the list you can edit that device's Azure Group tag and Display name. If you edit a device, the device will show in green text until your changes have been synchronized with Azure.
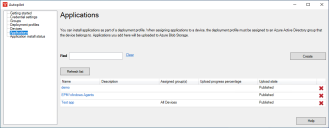
You can install applications as part of a deployment profile. When assigning applications to a device, the deployment profile must be assigned to an Azure Active Directory group the device belongs to. Applications you add are uploaded to Azure Blob Storage.
The application file must be in the ManagementSuite\landesk\files folder on the core server. The supported formats are .exe, .msi, and .intunewin. The upload process also requires that Microsoft's Win32 Content Prep Tool, IntuneWinAppUtil.exe, be in that same folder. The file upload happens when you save your changes at the end of the wizard.
For more information on where to download the Content Prep Tool, see About the Applications > Basics page.
When an Autopilot device is being provisioned, the device checks for apps the device may need to install. If the requirement rules are met, it downloads the apps from Azure blob storage, decrypts them, and installs each application one at a time.
To install an application as part of a deployment profile
-
In the Autopilot window, click Applications.
-
Click Create. If you're using version 2022 SU2 or later, click the Create generic app button. If you want to install a Microsoft 365 application, see Installing Microsoft 365 apps (2022 SU2).
-
On the Basics page, enter a Name and Description.
-
On the Install behavior page, click Select package file and browse for the file you want.
-
Customize the Install command if necessary and select whether the application should install under the System account or the logged-in user's account.
-
Select Force reboot after install if the application requires it. Click Next.
-
On the Requirements page, you can add rules that determine whether the application should be installed. These are optional. Click Next.
-
On the Detection rules page, you can add rules that help determine whether the application installed successfully. These are optional. Click Next.
-
On the Group assignment page, select which Azure groups should receive the application. Click Next.
-
On the Overview page, review your configuration and click Create application when you're ready. Monitor upload progress on the main Applications page.
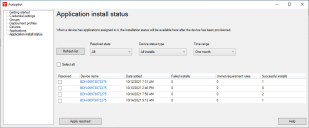
In the Autopilot window, click Application install status.
The application install status page shows application installation success/failure information for each device. Clicking an installation in this list shows detailed install information that may help with troubleshooting.
Apps can have detection rules as part of their configuration. These rules help identify whether an application was successfully installed. If both a detection rule and the application installer return code was marked successful, the application Install state will be Installed.
Once you've reviewed the install status, you can mark the application installs that you're satisfied with as Resolved. Click Apply resolved to apply your selections. This removes those applications from the default list view. Marking an application installation as resolved or unresolved doesn't do anything other than help you keep the list organized, so you don't have to do this if you aren't interested.
Later on if you change your mind about an install status, you can change the Resolved state filter to Unresolved and clear the selection in the Resolved list column.
Pre-provisioning a device allows IT, a device manufacturer, or a reseller to run the device through the Windows setup and device configuration portions of Autopilot, along with pre-installing applications if necessary. Once this is done, the OS is resealed and the device can be delivered to an end-user.
When the end-user turns on the device and connects to a network, they will be presented with a Windows setup interface where they can select their keyboard layout and possibly language if the deployment profile allows that, then once they log in they will see the end-user status page and go through the user phase of provisioning.
The length of time in the user phase depends on whether there are user apps to install and how long they take to install. If no applications are being installed, the setup process can take less than a minute. It is expected that most apps will have been installed during pre-provisioning, so this should be a quick process for the user.
Pre-provisioning requires physical hardware with TPM 2.0. You must also have entered Azure MDM application ID as described in Azure AD enrollment.
See this page for information on the technician pre-provisioning workflow: https://docs.microsoft.com/en-us/mem/autopilot/pre-provision#scenarios.
