Scheduling tasks
Ivanti® Endpoint Manager includes a powerful scheduled task system. Both the core server and managed devices have services/agents that support scheduled tasks. Endpoint Manager consoles and Web consoles can add tasks to the scheduler.
A software distribution task consists of a distribution package, delivery method, targeted devices, and a scheduled time. Non-distribution tasks consist of a script, targeted devices, and scheduled time.
Here are some of the tasks you can schedule:
- Device configurations
- Software distribution
- Various custom scripts
- Custom data form deployments
- Unmanaged device discoveries
- Vulnerability scans
- Software execution on managed devices
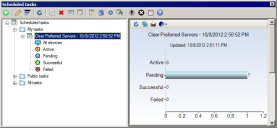
The Scheduled tasks window shows scheduled task status and whether tasks completed successfully or not. The scheduler service has two ways of communicating with devices:
- Through the standard Ivanti agent (must already be installed on devices).
- Through a domain-level system account. The account you choose must have the log in as a service privilege. For more information on configuring the scheduler account, see Configuring the scheduler service.
The console includes scripts that you can schedule to perform routine maintenance tasks such as running inventory scans on selected devices. You can schedule these scripts from Tools > Distribution > Manage scripts > All scripts.
Before you can schedule tasks for a device, it must have the standard Ivanti agent and be in the inventory database.
To schedule a task
- In the Scheduled tasks window, click one of these toolbar buttons: Schedule custom script, Custom data forms, Agent configuration, or Schedule inventory scan.
- Enter the information necessary for the task type you selected.
- Click the Schedule button. This displays the Scheduled tasks window and adds the script to it, where it becomes a task.
- In the network view, select the devices you want to be task targets and drag them onto the task in the Scheduled tasks window.
- In the Scheduled tasks window, click Properties from the task's shortcut menu.
- On the Schedule task page, set the task start time and click Save.
You can add more devices to the task by dragging them from the network view and dropping them on the task you want in the Scheduled tasks window.
Additional information about tasks
Use the Scheduled tasks window to configure and schedule scripts you've created. Schedule items for single delivery, or schedule a recurring task, such as a script task to regularly search for unmanaged devices.
The Scheduled tasks window is divided into two halves. The left half shows task tree and tasks, and the right half shows information specific to what you've selected in the tree.
Left pane
The left pane shows these task groups:
- My tasks: Tasks that you have scheduled. Only you and Endpoint Manager administrative users can see these tasks.
- Public tasks: Tasks that users with the "Edit public" right have marked public.
- All tasks: Both your tasks and tasks marked common.
You can drag scripts onto the Scheduled tasks window's left pane. Once a script is in the left pane, you can configure targets for it by dragging devices, queries, or groups to the right pane.
Tasks also have a right-click menu that you can use. The right-click Start now menu option has these choices:
- All: Runs the task on all targeted devices.
- Devices that did not succeed: Runs the task only on targeted devices that tried to complete the task but weren't successful.
- Devices that did not try to run the task: Runs the task only on targeted devices that didn't try to run the task, such as devices that were powered off or not connected to the network.
- Waiting or currently working: Runs the task on devices that are in a waiting or currently working state. This is useful when devices are stuck in one of these task states and you want to try the task on them again.
The Scheduled tasks window always shows job status. If you're scheduling device configurations or OS deployments, you'll also see the Client setup utility dialog. As the scheduler service proceeds through the target list, you'll see lists of devices to be configured, devices being configured, and devices completed.
If you're scheduling Targeted Multicast distributions, you'll see the Multicast software distribution status window. This window shows multicast status.
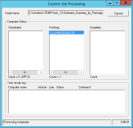
If you're scheduling custom scripts, you'll see the Custom job processing window showing scheduled, working, and completed targeted devices, in addition to a line-by-line script status as it executes.
There are three distribution task types:
- Policy-supported push: The combined push distribution and policy model. First, software distribution attempts to install the package on all devices in the target list. This way, you can do an initial deployment using Targeted Multicast. Second, any devices that didn't get the package or that later become part of the target list (in the case of a dynamic target list) receive the package when the policy-based management agent on the device requests it. Generally, this is the recommended delivery method.
- Policy: The core server makes the packages available for download. When a managed device checks for available policies, the package will be returned. Depending on the policy type, devices may install the package automatically or make the package available to users for them to install when they want.
- Push: The packages may be multicast out to the managed devices. The core server then initiates package installation at the managed devices.
You can change many default scheduled task settings. These default settings are applied every time you schedule a task. You can change the following defaults:
- Default package location
- Architecture options (32-bit or 64-bit)
- PowerShell options
- Timeout settings
- Client Portal Manager categories and tags
To change default scheduled task settings
- Click Tools > Distribution > Scheduled tasks.
- In the scheduled tasks toolbar click the gear icon and click Default scheduled task settings.

- Change the default settings and click Save.
Tasks have many configuration options. If there's a task configuration that you tend to reuse, you can make it a task template. The next time you create a new task, you can create it from the template and have that template's task settings automatically applied.
Endpoint Manager ships with some default task templates that are preconfigured with recommended settings.
To create new scheduled task based on an existing template
- Click Tools > Distribution > Scheduled tasks.
- From the tree's Task Templates group, open the shortcut menu for the template you want and click Create scheduled task(s).
- The Schedule task dialog box opens with the template's settings preconfigured. Customize the settings as necessary and click Save.
To create new scheduled task based on a template
- Click Tools > Distribution > Scheduled tasks.
- Click the Task templates tree item.
- On the toolbar, click New > Software distribution template or New > Patch template.
- Configure the template settings and click Save. Your new template will appear in the tree under Task templates.
You can cancel waiting or active tasks. The way to cancel a task depends on the task type, as described below.
- Software distribution tasks: Use the cancel button on the toolbar. This toolbar button is only available for software distribution tasks.
- Custom scripts: From the shortcut menu of the script you want to cancel, click Current status. The Task status dialog has Discontinue task and Cancel task buttons. Click the button you want.
- Waiting tasks: vOn the Schedule task page, click Leave unscheduled.
- Tasks in progress: From the shortcut menu of the task you want to cancel, click Cancel.

