Policy management
Policy management provides a way to distinguish between software that is:
- On an approved list
- On a mandatory list
- On an unapproved list
When a policy has been created and its status set to Active, you can view approved, unapproved or mandatory software items in the Software page. The Policy State column in the Software data grid identifies items that are in the approved software list, the unapproved software list or the mandatory software list using the following icons:
|
Policy State icon |
Policy List |
|---|---|
|
[blank] |
Not included in any policy list |
|
|
Unapproved Software list |
|
|
Approved Software list |
|
|
Mandatory Software list |
For more information on the Software page, see Software.
On the Software page, click Policy Management next to the gears menu to display the Policy Management page, where you can:
- Create new policies
- Edit existing policies
- Make existing policies active or inactive
- Delete existing policies
You can apply only one policy for each business unit, although you can apply each policy to multiple business units.
The Policy Management data grid initially contains all policy records.
To filter the data grid:
1.In the Select Business Unit drop-down list at the top of the page, select check boxes alongside the required business units and then click Filter.
The data grid updates.
Creating new policy records
To create a new policy:
1.Click Create New Policy at the top of the page.
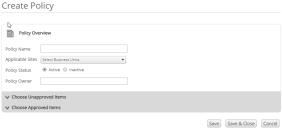
The Create Policy page appears.
2.In the Policy Overview section, specify a Policy Name and select the business units the policy applies to from the Applicable Sites list.
Each business unit may have only one policy applied to it. If you want to allocate the new policy to a business unit that already has a policy applied to it, you must first remove the pre-existing policy.
3.Set the Policy Status to Active or Inactive, and specify the Policy Owner if required.
4.Click Choose Unapproved Items.
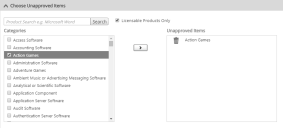
The Choose Unapproved Items section appears, where you can specify product categories or products that you want to include in the unapproved software list for the policy.
5.Select the check boxes alongside the required entries in the Categories list, then click the right arrow button.
The selected items move to the Unapproved Items list.
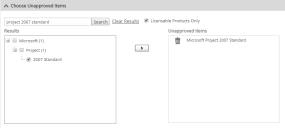
Alternatively, type a search term into the Product Search text and click Search to select a specific product or products. Clear the Licensable Products Only check box if you want to search for all products – including those that do not need a license. License Optimizer searches the Software Library for matching products and returns the matches in the Results list from where you can add them to the Unapproved Items list.
Click Clear Results to redisplay the Categories list.
Click ![]() to remove an item from the Unapproved Items list if required.
to remove an item from the Unapproved Items list if required.
6.Click Choose Approved Items.
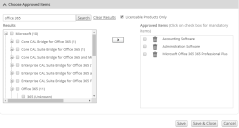
The Choose Approved Items section appears, where you can specify product categories or products that you want to include in the approved software list for the policy.
7.In the same way as you did for the Unapproved items, move the required entries to the Approved Items list.
8.In the Approved Items list, select the check box alongside items that are mandatory.
9.When you have completed the policy configuration, click Save & Close.
The record is saved and the Policy Management page appears.
Editing existing policy records
To edit an existing policy, click the relevant row in the data grid to display the Edit Policy page.
Making existing policies active or inactive
To activate or deactivate a policy, select Activate or Deactivate as appropriate from the in-line gears menu alongside the policy record to be changed.
Deleting policy records
To delete a policy record, click Delete from the in-line gears menu alongside the policy record you want to delete.


