Software Teaching
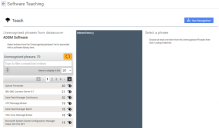
When a software data record cannot be matched to the Software Library, it appears in the Software Teaching page. You access the Software Teaching page by navigating to the Software Teaching Status page and selecting the data source tile against which you want to perform software teaching. Clicking a data source tile displays the Software Teaching page populated with the unrecognized phrases from that data source:
From this page, you can select unrecognized phrases and match them to a product in the Software Library; this is called teaching. Any teaching that is done never has to be repeated as long as the program name is consistent.
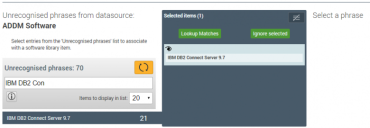
To teach a phrase, select the phrase to be taught from the Unrecognized Phrases pane on the left of the page; the selected phrase is then shown in the Selected Items pane (the dark blue pane in the center of the page):
You may:
- Add more phrases to the pane (when matching different phrases to the same product)
This is done by selecting additional phrases from the Unrecognized Phrases pane. To select multiple unrecognized phrases at one time, select the first phrase, then press Shift and scroll down the list and select the last phrase to be included. - Show additional detail relating to the phrase
The data import may have provided additional information alongside the phrase, which you can display by clicking the eye icon at the top left of the Phrase entry in the Selected Items pane. - Remove a phrase from the Selected Items pane
This is done by hovering over the phrase that you want to remove then clicking the X icon in the top right of the Phrase entry. - Clear the Selected Items pane
To remove all Phrase entries from the Selected Items pane, click at the top right of the pane.
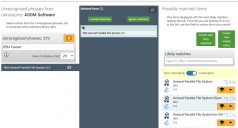
After you have selected the phrase(s) that you want to teach, click Lookup Matches. License Optimizer searches the Software Library for possible matches against the selected phrase(s) in the Selected Items pane and displays them in the Possible matched items pane on the right of the page:
In this pane, License Optimizer displays information about Software Library entries that may match the phrase(s) you selected. The most likely matches appear at the top of the list. You may filter the results by typing filter text into the Likely matches text box. By default, licensable items are displayed, but you may use the Licensable toggle switch to display possible matches that are not licensable.
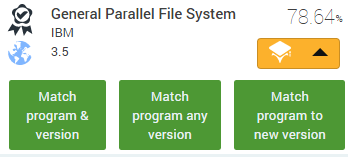
Each possible match is shown on a Possible Matched Item tile:

The tile provides the following information about the possible matched item:
- Licensable status
An icon appears at the top left of the tile showing whether the possible matched item is Licensable or Not Licensable; if the possible matched item is Licensable, the following icon appears:
If the possible matched item is Not Licensable, the following icon appears:
- Library
An icon appears at the bottom left of the tile showing whether the possible matched item is from the Global Software Library or the Local Software Library; if it is from the Global Software Library, the following icon appears:
If it is from the Local Software Library, the following icon appears:
- Product name
The product name of the possible matched item appears in bold text on the first line of the tile. - Vendor
The vendor of the possible matched item appears on the second line of the tile. - Product version
The product version of the possible matched item appears on the third line of the tile. - Match Likelihood
The likelihood of the match appears as a percentage at the top right of the tile. - Teaching Options icon
Clicking the Teaching Options icon at the bottom right of the tile expands the Teaching Options expansion pane:

Select the required option to teach the unrecognized phrase(s) in the Selected Phrases pane to the item selected from the Possible Matched Items pane:
•Match program & version
Matches the program and the version of the unmatched phrase to the product represented by the item selected.
•Match program any version
Matches any version of the unmatched phrase to the product represented by the item selected.
IMPORTANT: We advise using caution in using this option.
•Match program to new version
Displays the Teach to New Version dialog, which enables you to create a new version of the product represented by the item selected in the License Optimizer Software Library. The unmatched phrase is then matched to this new product version.
When you have selected the required Teaching Option, you are prompted to confirm that you want to proceed. The Teaching Notification pane appears, confirming the number of records that will be updated in License Optimizer and the number of phrases that will be taught if you proceed with the teaching action. To proceed with the teaching action, click Continue.
After all required teaching actions have been completed, you must run the Recognition process for the data changes to be shown in the platform. You can run the Recognition process by clicking Run Recognition at the top right of the Software Teaching page.
Adding records to the software library
Sometimes, you won't be able to find a match in the software library – maybe the software is specific to your organization, for example. In this case, you can add a new record to the Definitive Software Library (DSL).
The DSL is in two parts: a global DSL maintained by Ivanti, and a custom DSL maintained by you that stores software that is specific to your organization. You can add new items to your custom DSL if you cannot find an appropriate record that already exists in the global DSL from the Software Teaching page.
To add an item to your custom DSL:
1.On the Software Teaching page. add a phrase to the Selected Items list, then click Lookup Matches.
The Possible matched items panel appears showing likely matches.
2.If you cannot find a match in the Possible matched items list, you can create a new DSL record and associate the software record with it by clicking either Create new from selected or Create new empty entry.
Clicking Create new from selected opens a similar dialog with DSL Title field populated with the value from the Selected Items column for the software record; clicking Create new empty entry opens an empty Add new software item dialog.
3.Complete the Vendor Name field and the DSL Title field, then select either Licensable or Non-Licensable alongside State.
4.Complete the other fields as required, then click Save.
The new record is saved to your custom DSL and the selected software record is matched to it.


