Ongoing tasks
The Xtraction administrator is responsible for the following ongoing tasks.
Configuring display settings
These settings range from defaults for time zones and display colors to a default set of columns for viewing list components.
1. At bottom of the page, click the Administration > Settings link.
2.Under the Settings tab, configure these items: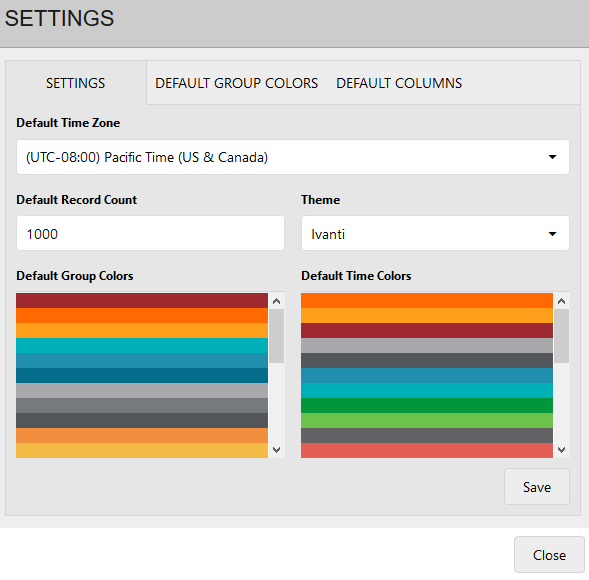
•Default Time Zone: Set the time zone to use when displaying date/time fields that are based on Greenwich Mean Time (GMT). These fields adjust to display in the local time for the selected time zone. User-defined settings override the value that you select here.
•Default Record Count: Enter a value to limit the number (count) of records that users can see and export at any one time. This setting only applies to list components, or when a user drills down in a dashboard chart and selects View records.
Setting a lower record count can enable faster rendering of large lists. Note that records not included because of this limit are still represented in non-list components, so that dashboard totals include all relevant records for the selected data source.
•Theme: From the drop-down list, set the background color for all dialogs and screens within Xtraction. This is an administrative option only—users can't set their own themes.
•Default Group Colors: Right-click to set the default colors for all group component charts.
•Default Time Colors: Right-click to set the default colors for all time component charts.
3.Click Save.
You can define the colors to use for the field values that display in group component charts. For example, with a field named "Priority," you could apply the color red to the value of "1," the color orange to the value of "2," and so on.
1.At bottom of the page, click the Administration > Settings link.
2.Click the Default Group Colors tab.
3.Ensure that a data source is selected. If color definitions already exist for fields of this data source, they'll display here.
4.If no color definitions exist, right-click in the dialog's left pane and select Add field. Add as many fields as you want to this list.
5.To apply a value and color to a specific field in the list, select the field name, then right-click in the Color column and select Add color. Add a value for which the color will be applied, then open the chart to select a color.
6.Click OK, then click Save. Note that you must click the Save button after each color you select.
7.Repeat the steps for each field/value you want to apply color to.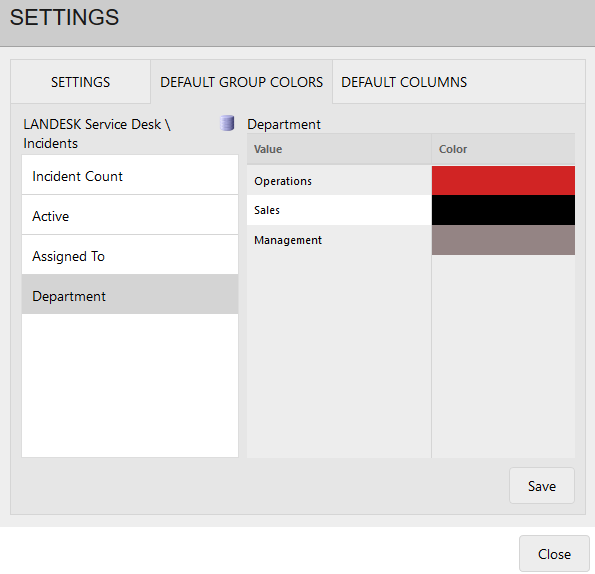
8.Click Save.
When the person acting as data model editor adds a data source to Xtraction, the entire record list is flagged for inclusion, or display. It's the responsibility of the editor to narrow those fields to around 10 columns of viewable data for use with list components in Xtraction.
To make list-component data even more manageable, the administrator can define a default set of columns for each data source that further narrows the viewable content. Columns excluded from the list are no longer presented for viewing.
In their personal profiles, individual users can also manipulate the viewable columns by defining their own default set based off of the administrator-defined set, which then takes precedence for their account.
1.At bottom of the page, click the Administration > Settings link.
2.Open the Default Columns tab. Right-click in the list and select Add.
3.Navigate to the data source for which you’re creating the default columns list, select it, and click OK.
4.In the Default Columns dialog, if a default columns list isn't already defined, the dialog is empty. 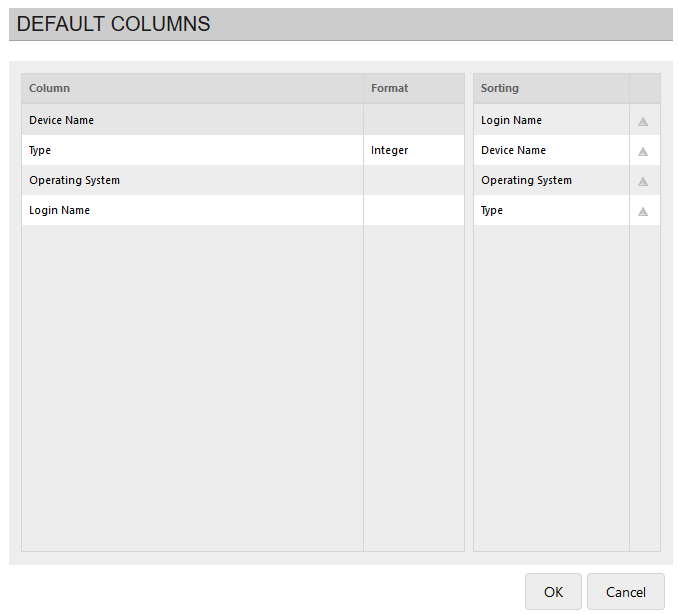
•Column: Empty for a new list, or lists the columns from the data source that constitute the current defaults. To define a set of columns: right-click in the Column area and select Edit columns. In the Select Columns dialog, drag and drop columns that you want to view over to the Selected columns list. Click OK when finished.
•Format: For columns where a numerical format is needed for the returned data. For example, Decimal (3) would return a number such as "4.567." Click the Format column to open a drop-down list of options.
•Sorting: The order in which the columns will display. Drag and drop column names into the Sorting column and move them up or down the list.
5.Click OK when finished.
Reloading the data model and license files
You need to reload these important files when conditions change:
•Data model file: The data model file (Datamodel.dat) contains the definition of the target databases against which Xtraction is configured to report. If updates are made to the data model file, you need to reload these definitions so that Xtraction can use the changes made.
•License file: A valid license file is required for Xtraction to operate. When a new license file is supplied, you need to reload it from the file system so that Xtraction recognizes the new license settings.
The current data model file must exist under the name of Datamodel.dat for Xtraction to recognize the file for reload.
Reloading either the data model file or license file does not interrupt the use of Xtraction.
1.Ensure that the updated data model file or current license file exists in the \Data\Configuration\ path of the Xtraction software installation. The default path is C:\Program Files\Xtraction Software\Xtraction\.
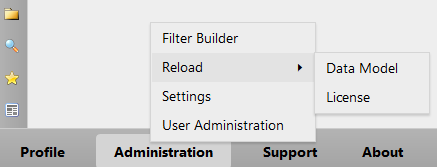
2.At bottom of the page, click Administration > Reload > Data Model or License. This action reloads the file and acknowledges success of the action.
Managing license availability
License availability can become a problem when users don't log out of the Xtraction web client correctly. By closing their browser to exit a session, the Xtraction license isn't immediately released for others to use. Instead, users should use the Logout option at the bottom of the page.
Because license usage is defined by each open Xtraction session in a browser, availability can also be a problem when users have multiple, concurrent sessions open but are not actively using each one. As a remedy, you may want to lower the session-timeout setting that automatically logs users out of inactive sessions and immediately releases those licenses for others to use.
You can change the session timeout via the Xtraction Settings utility (XtractionSettings.exe), located in the Xtraction installation folder. For details, see the Install & Upgrade Guide.
Note that directly before a session timeout occurs, a pop-up dialog will display with a two-minute countdown enabling a user to cancel it before the session ends.
Updating Xtraction database connection settings
If the database connection settings have changed from those used during installation, you'll need to update Xtraction before they work again. Reasons for updating include moving the installation to a new server or changes to security management. You can update connection settings via the Xtraction Settings utility (XtractionSettings.exe), located in the Xtraction installation folder. For details, see the Install & Upgrade Guide.