Installation
Before starting the Xtraction installation process, make sure you've reviewed the system requirements. For details, see System requirements.
Product setup includes four major parts:
1.Completing the pre-installation checklist, which includes downloading and installing your Xtraction license files and setting up the Xtraction database.
2.Installing the Xtraction application and configuring required and optional settings.
3.Configuring the data model settings.
4.Completing post-installation steps.
1. Pre-installation checklist
•IMPORTANT: From the Ivanti License Portal, you can automatically download and install the .LIC files for both Xtraction and the Data Model Editor application if they're going on the same server. After accessing the portal website, enter your credentials and select the Automatic option.
Otherwise, you can continue to manually download and install the .LIC files (which was the method for releases prior to 2019.1). The Manual option is required if you plan to install the Data Model Editor on a separate server, move your Xtraction installation to a different server, or use a customized .LIC file.
Selecting the Automatic or Manual option does not prevent you from choosing the other method if you modify your installation or update your license files at a later date. In either case, your license files are available from the Ivanti License Portal.
For troubleshooting tips related to licensing, register with the Ivanti community to view this article: Troubleshooting automatic and manual licensing.
• Download the data model files (i.e., connectors) that you're entitled to:
•For third-party connectors, do so from the Ivanti License Portal. For details, view this article on the Ivanti community: How to download Xtraction licenses and connectors from Ivanti.
•For Ivanti product connectors, go to Connector Downloads, where you must first register to log in.
You’ll configure the data model settings after installing Xtraction, as explained below.
•Install Internet Information Server (IIS) on your Xtraction server and ensure it’s working correctly.
•Install Microsoft .Net Framework 4.6.1 (this is the minimum requirement, though 4.7.2 will also work) on your Xtraction server.
•(Optional) If your target application database is on Oracle, install Oracle Client on your Xtraction server and configure it to access that database.
•Set up the Xtraction database using the procedure below. You'll create an empty Xtraction database with two user accounts:
•The first account needs read-only access to the target application database(s) on which Xtraction will report (this usually is not the Xtraction database itself).
•The second account needs read, write, and owner access to the Xtraction database in order to create tables. After installing Xtraction, you’ll run the Xtraction Settings utility for the first time. The Settings utility will use this account to create the required tables in the database.
If the accounts in steps 2 and 4 both use Windows authentication, they MUST be the same account.
1.Record all necessary environmental details as you complete these steps. To keep track, you may want to print the Installation details checklist.
2.Identify or create a user account with read-only permissions to the target application database(s). The username(s) can be any valid name, but Ivanti recommends using Xtraction_RO for consistency. If this account uses Windows authentication, be sure to include the domain name (e.g., MYDOMAIN\myuser).
•For MS SQL, it should be sufficient to grant db_datareader access.
3.Manually create the Xtraction database on an MS SQL server to store the Xtraction data. The database name can be any valid name, but Ivanti recommends using Xtraction for consistency.
4.Identify or create a user account to enable Xtraction to connect to the Xtraction database with read, write, and owner permissions. The username can be any valid name, but Ivanti recommends using Xtraction for consistency. If the account uses Windows authentication, be sure to also include the domain name (e.g., MYDOMAIN\myuser).
•For MS SQL, it should be sufficient to grant db_owner, db_datareader, and db_datawriter permissions once the tables are created.
2. Install the Xtraction application
You can install the Xtraction application on the same server as the Xtraction database, or a different one. The installation process needs to run using an account with administrator privileges that has administrative rights on the Xtraction server. Administrative access is required only for installation.
1.Run Setup.exe to start the install wizard. After reading the welcome message, click Continue.
2.After reading the license agreement, select I accept the terms in the License Agreement and click Continue.
3.The installation performs a prerequisite check and lists any missing prerequisites. If you want to see what those prerequisites are, click the Show all prerequisites check box. Follow the instructions in the install wizard to provide the missing components. If all prerequisites are met, the installation indicates that the prerequisites check has passed. Click Continue.
4.Designate the folder where Xtraction is to be installed. The default folder is C:\Program Files (x86)\Xtraction Software\Xtraction. Click Continue.
5.When you're ready to install the files, click Install. The installer will step through several tasks, such as registering components, copying files, and configuring Internet Information Server (IIS).
6.When the Configuring Xtraction installation task begins, the wizard will open the Xtraction Settings utility. You can complete the required configuration settings now or cancel and do so later—the installation will finish either way when you click Finish.
IMPORTANT: Note that even though the installation is complete, Xtraction will not work until the required settings are configured, as explained below.
The Xtraction Settings utility runs near the end of the installation process. You can configure the product settings as part of installation or cancel and configure them later. Note that the settings described in this section must be configured for Xtraction to work. Other optional settings are also available and may be useful to your installation.
You can find the Xtraction Settings utility with the other installed Xtraction files (by default at C:\Program Files (x86)\Xtraction Software\Xtraction\Tools).
Xtraction license files
You’re provided with two license files—one for Xtraction and one for the Data Model Editor. Under the General tab > Licenses group box, locate both license files using the ellipsis buttons. Click Test to verify that each license is valid.

Database connection and setup
Note that Xtraction will fail without this next step.
To configure the connection settings to the Xtraction database that was created before installation, click the General tab. In the Database Connection group box, click the Create/Update Database button. The Verify or Enter Connection Details dialog opens:
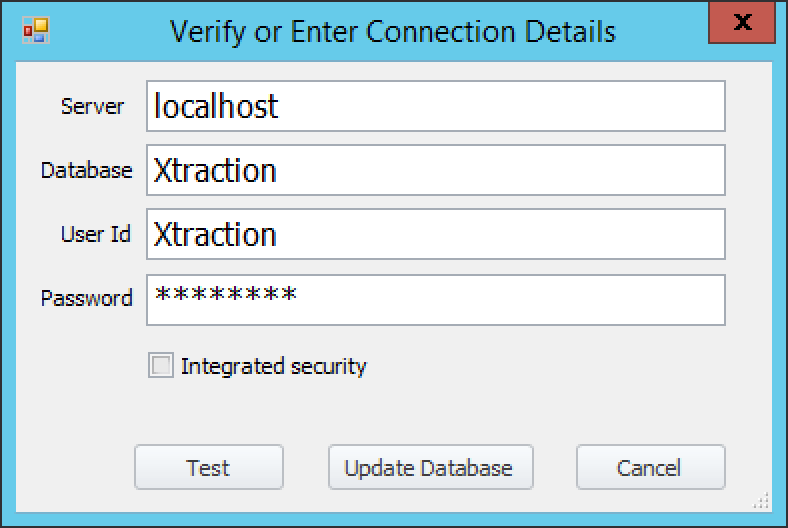
•Server: The name of the database server where the Xtraction database resides. If a non-standard port is used, place a comma (“,”) after the server name, followed by the port number.
•Database: The name of the Xtraction database created as part of the pre-installation steps.
•User ID: The User ID that Xtraction should use when connecting to this database. Leave this field empty if you’re using Integrated Security.
•Password: The password for the User ID specified above. The following special characters are NOT supported: single quote (‘), double quotes (“), semicolon (;), < >, &, and %. Leave this field empty if you’re using Integrated Security.
•Integrated Security: Select if the IIS application pool running Xtraction will connect to the Xtraction database using Windows Authentication.
If you’re using Integrated Security, the Test and Update Database buttons described below will use the Windows account that you’re currently using to run the Xtraction Settings utility, not the Windows account that is or will be configured in IIS. If you need to use the Windows account that is or will be configured in IIS, you must either re-run the Settings utility with the Run as a Different User option, or log back into the server with that Windows user account.
After you’ve entered the details for your database, click Test to attempt a database connection and ensure that the provided details are correct.
When you click Update Database after completing and testing the connection settings, the Settings utility will automatically run the script to configure your Xtraction database. By default, this script is found at: <Xtraction installation path>\Tools\DatabaseScripts\Build.sql.
Note that the Update Database button modifies the schema, requiring you to have DBO permissions.
Authentication
You must specify at least one authentication provider for Xtraction to function correctly, though you can specify more than one. A single instance of Xtraction supports all three methods of authentication, which are:
•Windows: The Xtraction user accounts are tied to the corresponding Windows user accounts. User passwords are not maintained within Xtraction. Xtraction verifies the user’s identity via IIS.
•Xtraction Local: The Xtraction user accounts are created and maintained within Xtraction. All account information, including passwords, are maintained in Xtraction. Note that any administrator account using local authentication will always have access to an analyst license to perform administrative functions even if all available Xtraction licenses are in use by others.
•Custom: The Xtraction user accounts are tied to the corresponding user accounts in an external system. User passwords are not maintained within Xtraction, and users are authenticated by the external system.
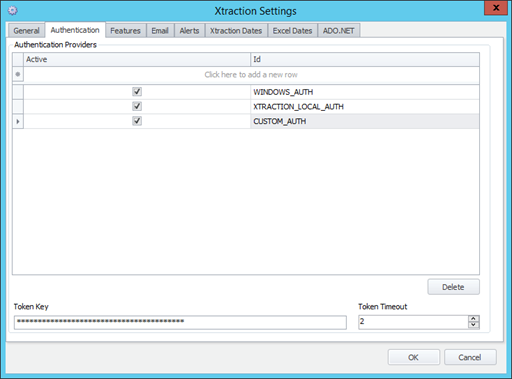
•Authentication Providers: The list of the authentication providers set up within your Xtraction instance. You can add/edit/remove these entries via the right-click context menu or by double-clicking a listed provider.
•Token Key: The key to use for encrypted, secure communication between Xtraction and the different authentication providers; it must match the key stored at the authentication provider. A default key is provided, but you should change it during installation.
•Think of this key as a password and change it to something unique for your organization. Set it to a character string of 10–20 characters. The only requirement is that the same password needs to be set at each authentication provider.
•If you're using Windows authentication, you also need to change this value in the Web.config file of the WinAuth web application, under secretKey. For details, see Enhanced Active Directory integration.
•Token Timeout (mins): The number of minutes a token from an authentication provider is valid for. Any token received by Xtraction that is older than this value will be rejected.
Provider details
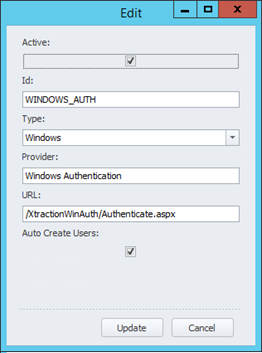
•Active: Select if this authentication provider is active within Xtraction.
•ID: A unique ID for this authentication provider instance.
•Type: The type of authentication provider this instance refers to.
•Provider: A display name for the provider.
•URL: The URL that unauthenticated users should be redirected to for authentication.
•Auto Create Users: Select if Xtraction should automatically create a user who has been authenticated by the provider but doesn’t exist within Xtraction. It's recommended that you enable this option.
For information about configuring enhanced Active Directory integration, see Enhanced Active Directory integration.
This section describes the settings that are not required for Xtraction to work but are otherwise useful. You can find the Xtraction Settings utility with the other installed Xtraction files (by default at C:\Program Files (x86)\Xtraction Software\Xtraction\Tools).
General
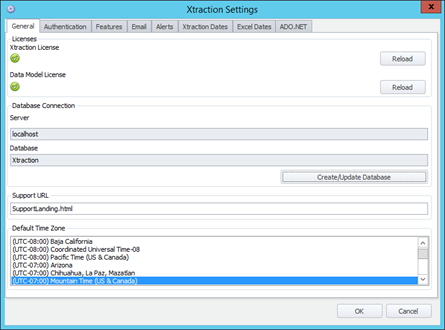
•Support URL: At the bottom of the Xtraction web client is a Support link that you can customize for your organization's support process. Setting this URL will control the action to be performed after a user clicks it. For example, you can send Xtraction users to an internal help desk. Both HTTP and HTTPS configurations are supported here.
When using MAILTO, the end-user’s default mail client will display, allowing an email to be sent to the correct location.
•Default Time Zone: Xtraction adjusts date/time values to the appropriate time zone. This default time zone used here will be the default time zone applied to all users, unless their accounts have been individually updated to reflect a different time zone. Xtraction automatically adjusts for daylight savings if the selected time zone observes daylight savings.
Features
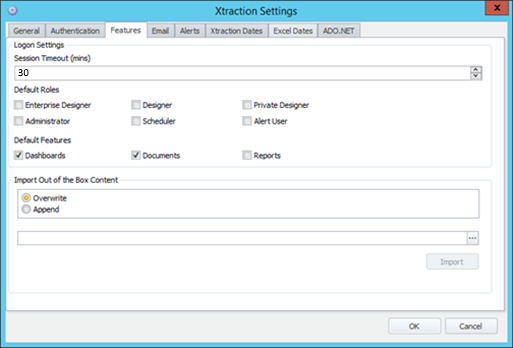
•Session Timeout: A user’s session will time out if the user hasn’t contacted the Xtraction server in this time period. The user will need to log back into Xtraction to continue. Note that a session timeout is required, so you cannot set the number to zero.
•Default Roles: When the Auto Create Users option is selected for an authentication provider, any newly created users will get the roles selected here by default.
•Default Features: When the Auto Create Users option is selected for an authentication provider, any newly created users will get the designer features selected here by default.
•Import Out of the Box Content: Used to import out-of-the-box (OOTB) content packs into Xtraction. Select Overwrite or Append, navigate to the OOTB zip file, and click Import to save the content to Shared Folders within Xtraction.
If you want the Xtraction Task Scheduler service to send email, use the Email tab to set up the email settings.
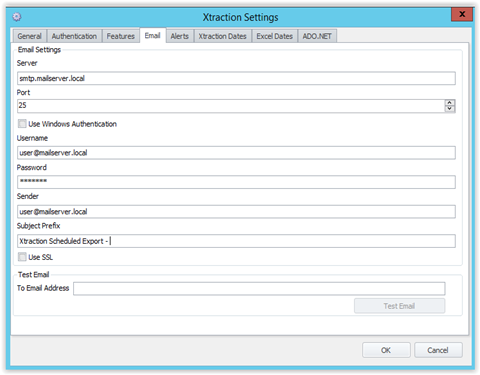
•Server: The name of the email server.
•Port: The port to use when sending email to the email server.
•Username: The username to use to connect to the email server.
•Password: The password to use to connect to the email server.
•Sender: The sender to use when sending email from Xtraction. This must be a valid email address.
•Subject Prefix: Text entered here will be shown on the email subject line before the document name.
•Use SSL: Select if the connection to the email server needs to be made via SSL.
•Test Email: If you want to test the settings provided, enter an email address and then click Test Email.
Alerts
Use the Alerts tab is to configure the Xtraction Alerts service. This service shares email configurations with the Xtraction Task Scheduler service, so the settings on the Email tab will be used with both services.
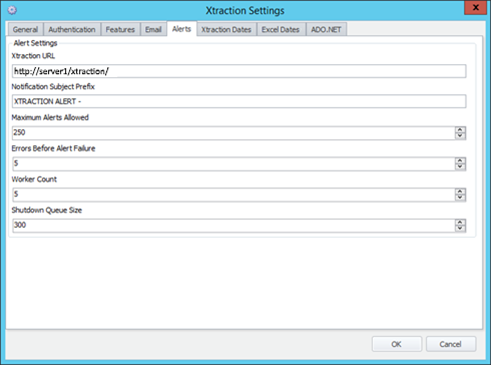
•Xtraction URL: When notification emails are sent, there’s an option to link to Xtraction content. Use the base URL of your Xtraction installation when building the URL to send in the notification email (for example, http://server1/xtraction/, where “server1” is the name of your Xtraction server). Note that the slash ( / ) at the end of the URL is required.
•Notification Subject Prefix: All notification emails are sent with this prefix in the email subject line.
•Maximum Alerts Allowed: The maximum number of alerts allowed to be defined in Xtraction. Once this number has been reached, no more alerts can be defined.
•Errors Before Alert Failure: The number of errors an alert can encounter before it’s flagged as failed.
•Worker Count: Once an alert is triggered to be checked, it’s placed in a queue for checking. This value defines the number of worker processes that pull alerts from the queue to perform alert checking and actioning if necessary.
•Shutdown Queue Size: The maximum number of entries allowed in the queue before the Alerts service shuts down and restarts. See Worker Count.
Xtraction dates
If you want to change the format for dates that are displayed in Xtraction, you can set them on the Xtraction Dates tab.
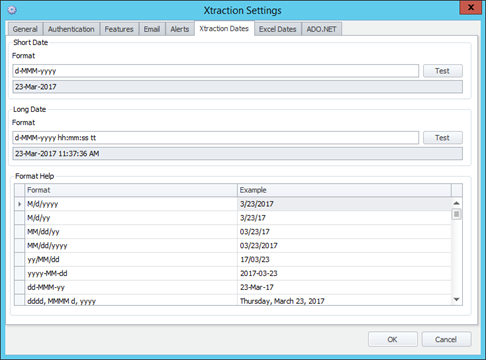
•Short Date Format: The short date format contained within the Xtraction configuration file Settings.dat is displayed here. If you change this value and click OK, the change is saved back to the Settings.dat file.
•Long Date Format: The long date format contained within the Xtraction configuration file Settings.dat is displayed here. If you change this value and click OK, the change is saved back to the Settings.dat file. The long date format affects the way the date is shown in most presentations.
•Test: Used to view today’s date and time in the format entered in the text boxes for short date or long date format.
•Format Help: This is a list of known formats for your locale.
Excel dates
Documents that are exported to Excel will format date columns in accordance with the Excel date format shown below. The Excel date format is separate from the Xtraction date formats, because Xtraction uses Windows operating system locale date/time formats, and not all of these formats are valid in Excel.
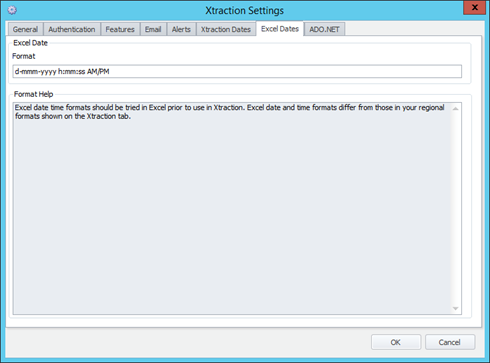
•Excel Date Format: The date format used for columns containing dates. The Settings utility doesn't validate the format you save, so it’s recommended that you test the format in Excel before exporting content to that application.
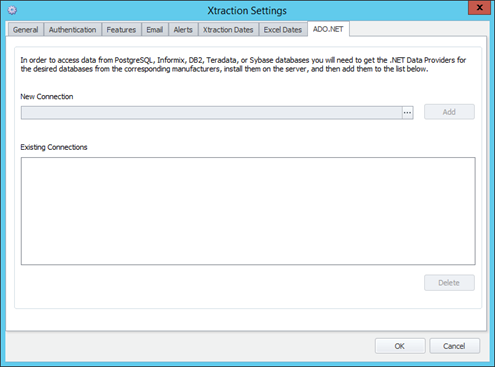
ADO.NET
If you're using Xtraction to report from a non-MS SQL database such as PostgresSQL, Informix, DB2, Teradata, or Sybase, add a connection to it from the ADO.NET tab after you install the desired .NET Data Providers.
Telemetry
On the Telemetry tab (new for version 2020.4), the Send Telemetry Data option is selected by default. During upgrades, this feature enables Xtraction to upload certain usage information to Ivanti so that we can improve the product.
Currently, this data is limited to the following information:
• Computer name
• Xtraction current version and version upgraded from
•Information about templates
•Information about dashboards
3. Configure the data model settings
Before running Xtraction, you must configure the data model selected earlier for your environment by using the Xtraction Data Model Editor application that was installed with Xtraction.
First, rename the Datamodel.dat file that was installed with the default instance of Xtraction. You can find this file in the …\Xtraction Software\Xtraction\Data\Configuration\ folder where Xtraction was installed.
Rename the Datamodel.dat to Datamodel.old. Next, copy the data model file that you downloaded from the Ivanti Licensing Portal (as discussed in the pre-installation checklist) and save it as Datamodel.dat.
Next, open the Data Model Editor to change several settings to get the data model up and running. In a default installation, a shortcut to the editor is placed on the desktop. Otherwise, it can be found in the …\Xtraction Software\Xtraction\Tools\ folder where Xtraction was installed.
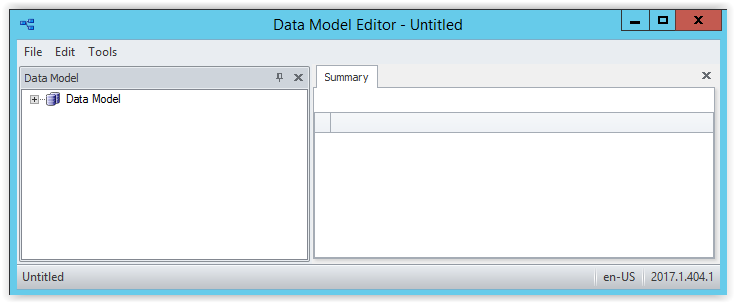
Load the data model
By default, there is no saved data model associated with Xtraction when it's installed. The very first time you use the Data Model Editor and load a data model, you’ll need to browse to the folder as noted above where you saved the data model obtained from the Ivanti License Portal. To load a data model, click File > Open and select the Datamodel.dat.
Add connection strings
For each data source in your data model, you need to provide a read-only connection string so that Xtraction can connect to that data source. Open the Connection String Editor by clicking Tools > Connection String Editor.
This dialog displays all of the data sources within your data model. To edit a connection string, click the appropriate connection item and then click the ellipsis button.

If your data model contains data sources that connect to the same physical database, after setting up the first connection string, you can copy the information by selecting the appropriate items, right-clicking the connection to copy, and selecting Copy.
When you’re finished, click File > Save to save the data model file. The connection strings are encrypted and associated with the server where the file was opened and saved to a file called Datamodeldb.dat.
If you copy the data model file to a different server, you'll need to re-enter the connection string details there, where they'll be encrypted and saved in a Datamodeldb.dat file on that server. Each Datamodeldb.dat file is specific to the server it's created on and will not work if copied elsewhere.
Update target application URLs
When displaying lists of records in Xtraction, a user can double-click a record to launch the associated application’s website to display that record in the native application. For this to work, Xtraction has to know the URL for the website. To update the URLs within the data model, click Tools > URL Editor.
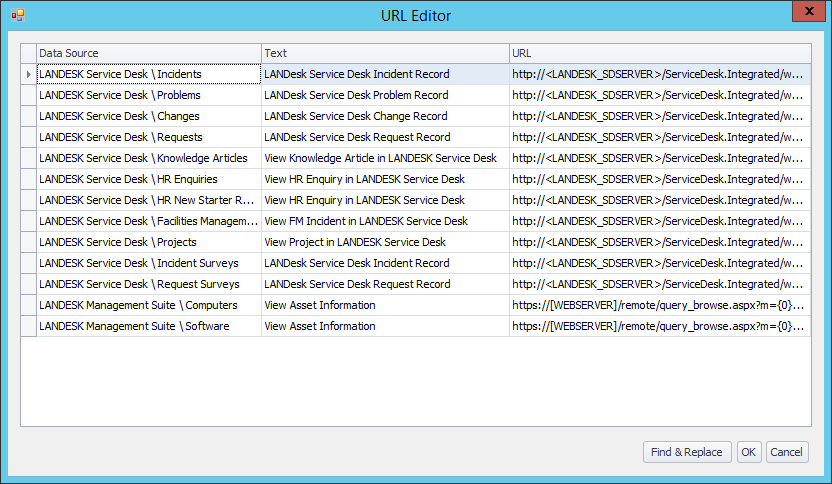
By default, a placeholder is included with the URLs, and you’ll need to update this based on your environment. You can edit URLs in the grid or click Find & Replace to edit multiple URLs at once.

Use this dialog to replace these placeholders with the correct address. Below are some examples of search-and-replace strings based on different scenarios.
Standard URL:
•Sample URL: http://appserver/Remote/...
•Search for: [WEBSERVER]
•Replace with: appserver
HTTPS:
•Sample URL: https://appserver/Remote/...
•Search for: https://[WEBSERVER]
•Replace with: https://appserver
Alternate port:
•Sample URL: http://appserver:8080/Remote/…
•Search for: [WEBSERVER]
•Replace with: appserver:8080
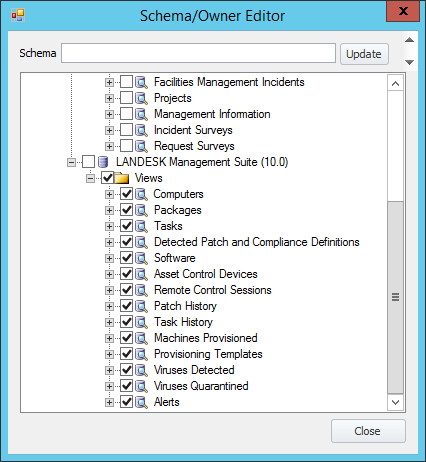
Update the schema or table owner
Depending on your database setup, it may be necessary to modify the schema/owner where the tables are located. To update the schema/owner, click Tools > Schema/Owner Editor. This dialog displays the entire data model and enables you to check the appropriate tables to update.
Simply enter the name of the schema/owner and click Update. Repeat this process for each set of tables.
4. Post-installation steps
Once the installation process is complete, it's necessary to finish up with some post-installation steps.
IIS settings
If you’ve chosen to use an AD account against your Xtraction database, this is where you’ll need to configure the Identity setting. For details about using AD, see Enhanced Active Directory integration.
For Windows 2008 or higher servers, confirm the following IIS settings before running Xtraction for the first time:
Basic Settings: Verify that Xtraction is running within its own application pool, which should’ve been created during installation.
Advanced Settings: If any of your application databases use Integrated Security to connect to the Xtraction database, update the Identity setting:
1.In IIS, locate the Xtraction application pool.
2.Open Advanced Settings.
3.Change the Identity setting to the user account used to access the database. The Xtraction application will now execute as the user account specified. This account needs the correct permissions to the file system in order to read the Xtraction web files (located by default at C:\Program Files\Xtraction Software\Xtraction\Web\Server\).
Xtraction Task Manager
The Xtraction Task Manager is a Windows service used to run scheduled exports of documents, dashboards, and custom reports. Task Manager is installed by default into Windows services but may need to be configured for your environment.
1.Make sure the file is not blocked:
•Navigate to the Tools folder (by default, C:\Program Files (x86)\Xtraction Software\Xtraction\Tools).
•Locate the Xtraction.SchedulerService.exe file.
•Right-click Properties.
•Check to see if there’s an Unblock button on the General tab (Windows Server 2008 R2).
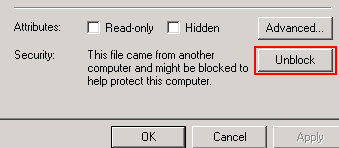
•Click Unblock, then Apply, then OK.
•Right-click Properties again to make sure it has disappeared.
2.Open the Services Manager.
3.Scroll to the bottom where you should see Xtraction Task Manager.
4.Set up the appropriate settings (Startup type and Logon).
5.Start the Xtraction Task Manager service.
Xtraction Alerts
Xtraction Alerts is a Windows service used to run the alert checks defined within Xtraction. The Alerts service is installed by default into Windows services but may need to be configured for your environment.
1.Make sure the file is not blocked:
•Navigate to the Tools folder (by default, C:\Program Files (x86)\Xtraction Software\Xtraction\Tools).
•Locate the Xtraction.AlertService.exe file.
•Right-click Properties.
•Check to see if there’s an Unblock button on the General tab (Windows Server 2008 R2).
•Click Unblock, then Apply, then OK.
•Right-click Properties again to make sure it has disappeared.
2.Open the Services Manager.
3.Scroll to the bottom where you should see Xtraction Alerts.
4.Set up the appropriate settings (Startup type and Logon).
5.Start the Xtraction Alerts service.
Now that the post-installation process is complete, you're ready to use the product. For details, see Running Xtraction.