Scheduled exports
You must have enterprise designer or scheduler rights to schedule exports for dashboards, documents, and reports. All content must be saved before you can export it.
You can schedule periodic exports of dashboards, documents, and reports in a variety of formats such as Word, Excel, HTML, and PDF. You can then use the Scheduled tasks page to manage those exports as tasks.
1.With a saved dashboard, document, or report open, click the ![]() icon in the title header.
icon in the title header.
2.In the Scheduled Export dialog, provide a name to identify the scheduled task and details about when it should run: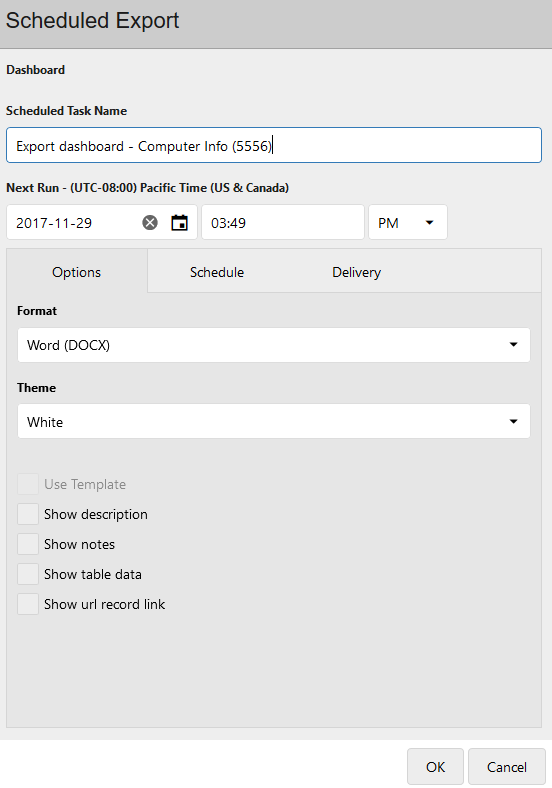
If you're scheduling a document for export that contains parameters, the ![]() icon will display in this dialog. You can set the parameter values for the export by clicking the
icon will display in this dialog. You can set the parameter values for the export by clicking the ![]() icon.
icon.
3.Under the Options tab, select the following details about the export:
•Format: Select the file format for the export. If exporting to HTML, the file will export to a .ZIP file instead of displaying onscreen.
•Theme: Select the background color if the content is graphics based. The white theme helps save on toner when printing.
•Use standard layout: Export all onscreen content (may include a table cell next to any charts showing notes or descriptions if those are included).
•Use template: Export to a Word template. (If the content wasn't designed for use with a template, this option is dimmed.)
•Show description: Include a summary of the data source and filter conditions used for each component in the details pane.
•Show notes: Include any optional notes that are part of this content.
•Show table data: Include data that's presented in tables. As this option can export a lot of data, carefully consider the number of records you'll be exporting.
•Show URL record link: For list components. Embeds URL links in the exported record list that can open specific records (for example, service desk incidents) in the native application.
4.Under the Schedule tab, set up the export schedule. The time the task will run is taken from the information you entered in step 2 above:
•Daily: Run the task daily.
•Weekly: Run every week on the days selected.
•Monthly: Run every month on the days and months selected.
•Timer: Run the task at the specified interval. Set up both the interval amount and type (minutes, hours, days). The task will run continuously at the interval specified.
5.Under the Delivery tab, set up delivery options:
•Xtraction server: Select a folder on the Xtraction server for where to save the report. Exporting to a folder ensures this file will be available in the Stored Reports dialog (accessed by clicking the toolbox's ![]() icon, then clicking the
icon, then clicking the ![]() icon). Also enter a filename for this report and if you want to append a datestamp.
icon). Also enter a filename for this report and if you want to append a datestamp.
•File system: Specify a path for where to save the report, for example a company intranet web server. Note that this path is relative to the Xtraction server and not your local device. Also enter a filename for this report and if you want to append a datestamp.
•Email: Specify an email address for where to send the report. Use a semi-colon (;) to separate multiple email addresses. Also enter a filename for this report and if you want to append a datestamp.
6.Click OK to schedule the task. After scheduling an export, your task will display on the Scheduled tasks page, accessed by clicking the ![]() icon in the toolbox.
icon in the toolbox.
Scheduled tasks page
After scheduling an export, it displays as a task on the Scheduled tasks page where you can manage it. Access this page by clicking the ![]() icon in the toolbox. Task status is shown in the colored box next to each task: green is running, red is failed, gray is paused.
icon in the toolbox. Task status is shown in the colored box next to each task: green is running, red is failed, gray is paused.
By default, the page displays tasks from all users. To view just your own tasks, click My tasks only in the upper-right corner.
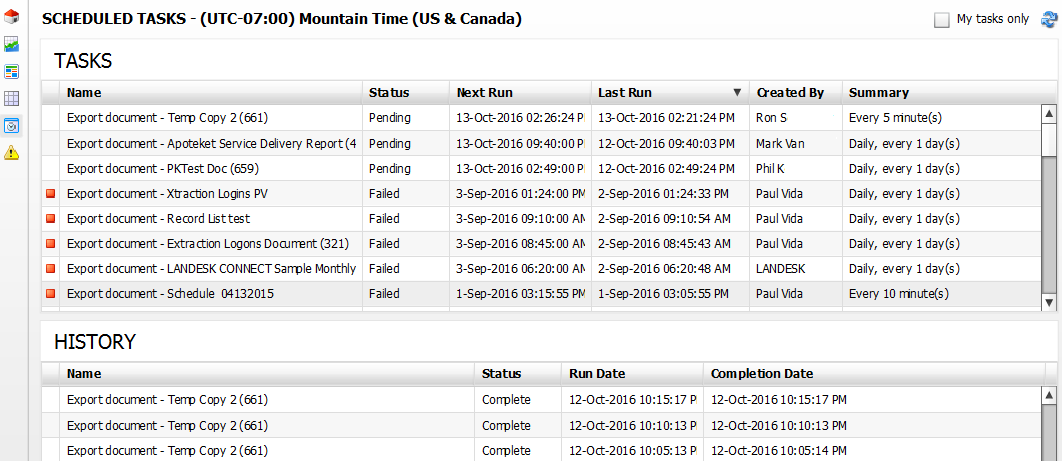
Right-click a listed task to do the following:
•Task history: View the export history details of the task in the bottom pane.
•Edit task: Change the export and schedule details.
•Pause task: Pause a running task to stop it from exporting on schedule.
•Run task: Override the export schedule to run the task right now. The Summary column will update with "Manually run." To reset the original schedule, right-click the task again, select Edit task, then click OK.
•Delete task: Delete from the system.
•Resume task: Turn on a paused task so that it exports on schedule.
•Reset task: Reset a failed task so that its export is rescheduled.