Authenticating with Microsoft Entra ID or Okta
Xtraction supports the use of Microsoft Entra ID (formerly Azure AD) and Okta as authentication providers. This enables end users to authenticate with their Okta or Entra ID credentials when logging into the Xtraction web client.
As a prerequisite, you need to create Xtraction as an application in Entra ID, Okta, or both before configuring the authentication in the Xtraction Settings utility. For details, see this Xtraction community article: Configuring Microsoft Azure AD and Okta for Xtraction authentication. (You may first need to register with the community to view it.)
Once you've completed the procedures in the community article, follow the procedure below to configure authentication for Entra ID or Okta. You can do this as part of Xtraction setup or any time afterward.
To configure Entra ID or Okta authentication
Before starting, make sure you have access to the information saved after completing the procedures in the Xtraction community article listed above. For Entra ID, this is the tenant ID, client ID, and client secret. For Okta, this is the authority URI, client ID, and client secret.
1.Open the Xtraction Settings utility. You can find the utility with the other installed Xtraction files (by default at C:\Program Files (x86)\Xtraction Software\Xtraction\Tools).
2.Click the Authentication tab.
3.Click Click here to add a new row to add Entra ID or Okta as an authentication provider.
4.In the Edit dialog, open the Type drop-down and select AzureAD Auth or Okta Auth.
5.Fill in the fields exactly as shown below; some will require the information you saved earlier.
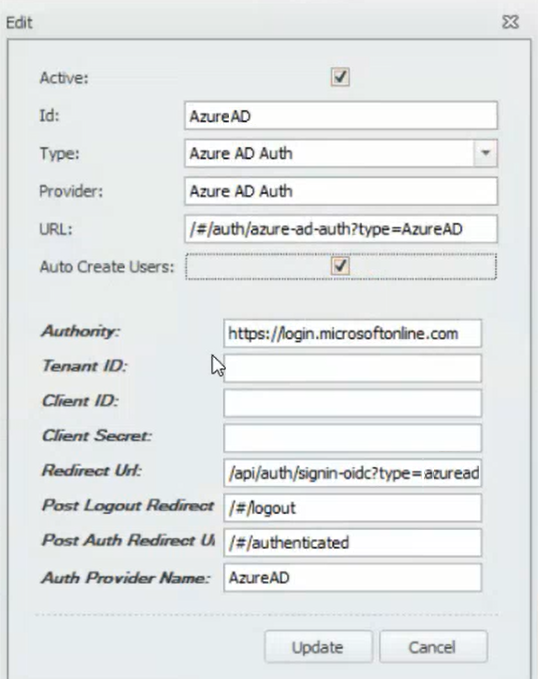
•Active: Select to make the authentication method active. If you clear this check box to deactivate this authentication method at a later date, the settings will continue to be saved.
•Id: Enter the ID any way you like, but it must include AzureAD (as one word) or Okta in the name. This ID isn't case sensitive.
•Provider: Enter a name that will clearly identify the authentication provider on the Xtraction login page.
•URL: For Entra ID, enter /#/auth/azure-ad-auth?type=AzureAD. For Okta, enter /#/auth/okta-auth?type=Okta.
•Auto Create Users: Select if Xtraction should automatically create a user who has been authenticated by the provider but doesn’t exist within Xtraction. These users are automatically assigned the default user role(s) that you can set up under the Features tab of this utility. It's recommended that you enable this option.
At any time after setup, you can edit permissions for individual users via the Administration link > User Administration tab at the bottom of the Xtraction web client.
•Authority: For Entra ID, enter https://login.microsoftonline.com. For Okta, enter the authority URI that you saved earlier.
•Tenant ID: Enter the information saved earlier. This field isn't available for Okta.
•Client ID: Enter the information saved earlier.
•Client Secret: Enter the information saved earlier.
•Redirect URI: For Entra ID, enter /api/auth/signin-oidc?type=azuread. For Okta, enter /api/auth/signin-oidc?type=okta. Important: For both products, this URI needs to be in all lowercase letters.
•Post Logout Redirect URI: Enter /#/logout.
•Post Auth Redirect URI: Enter /#/authenticated.
•Auth Provider Name: Enter AzureAD (as one word) or Okta.
6.Click Update, then click OK.
7.After completing the required configuration on the MS EntraID site, open the Xtraction.WebApi.dll.config file located at C:\Program Files (x86)\Xtraction Software\Xtraction\Web\Server\Xtraction.WebApi.dll.config in a text editor and add the group mapping.
<?xml version="1.0" encoding="utf-8"?>
<configuration>
    <configSections>
        <section name="OIDCAuth" type="Xtraction.Model.Configuration.OIDCAuthConfigurationSection, Xtraction.Core" requirePermission="false"/>
    </configSections>
    <OIDCAuth>
        <AzureADAuth updateXtraction="true">
            <groupMap>
                <add
                  name="administrators"
                  SSOGroupName="X-Admin"
                  roleIds="1,2,5,9"
                  featureIds="1,3,4"
                  xtractionGroupNames="AdminGroup"
                  securityPolicyName="" />
                <add
                  name="Private Designers"
                  SSOGroupName="X-PrivateDesigner"
                  roleIds="3"
                  featureIds="1,2"
                  xtractionGroupNames="PrivateGroup"
                  securityPolicyName="Your_Pre-Created_Privacy_Policy1" />
                <add
                  name="viewers"
                  SSOGroupName="X-Viewer"
                  roleIds=""
                  featureIds=""
                  xtractionGroupNames="GuestGroup"
                  securityPolicyName=""/>
            </groupMap>
        </AzureADAuth>
</OIDCAuth>

    </configuration>
8.Execute an IIS reset from an administrator command prompt.
To test the authentication configuration
1.Open the Xtraction web client. The login page will take a moment to load.
2.You should see a button for each newly configured authentication provider. Select one and sign in as required. When authenticating with Okta for the first time, you'll go through a two-factor sign-in process to validate the login.
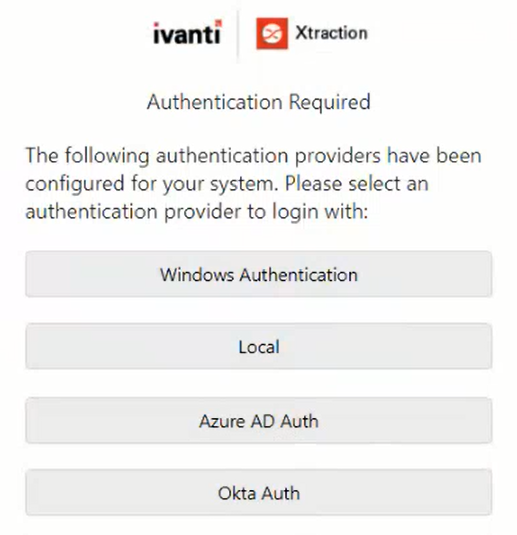
If sign-in is successful and the Xtraction UI displays, the configuration is fully working.