Connecting to a cloud-based or encrypted service
Xtraction’s product connectors are limited to pulling data into Xtraction from databases. If you want Xtraction to report on data from a cloud-based or encrypted service (such as Ivanti Neurons for ITSM, Salesforce, and so on) extra steps are required to set up that connection.
Specifically, you need to create a new, blank SQL Server database that Xtraction can connect to, and then use a provided sync tool to configure data syncs between that database and the cloud-based or encrypted service.
You can use Xtraction’s Data Model Editor tool to configure a specific connector for the service, which provides the connection between the new database and the Xtraction web client. Once the syncs populate the new database with your cloud-based or encrypted service data, you can begin viewing the data in Xtraction.
The following information assumes you already have Xtraction up and running in your environment.
Getting started
You first need to download the connector for the cloud-based or encrypted service you want Xtraction to connect to. For Ivanti product connectors, go to Connector Downloads, where you need to register to log in. Third-party connectors are available on demand after their purchase has been verified by Ivanti. Each connector is downloaded in a zip file that includes the Xtraction sync tool (XtractionSync.exe).
After downloading the connector, follow the instructions below to:
•Create a new SQL Server database that replicates the cloud-based or encrypted service.
•Install the sync tool on the Xtraction application server.
•Configure the data syncs between the cloud-based or encrypted service and the new SQL Server database (using the sync tool).
•If using Integrated Security, configure the Windows sync service.
•Configure the connector using Xtraction's Data Model Editor tool.
The following procedures apply generally to all cloud-based or encrypted services supported by Xtraction. For specific details regarding each connector, see the PDF file included with the download.
Creating a new SQL Server database
Create a new, blank database and SQL or domain account on a database server (that can be the same or separate from the Xtraction application server). It's assumed you know how to do this; instructions are not included here.
Before creating the database, ensure the following prerequisites are met for the database server:
•Requires a SQL Server instance and a newly created blank database (any name) in that instance.
•Requires a SQL or domain service account that has dbo rights to the newly created database.
Installing the sync tool on the Xtraction application server
Before installing the sync tool, ensure the following prerequisites are met for the Xtraction application server:
•Requires an account with admin rights to the cloud-based or encrypted service server.
•Requires Windows for a Windows sync service that will install with the tool.
•Requires dbo rights to the database server, default port 1433.
•Requires internet access.
•May be the same or separate from the database server.
1.Run the XtractionSync.exe file that's included in the connector zip file that you already downloaded.
2.Accept the License Agreement.
3.Select a location.
4.Accept the install. The file will install a configuration program on the server, along with a Windows sync ervice called XtractionSync.
Configuring syncs between the cloud-based or encrypted service and the new database
Use the sync tool to configure how data syncs will occur between the cloud-based or encrypted service and your new SQL Server database. This process includes configuring the data source, destination database, and sync job, as well as adding customizations if applicable.
1.From the Start menu, navigate to Xtraction Sync > Sync Setup.
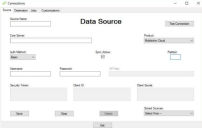
2.Under the Source tab, enter the following values that define the data source (i.e., cloud-based or encrypted service):
•Source Name: Any unique name that identifies this data source.
•Core Server: Base URL for the server hosting the cloud-based or encrypted service.
•Product: The cloud-based or encrypted service that is this data source.
•Auth Method: The preferred authentication method for this data source. Depending on the selection, some fields will be disabled.
•Sync Active: Activates syncing for this data source.
•Partition: Leave blank; this option will populate when the Test Connection is validated.
•Username and Password: Account credentials that will be used to access the cloud-based or encrypted service.
•Test Connection: Confirms that the connection details are valid and populates the Partition drop-down list with all available partitions. Where multiple partitions are required, each partition is considered a different data source.
•Save: Saves or updates the configuration.
•Delete: Deletes the current configuration.
•Stored Sources: Lists all saved data sources and their configurations.
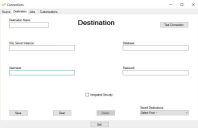
3.Open the Destination tab and enter the following values for the new SQL Server database that you created earlier:
•Destination Name: Any unique name that identifies this destination database.
•SQL Server Instance: Includes the server name and any instance if applicable (for example, Server123, 192.168.68.5, or ISM\MSSQLSERVER).
•Database: Name of the newly created database.
•Username and Password: Account credentials with dbo rights to the destination database.
•Integrated Security: Connects the Windows sync service to the database using the account running the service. This account must have dbo rights to the destination database for the sync to be successful.
The sync tool can only use one Integrated Security account. If you're using Integrated Security for all databases, then the service account will need dbo access to all relevant databases. If you're using SQL Authentication, each database can have a separate account.
•Test Connection: Confirms that the connection details are valid.
•Save: Saves or updates the configuration.
•Delete: Deletes the current configuration.
•Stored Destinations: Lists all saved destination databases and their configurations.
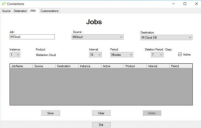
4.Open the Jobs tab to set up the sync job for this data source and destination database:
•Job: Any unique name that identifies this specific sync job.
•Source: Lists all saved data sources. Select the correct data source for this sync job.
•Destination: Lists all saved destination databases. Select the correct destination for this data source.
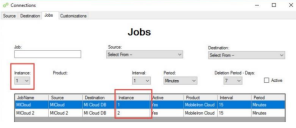
•Instance: Generally, the instance is set to 1. However, it's possible to have multiple instances from different partitions syncing to a single database, so each data source would then have a different instance number. As shown below, two data sources are syncing to the same database, so each has its own instance. You can add additional instance configurations at any time.
•Interval and Period: Time interval between data syncs.
•Deletion Period - Days: Some APIs do not indicate when a user or device has been removed from the system. The sync will delete any device or user that has not checked-in in the last number of days defined here (7 by default). If the user or device still exists, it will be re-added at the next sync.
•Active: Select to make this sync job active. When cleared, the job is not active but stored for future use.
•Grid: Shows all stored jobs, including some details. Double-click any job to open it for editing.
•Save: Saves the job and relevant details. The first time a job is saved to a destination, the sync tool will build the schema for the destination database. If Integrated Security is used, the job will use either the stored SQL credentials or the logged-in user's user domain account. When using Integrated Security, it's essential that you have dbo access to the newly created destination database.
•Delete: Deletes the loaded job configuration.
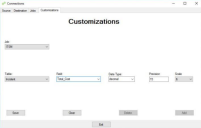
5.Open the Customizations tab. With many but not all cloud-based or encrypted services, you can add customizations to the front-end that are added automatically to the list of fields that can be retrieved using APIs. To take advantage of this functionality, the sync tool enables you to add more fields.
This functionality is not supported by all cloud-based or encrypted services. Where applicable, enter the following values:
•Job: Lists all saved jobs. Select the one you want to customize.
•Table: Lists available tables for the selected job. Select the one you want to customize.
•Field: Lists fields in the selected table, including data type and length where applicable.
•Add: After selecting a job and table, click Add to highlight the Field box. Enter the name of the custom field (and data type and length information where applicable). Field names cannot contain spaces—separate each word with an underscore.
•Save: Saves the new field to the selected table. Scroll down the field list to view the newly created field.
•Delete: Deletes the selected field.
If you're using SQL Authentication for all destination databases, no configuration is required for the sync service; it should have started automatically.
The initial data sync will occur after the time period stored in the job elapses.
1.In the Windows search pane, type Services and click Services App.
2.Scroll down to the bottom of the list and locate the Xtraction Sync service. Right-click and select Properties.
3.Open the Log On tab.
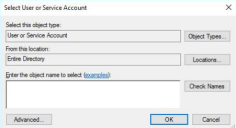
4.Select This Account and click Browse. Enter the following values:
•Object Types: Select User or Service Account.
•Locations: Select Your Domain or Entire Directory.
•Enter the object name to select: Enter the service account name to connect to the database(s).
•Click Check Names, then click OK.
•Enter the password twice.
•Click Apply, then click OK.
•Right-click Xtraction Sync service and select Restart. Once the service restarts, close the Services App.
1.Open MS SQL Server Management Studio and connect to the destination database.
2.Expand the tables.
3.Right-click EntityList and select Select Top 1000 Rows.
4.Scroll right until the LastProcessed column is visible.
5.If all the values are NULL, then the first sync has not started or been successful. If there are dates present as shown below, the sync is working correctly and data will be present to report on in Xtraction. If some values are NULL, the initial sync has not completed.
You can troubleshoot why a data sync didn't work by viewing the Xtraction error logs.
Open the Xtraction Logs folder (located by default at: C:\Program Files (x86)\Ivanti\Xtraction Sync\Logs). There will be logs relevant to the current date; open the log from the current day in a text editor. The contained information should give you an indication of the issue.
In the following example, the issue is with data source authorization:
4/7/2022 12:50:30 PM
System.Net.WebException: The remote server returned an error: (401) Unauthorized.
at System.Net.HttpWebRequest.GetResponse()
at CloudSync.Tables.GetRecordCount.GetRecordCounts(String Source, String[] Entity) in D:\Repos\Cloud
Sync\XtractionSync\Tables\GetRecordCount.cs
Configuring the connector using the Data Model Editor
Finally, configure the connection from the replicated database to the cloud-based or encrypted service.
Complete this procedure from the Xtraction application server.
1.Create a read-only user to the SQL Server database created above.
2.Copy the new data model to the Configuration folder (located by default at: C:\Program Files (x86)\Xtraction Software\Xtraction\Data\Configuration).
3.From the Start menu, open the Xtraction Data Model Editor tool.
4.Click File > Open and open the new data model in the tool.
5.If you have an existing DataModel.dat file (and want to preserve the existing connections), merge the new data model into the DataModel.dat file. You need an Enterprise Server license to do so:
•Click Tools > Copy Objects.
•Right-click anywhere in the Copy Source (External File) pane and select Load External Data Model.
•Navigate to the Data\Configuration folder and open the new data model.
•Expand the list to view the new data model in the Copy Source (External File) pane.
•Drag and drop the new data model into the Destination (Current Data Model) pane.
•Click Yes to confirm and then click Close. The new data model is now visible.
•Click File > Save to complete the process.
- Or -
If you're not merging with an existing DataModel.dat file, enter the connection details for the new data model:
•Click Tools > Connection String Editor.
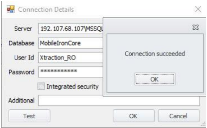
•Click the Connection column next to the new data model, then click the ellipsis (…) to open the Connection Details dialog.
•Enter the connection string properties for the new data model. For SQL Authentication, enter a user ID and password. For Windows Authentication, leave the user ID and password blank and select the Integrated security check box.
•Click the Test button to validate that the connection can be made.
•Rename the new data model to be DatModel.dat, then click File > Save As.
