Upgrades
These instructions guide you through the process of upgrading to versions of Xtraction 2018 and higher and are valid for upgrading from Xtraction v14 installations on up.
Server limitations:
•Windows Server 2008 and earlier are no longer supported. Ensure that you upgrade to a more recent version of Windows Server before upgrading your Xtraction installation.
•The Xtraction application (web portion of the software) for versions 2018 and higher cannot be installed on a Domain Controller—you must install the upgrade on a new server. If you need assistance or have questions about installing on a new server, please contact Ivanti support.
•Because your Xtraction license is server-name based, you may need to contact the Xtraction licensing team to obtain a new license for your new server. You'll also want to migrate your Datamodel.dat file if you've made alterations to it. You can use the Xtraction Xport utility to move your data, but the dashboards and documents should remain in the database. For details about using the Xport utility, see Xport utility.
Client considerations:
•For Xtraction 2018 and higher, only 64-bit web browsers are supported, with Chrome being the recommended browser. Due to decreased performance, Ivanti doesn't recommend using Internet Explorer 11.
•Prior to Xtraction 2018, clients required a web browser that supported Adobe Flash Player to access the database. As of version 2018, Adobe Flash Player is no longer required.
1. Pre-installation steps
Ensure you have db_owner rights to the Xtraction database
To ensure that your upgrade installation works correctly, you’re required to select a certain setting near the end of the upgrade process. You'll need to have db_owner access to the Xtraction database to do this. (Prior to Xtraction 2016.3, db_owner access was not required.)
If your DBA has concerns about leaving db_owner access enabled, the DBA can remove it after a successful upgrade but will need to re-enable access before each future Xtraction upgrade.
Download the Xtraction software
Download the Xtraction zip file from Downloads & Instructions, where you must first register to log in.
Back up the Xtraction installation folder and database
Back up the Xtraction installation folder. For a default installation, this is everything under C:\Program Files (x86)\Xtraction Software\Xtraction. Also back up your Xtraction database.
Back up specific Xtraction files
If your environment connects to a DB2, Informix, Postgres, or MySQL database, you may have made changes to .config files on the Xtraction server. If so, the upgrade will overwrite those changes, so ensure the files are backed up prior to upgrading. The files affected include the following (default folder location provided):
•C:\Program Files (x86)\Xtraction Software\Xtraction\Web\Server\Web.config
•C:\Program Files (x86)\Xtraction Software\Xtraction\Web\WinAuth\Web.config
•C:\Program Files (x86)\Xtraction Software\Xtraction\Tools\DataModelEditor.exe.config
•C:\Program Files (x86)\Xtraction Software\Xtraction\Tools\Xtraction.AlertService.exe.config
•C:\Program Files (x86)\Xtraction Software\Xtraction\Tools\ Xtraction.SchedulerService.exe.config
Following the upgrade, manually overwrite any DbProviderFactories entries in the above .config files with the entries from the .config files that were backed up. This ensures that Xtraction and the Data Model Editor can continue to connect to the DB2, Informix, Postgres, or MySQL database.
2. Installation steps
Run Xtraction setup
After completing the pre-installation steps, run Setup.exe. The Setup program will determine if this is an upgrade or new install.
The upgrade process needs to run using an account with administrator rights on the Xtraction server. Administrative access is required only for the upgrade installation.
If you're upgrading by installing Xtraction on a different server, rather than upgrading an existing server in-place, do the following:
Copy the contents (including subfolders) of C:\Program Files (x86)\Xtraction Software\Xtraction\Data\Templates from the original server to the same location on the new server.
Copy the contents of C:\ProgramData\Ivanti\Xtraction\Install from the original server to the same location on the new server.
If it exists, copy the C:\Program Files (x86)\Xtraction Software\Xtraction\Data\Configuration\SecurityModel.dat file from the original server to the same location on the new server.
You must do all of the above before clicking the Create/Upgrade Database button in the Xtraction Settings utility (see next section). This will ensure that any templates are correctly updated and any data policies are imported into the database.
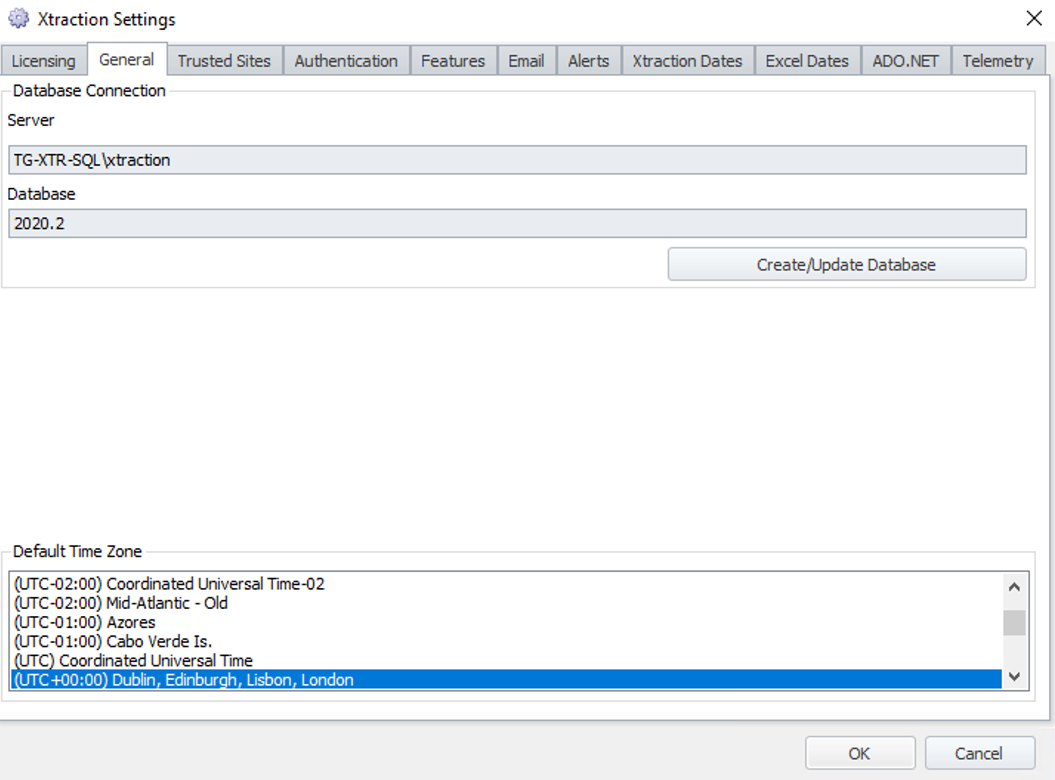
Create/update the database
To ensure that your upgrade will work correctly, you must click the Create/Update Database button as shown in the image below (located in the Xtraction Settings utility, which opens automatically near the end of the upgrade process). When finished, exit the Settings utility.
3. Post-installation steps
To finish the upgrade, you must complete the following post-installation steps.
Apply needed modifications to the Web.config file
Modifications made to the Web.config file prior to version 2021.3 will not remain in the file after an upgrade to 2021.4 or later. The modifications are retained in a copy of the file made at the start of the upgrade process at [InstallDir]\Xtraction\Data\ConfigTemp. You can manually re-apply the needed values by copying and pasting from the old Web.config file into the new one.
Important: Do not copy the old Web.config file over the new file. This will result in Xtraction no longer working correctly.
Start the services (if they didn’t start already)
•Start the Xtraction Task Manager service.
•Start the Xtraction Alerts service.
Restart the application pools in IIS (if they didn't start already)
A restart is necessary because the IIS settings have been moved from the Settings.dat file to the database. A restart ensures that the running application doesn’t try to access the application pools in the previous location.
•Start the Xtraction application pool.
•Start the XtractionWinAuth application pool.
Use the Data Model Editor to resave the Datamodel.dat file
Starting with Xtraction 2019.1, the connection string details for each data source are no longer stored in the Datamodel.dat file. They're now stored in a separate file named Datamodeldb.dat, which is encrypted and associated with the server where the file is created.
Using the Data Model Editor application, you should immediately open the current Datamodel.dat file and resave it. This action creates a Datamodeldb.dat file and moves the connection string details into that new file.
Test the upgrade
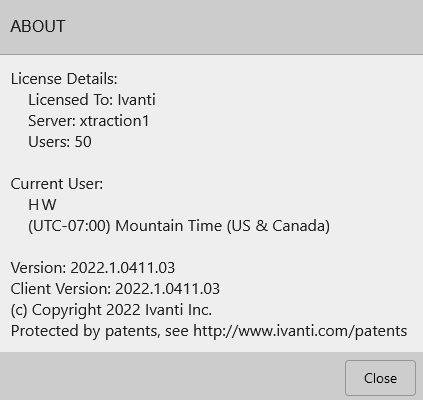
1.Load Xtraction in your browser, preferably Chrome.
2.Click the About link at the bottom of the page.
3.In the About dialog, you’ll notice two version numbers that should match. If the Client Version shows a lower number, your browser may still be using a locally cached copy of the old version. You can remove this cached copy by clearing the temporary internet files from your browser.
Important—clear the browser cache
To avoid or resolve unexpected visual problems with the Xtraction interface after upgrading, it's recommended that end users clear their cached browser data. Methods will vary depending on the browser in use, but for Chrome, follow the instructions here: https://support.google.com/chrome/answer/2392709